Git Branching Merging Conflicts & Workflows
Introduction
Git branching is one of the most powerful features of Git, allowing developers to work on multiple features, bug fixes, or experiments simultaneously without affecting the main project code.
In simple terms, a branch is an independent line of development. Instead of changing the main code directly, developers create a branch, make changes safely, and then merge those changes back into the main project.
For Pakistani students learning software development—whether in Lahore, Karachi, or Islamabad—understanding Git branching is essential because almost every professional software team uses it.
For example:
- Ahmad works on a login feature
- Fatima works on UI improvements
- Ali fixes a payment bug
All of them can work at the same time using separate Git branches without interfering with each other's work.
Learning git branches, git merge, merge conflicts, git workflow, and git branching strategy will help students collaborate effectively in real-world development teams.
Prerequisites
Before starting this tutorial, you should already understand the following concepts:
- Basic Git commands (
git init,git add,git commit) - What a repository is
- How version control works
- Basic command-line usage
- Installing Git on your system
- Creating and cloning repositories
If you're new to Git, it’s recommended to first learn:
- Git Basics
- Git Commit and Version Control
- GitHub Repository Management
These topics build the foundation required to understand branching workflows.
Core Concepts & Explanation
Understanding Git Branches
A Git branch represents a separate timeline of commits.
By default, every repository starts with a branch called:
main
Developers create new branches when they want to:
- Add new features
- Fix bugs
- Test experimental code
- Work independently from other developers
For example:
main
 ├── login-feature
 ├── payment-fix
 └── ui-improvements
Each branch allows development without affecting the main production code.
Creating a branch in Git:
git branch login-feature
Line-by-line explanation:
git→ Git command-line toolbranch→ Creates or manages brancheslogin-feature→ Name of the new branch
Switching to the branch:
git checkout login-feature
Explanation:
checkoutswitches your working directory to another branch- Now any commits will belong to
login-feature
Shortcut command:
git checkout -b login-feature
Explanation:
-b→ Creates and switches to the branch in one step
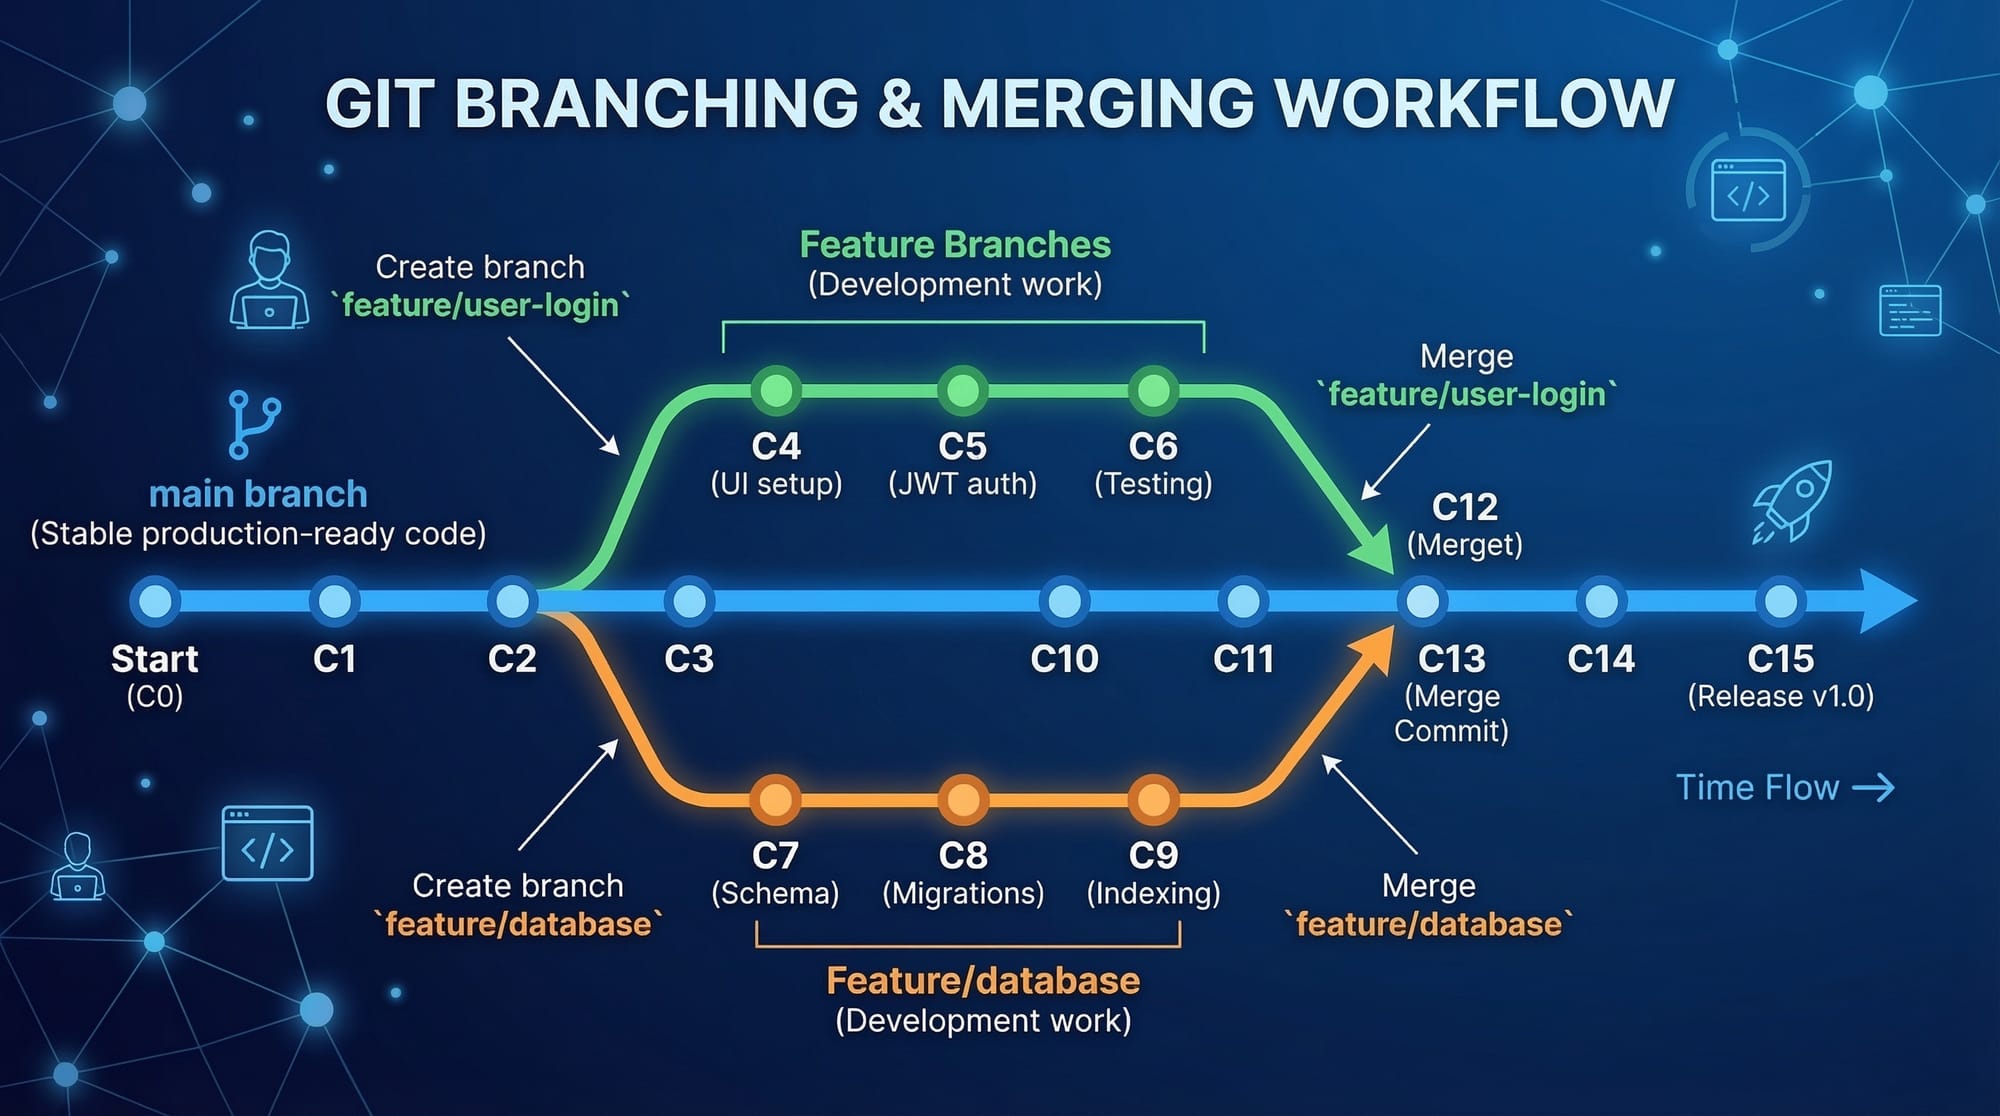
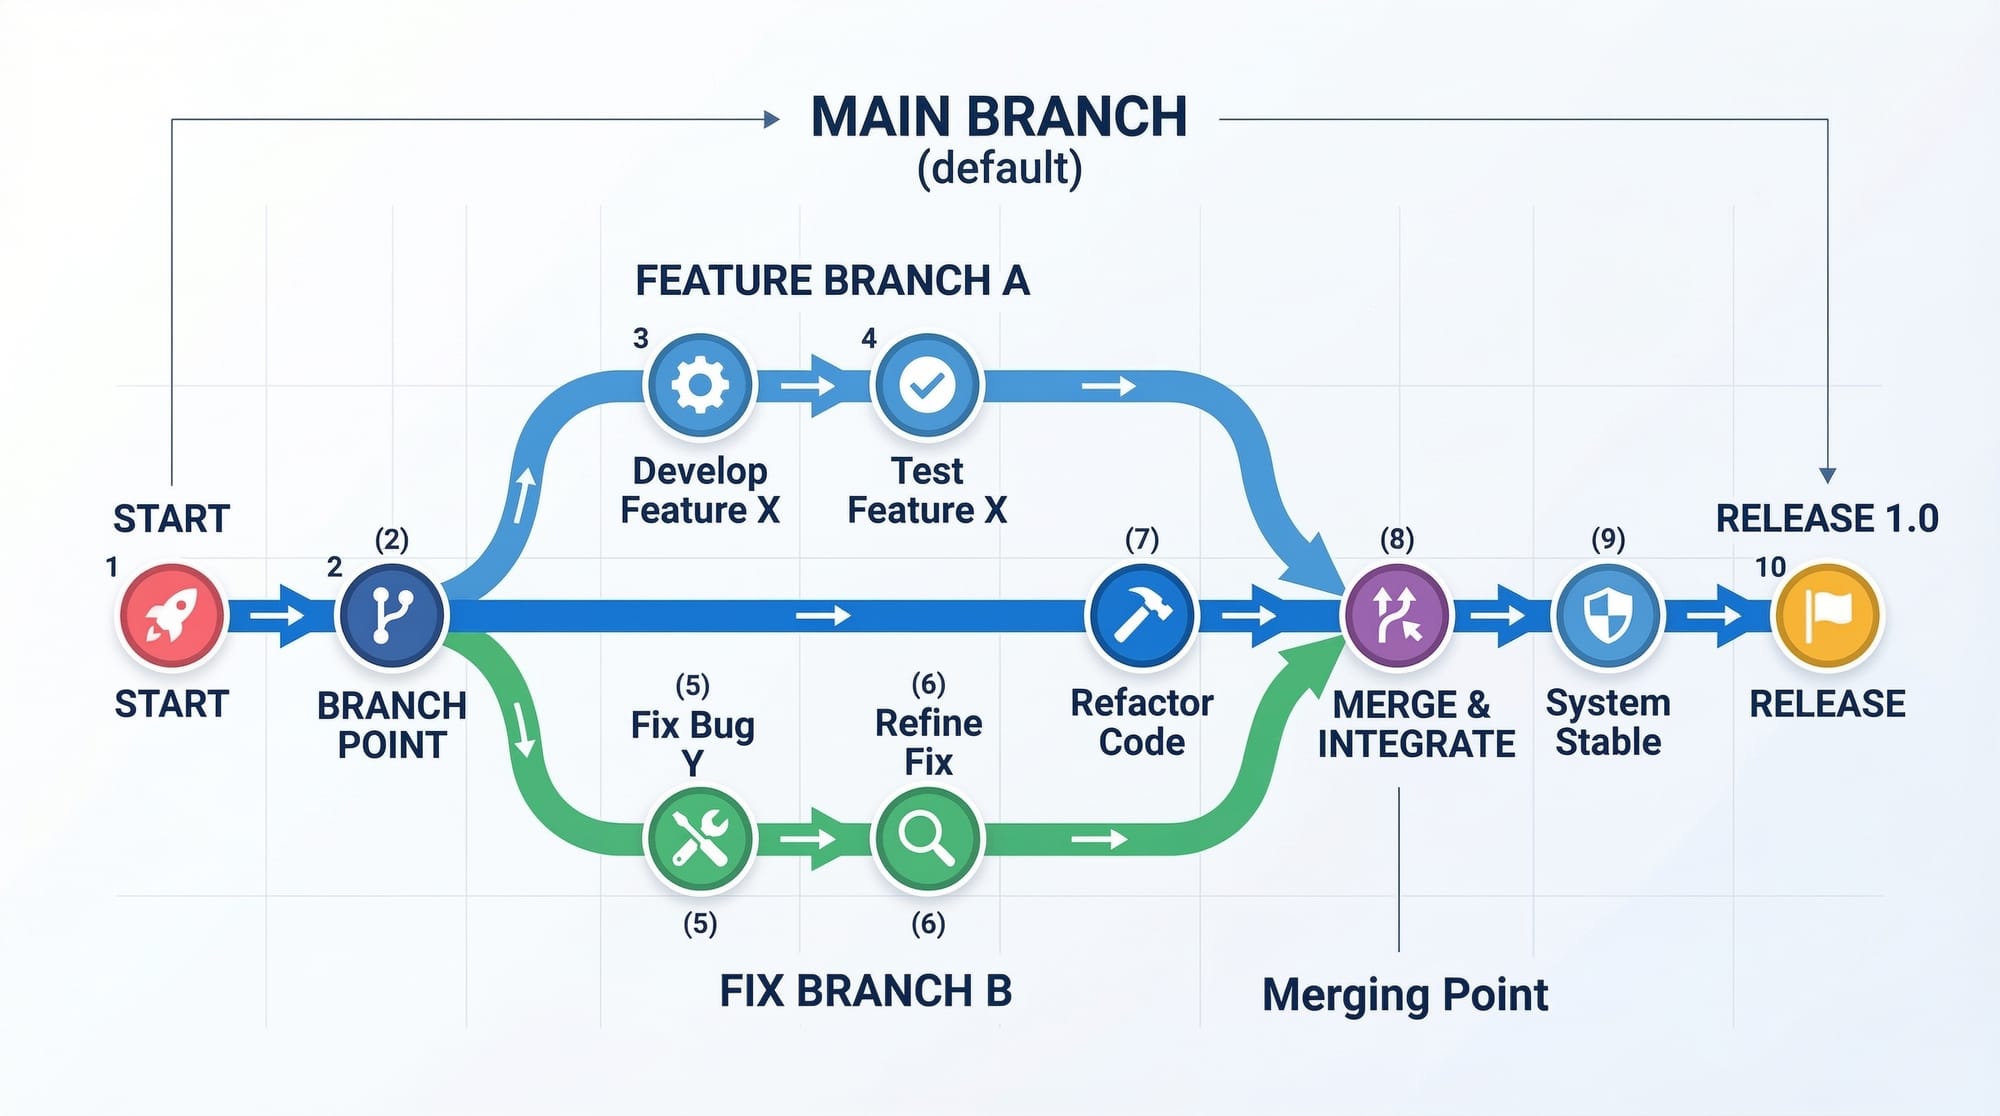
Merging Branches in Git
Once development is complete, branches must be merged back into the main branch.
Example workflow:
- Create branch
- Add changes
- Commit changes
- Merge branch into main
Example:
git checkout main
git merge login-feature
Explanation:
checkout main→ Switch to main branchmerge login-feature→ Merge the feature branch into main
Git will combine the changes automatically if there are no conflicts.
Example scenario:
Fatima develops a profile page feature in her branch.
After testing, she merges it into main.
This keeps the main project stable while development happens separately.
Practical Code Examples
Example 1: Creating and Merging a Feature Branch
Imagine Ahmad is adding a login feature to a website.
Step 1: Create and switch to a new branch
git checkout -b login-feature
Explanation:
checkoutswitches branches-bcreates a new branchlogin-featureis the branch name
Step 2: Add files
git add login.js
Explanation:
git addstages changeslogin.jsis the login feature file
Step 3: Commit changes
git commit -m "Added login feature"
Explanation:
commitsaves the staged changes-madds a message describing the update
Step 4: Merge the branch
git checkout main
git merge login-feature
Explanation:
- Switch to the
mainbranch - Merge the login feature branch
Now the login feature becomes part of the main project.
Example 2: Real-World Application
Imagine a student project at a university in Islamabad where three developers collaborate.
Project: Online Book Store
Developers:
- Ahmad → Authentication system
- Fatima → Product listing
- Ali → Shopping cart
Branch creation:
git branch auth-system
git branch product-list
git branch shopping-cart
Explanation:
- Each branch represents a feature
- Developers work independently
Switch to branch:
git checkout auth-system
Explanation:
- Ahmad switches to his feature branch
Commit work:
git add .
git commit -m "Authentication system completed"
Explanation:
add .stages all modified files- Commit saves changes
Merge completed feature:
git checkout main
git merge auth-system
Explanation:
- Move to main branch
- Merge completed authentication system
This workflow is common in professional companies in Pakistan and globally.
Common Mistakes & How to Avoid Them
Mistake 1: Working Directly on the Main Branch
Many beginners commit directly to the main branch.
Example mistake:
git commit -m "Added payment feature"
Problem:
- Code may break production
- Difficult to track feature development
Correct approach:
git checkout -b payment-feature
Work inside the feature branch instead.
Benefits:
- Safer development
- Easier debugging
- Better collaboration
Mistake 2: Merge Conflicts
A merge conflict happens when two branches modify the same part of a file.
Example conflict:
<<<<<<< HEAD
console.log("Login successful");
=======
console.log("User logged in");
>>>>>>> login-feature
Explanation:
HEAD→ Current branchlogin-feature→ Incoming branch
Git cannot decide which change to keep.
Solution:
Manually edit the file:
console.log("User logged in successfully");
Then mark it resolved:
git add login.js
git commit -m "Resolved merge conflict"
Explanation:
git addmarks conflict resolvedcommitfinalizes the merge
Practice Exercises
Exercise 1: Create a Feature Branch
Problem:
Create a branch called profile-page and switch to it.
Solution:
git checkout -b profile-page
Explanation:
checkoutswitches branches-bcreates a new branchprofile-pageis the feature branch
Exercise 2: Merge a Branch
Problem:
Merge the branch profile-page into main.
Solution:
git checkout main
git merge profile-page
Explanation:
- Switch to main branch
- Merge the feature branch
Frequently Asked Questions
What is a Git branch?
A Git branch is a separate line of development within a repository. It allows developers to work on features or fixes independently without affecting the main project code.
How do I create a new branch in Git?
You can create a branch using the command git branch branch-name. A faster way is git checkout -b branch-name, which creates and switches to the branch immediately.
What is a merge conflict?
A merge conflict occurs when two branches modify the same part of a file and Git cannot automatically combine the changes. Developers must manually resolve the conflict.
What is a Git workflow?
A Git workflow is a structured process for managing branches, commits, and merges during development. It ensures team collaboration and organized code management.
What is a Git branching strategy?
A Git branching strategy defines how branches are created, merged, and managed in a project. Examples include Feature Branch Workflow, Git Flow, and Trunk-Based Development.
Summary & Key Takeaways
- Git branches allow developers to work independently on features.
- Feature branches keep the main codebase stable.
- Git merge combines work from different branches.
- Merge conflicts happen when changes overlap in the same file.
- A structured Git workflow improves team collaboration.
- Choosing the right git branching strategy is important for large projects.
Next Steps & Related Tutorials
To deepen your understanding of Git, continue learning with these tutorials on theiqra.edu.pk:
- Learn Git Basics and Version Control to understand repositories and commits.
- Explore Node.js Project Setup with Git to manage backend applications effectively.
- Study GitHub Collaboration and Pull Requests to work with teams professionally.
- Practice Deploying Projects Using Git and GitHub for real-world development.
Mastering Git branching, merging, and workflows will significantly improve your ability to collaborate in modern software development teams and prepare you for real-world development environments used in Pakistan and worldwide.
Test Your Python Knowledge!
Finished reading? Take a quick quiz to see how much you've learned from this tutorial.