HTML Forms Input Fields Buttons & Validation

Introduction
Every website you use — whether it's a login page, a job application portal, or an online shopping checkout at Daraz.pk — relies on HTML forms to collect information from users. HTML forms are the backbone of interactive web pages. They allow users to enter data, which is then sent to a server for processing.
Imagine Fatima is applying for a scholarship at her university in Lahore. She visits the university's website and fills in her name, email, CNIC number, and uploads a document. Behind all of that? A well-structured HTML form. If you want to build real, functional websites as a Pakistani developer, mastering HTML forms is not optional — it is essential.
In this tutorial, you will learn how to create HTML forms from scratch, understand all the major html input types, add buttons, and implement form validation so users always provide correct data before submission.
Prerequisites
Before diving into this tutorial, make sure you are comfortable with the following:
- Basic HTML structure — you should know what
<!DOCTYPE html>,<html>,<head>, and<body>tags do - HTML tags and attributes — understanding how to write
<tag attribute="value">syntax - A text editor — VS Code, Sublime Text, or even Notepad++ will work perfectly
- A web browser — Chrome or Firefox to test your forms
If you need a refresher on basic HTML, check out our HTML Basics for Beginners tutorial first.
Core Concepts & Explanation
The HTML Form Element
The <form> tag is the container that wraps all your html form elements. Every input field, button, and label you create for data collection must live inside this tag.
Here is the basic structure:
<form action="/submit" method="POST">
  <!-- form fields go here -->
</form>
The two most important attributes on <form> are:
action— tells the browser where to send the form data (a URL or server-side script). If you leave it empty, the form submits to the current page.method— defines how data is sent. UseGETfor search forms (data appears in the URL), andPOSTfor sensitive data like passwords or personal details.
Think of the <form> tag like an envelope. The action is the address you write on the envelope, and the method is whether you hand-deliver it or send it by post.
HTML Input Types
The <input> element is the most versatile html form element. By changing its type attribute, you get completely different controls — text boxes, checkboxes, radio buttons, date pickers, and more.
Here are the most commonly used html input types:
| Input Type | What It Creates | Example Use |
|---|---|---|
text |
Single-line text box | Name, city |
email |
Email field with built-in validation | Email address |
password |
Masked text box | Login password |
number |
Numeric input with arrows | Age, quantity |
tel |
Phone number field | Mobile number |
date |
Date picker | Date of birth |
checkbox |
Tick box (multiple selections) | Interests |
radio |
Circle button (one selection) | Gender |
file |
File upload button | Document upload |
submit |
Form submission button | Submit |
reset |
Clears all fields | Reset form |
hidden |
Invisible field (stores data) | User ID |
Each input type also provides built-in browser-level form validation — for example, type="email" will warn the user if they forget the @ symbol.
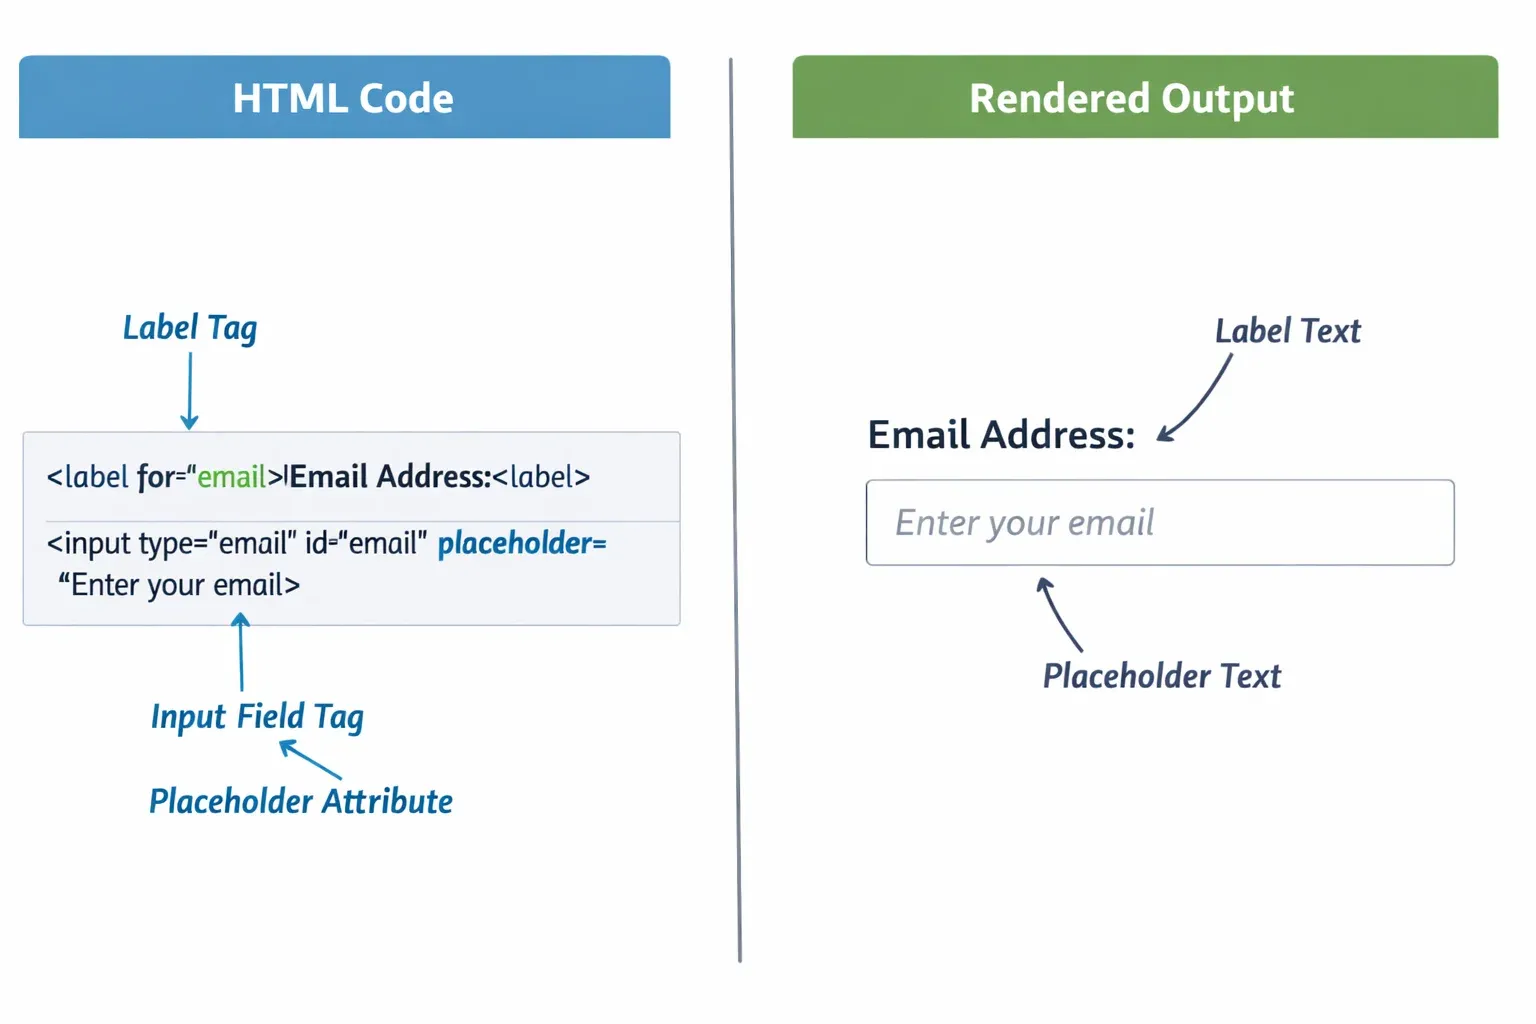
Labels, Placeholders, and the name Attribute
Three small but critical parts of every form input:
Labels link a text description to an input field using the for attribute, which must match the input's id. This improves accessibility and lets users click the label text to focus the field.
<label for="student-name">Full Name:</label>
<input type="text" id="student-name" name="fullName">
Placeholders show hint text inside the field before the user types anything. They disappear once the user starts typing.
<input type="text" placeholder="e.g. Ahmad Khan">
The name attribute is what gets sent to the server — it is the key in the key-value pair of form data. Without name, the field's data will not be submitted. Always include it.
Practical Code Examples
Example 1: Student Registration Form
Let us build a simple student registration form — the kind used on Pakistani university portals. This example uses multiple html input types and proper labels.
<!DOCTYPE html>
<html lang="en">
<head>
  <meta charset="UTF-8">
  <meta name="viewport" content="width=device-width, initial-scale=1.0">
  <title>Student Registration - TheIqra</title>
</head>
<body>

  <h1>Student Registration Form</h1>

  <form action="/register" method="POST">

    <!-- Full Name -->
    <label for="fullName">Full Name:</label>
    <input type="text" id="fullName" name="fullName"
           placeholder="e.g. Ahmad Ali" required>
    <br><br>

    <!-- Email Address -->
    <label for="email">Email Address:</label>
    <input type="email" id="email" name="email"
           placeholder="[email protected]" required>
    <br><br>

    <!-- Phone Number -->
    <label for="phone">Phone Number:</label>
    <input type="tel" id="phone" name="phone"
           placeholder="03XX-XXXXXXX" required>
    <br><br>

    <!-- City -->
    <label for="city">City:</label>
    <select id="city" name="city" required>
      <option value="">-- Select City --</option>
      <option value="lahore">Lahore</option>
      <option value="karachi">Karachi</option>
      <option value="islamabad">Islamabad</option>
      <option value="peshawar">Peshawar</option>
    </select>
    <br><br>

    <!-- Date of Birth -->
    <label for="dob">Date of Birth:</label>
    <input type="date" id="dob" name="dob" required>
    <br><br>

    <!-- Gender (Radio Buttons) -->
    <fieldset>
      <legend>Gender:</legend>
      <input type="radio" id="male" name="gender" value="male">
      <label for="male">Male</label>

      <input type="radio" id="female" name="gender" value="female">
      <label for="female">Female</label>
    </fieldset>
    <br>

    <!-- Interests (Checkboxes) -->
    <fieldset>
      <legend>Areas of Interest:</legend>
      <input type="checkbox" id="webDev" name="interest" value="webDev">
      <label for="webDev">Web Development</label>

      <input type="checkbox" id="python" name="interest" value="python">
      <label for="python">Python</label>

      <input type="checkbox" id="design" name="interest" value="design">
      <label for="design">UI/UX Design</label>
    </fieldset>
    <br>

    <!-- Profile Picture Upload -->
    <label for="photo">Upload Profile Photo:</label>
    <input type="file" id="photo" name="photo" accept="image/*">
    <br><br>

    <!-- Submit and Reset Buttons -->
    <button type="submit">Register Now</button>
    <button type="reset">Clear Form</button>

  </form>

</body>
</html>
Line-by-line explanation:
- Line 1–6: Standard HTML boilerplate with UTF-8 charset (important for Urdu characters if needed) and a responsive viewport meta tag.
<form action="/register" method="POST">: The form sends data to/registeron the server using the POST method — secure for personal data.type="text"withrequired: Creates a plain text input. Therequiredattribute means the browser will block form submission if this field is empty — this is built-in form validation.type="email": The browser automatically checks that the value contains@and a valid domain format.type="tel": Creates a phone field. On mobile devices, this opens a numeric keypad automatically — perfect for Pakistani students using smartphones.<select>with<option>tags: Creates a dropdown menu. We pre-populated it with major Pakistani cities.type="date": Renders a calendar date-picker in modern browsers.<fieldset>and<legend>: Groups related inputs together with a visible box and title — great for radio buttons and checkboxes.type="radio"with samename: When multiple radio inputs share the samename, only one can be selected at a time.type="checkbox": Unlike radio buttons, multiple checkboxes with the samenamecan all be selected simultaneously.type="file"withaccept="image/*": Opens the file browser and filters to image files only.type="submit"andtype="reset":submitsends the form;resetclears all fields back to their default values.
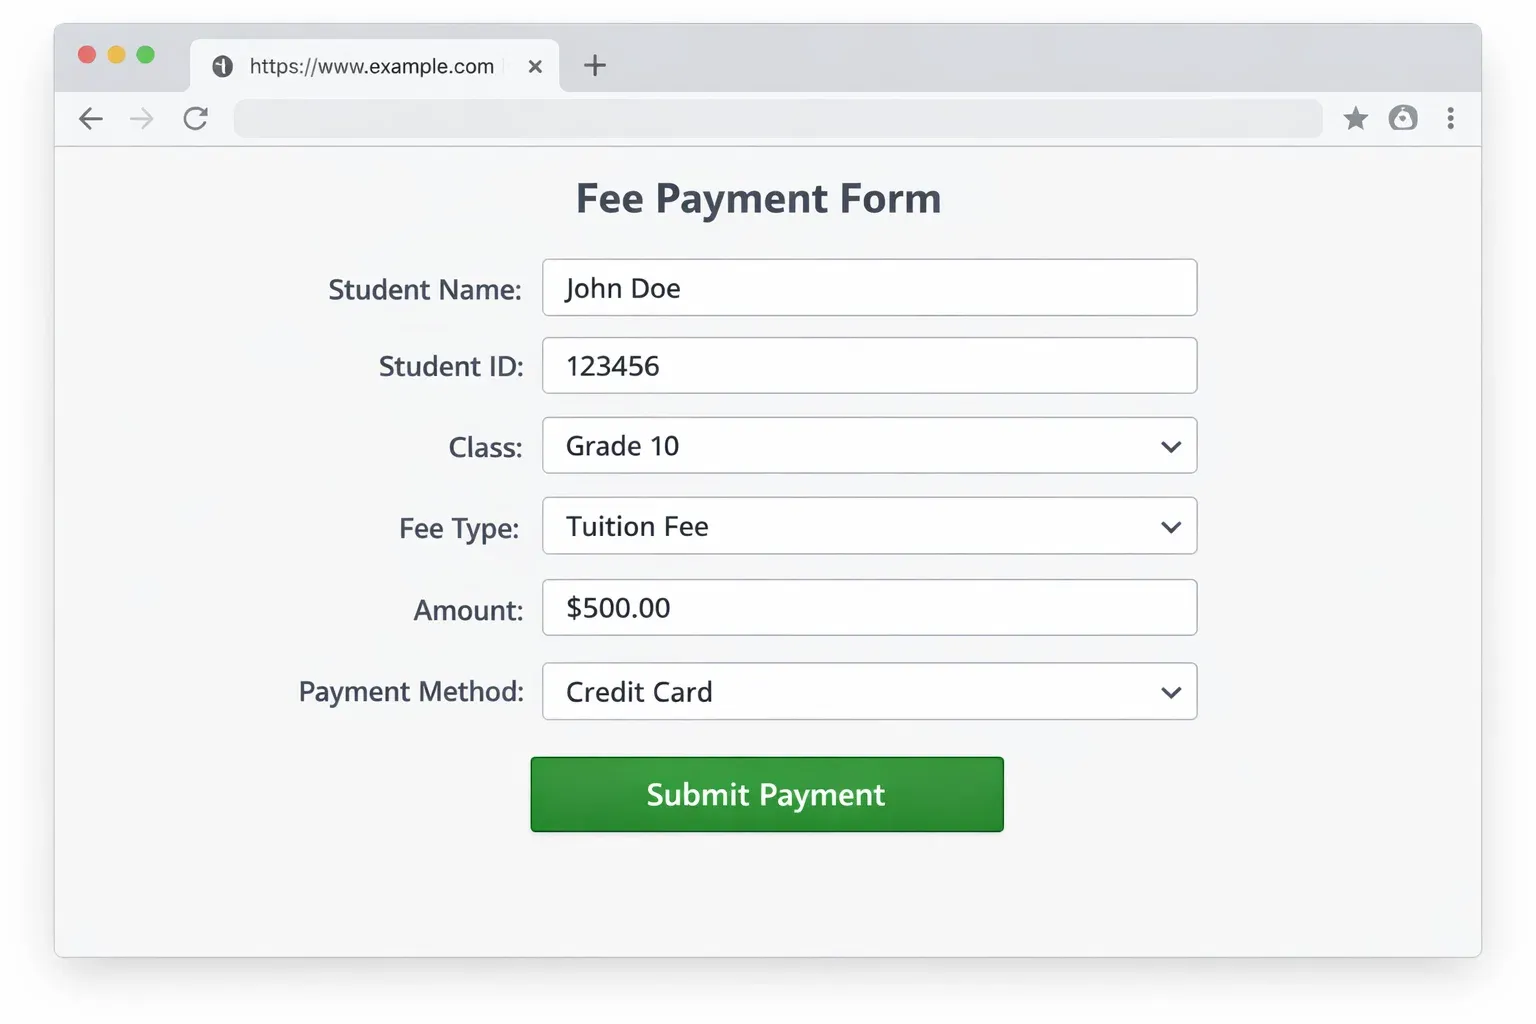
Example 2: Real-World Application — Online Fee Payment Form
Here is a real-world scenario: a Pakistani student paying a university fee of PKR 25,000 online. This form demonstrates hidden fields, number inputs, and textarea — all common in real applications.
<!DOCTYPE html>
<html lang="en">
<head>
  <meta charset="UTF-8">
  <title>Fee Payment - TheIqra University Portal</title>
</head>
<body>

  <h2>Online Fee Payment</h2>
  <p>Pay your semester dues securely. Amount: <strong>PKR 25,000</strong></p>

  <form action="/process-payment" method="POST">

    <!-- Hidden field: stores fee amount server-side -->
    <input type="hidden" name="feeAmount" value="25000">
    <input type="hidden" name="currency" value="PKR">

    <!-- Student Roll Number -->
    <label for="rollNo">Roll Number:</label>
    <input type="text" id="rollNo" name="rollNo"
           placeholder="e.g. BSCS-2024-001"
           pattern="[A-Z]+-[0-9]{4}-[0-9]{3}"
           title="Format: BSCS-2024-001"
           required>
    <br><br>

    <!-- Student Name -->
    <label for="studentName">Full Name:</label>
    <input type="text" id="studentName" name="studentName"
           placeholder="e.g. Fatima Zahra" required>
    <br><br>

    <!-- Installment Amount -->
    <label for="amount">Payment Amount (PKR):</label>
    <input type="number" id="amount" name="amount"
           min="5000" max="25000" step="1000"
           placeholder="Minimum PKR 5,000" required>
    <br><br>

    <!-- Payment Method -->
    <label for="payMethod">Payment Method:</label>
    <select id="payMethod" name="payMethod" required>
      <option value="">-- Choose Method --</option>
      <option value="easypaisa">Easypaisa</option>
      <option value="jazzcash">JazzCash</option>
      <option value="bank">Bank Transfer</option>
      <option value="card">Debit/Credit Card</option>
    </select>
    <br><br>

    <!-- Transaction ID -->
    <label for="txnId">Transaction ID (if applicable):</label>
    <input type="text" id="txnId" name="txnId"
           placeholder="Leave blank for card payments">
    <br><br>

    <!-- Additional Notes -->
    <label for="notes">Additional Notes:</label>
    <textarea id="notes" name="notes"
              rows="4" cols="40"
              placeholder="Any remarks or special instructions..."></textarea>
    <br><br>

    <!-- Terms Agreement -->
    <input type="checkbox" id="agree" name="agree" value="yes" required>
    <label for="agree">I confirm this payment is correct and agree to the terms.</label>
    <br><br>

    <button type="submit">Submit Payment</button>

  </form>

</body>
</html>
Key highlights in this example:
type="hidden": These fields are invisible to the user but get submitted with the form. Great for storing preset values like the fee amount or currency.pattern="[A-Z]+-[0-9]{4}-[0-9]{3}": This is a regular expression for form validation. The browser will only accept input that matches this exact pattern. Thetitleattribute shows the user a hint about what format is expected.type="number"withmin,max,step: Sets boundaries on the number. The user cannot type a value below 5,000 or above 25,000, and the step arrows increment by 1,000.<textarea>: Unlike<input>,<textarea>creates a multi-line text box. Use it for messages, comments, or addresses. Therowsandcolsattributes control its size.- Payment options include Easypaisa and JazzCash — the two most popular mobile payment platforms in Pakistan, making this form immediately relevant and realistic.
requiredon checkbox: The user must tick the agreement checkbox before the form will submit.
Common Mistakes & How to Avoid Them
Mistake 1: Forgetting the name Attribute on Inputs
This is one of the most common beginner mistakes. When you submit a form, the server receives data as key-value pairs like fullName=Ahmad. The key comes from the name attribute. Without it, the field's data is simply ignored.
Wrong:
<input type="text" id="city" placeholder="Your city">
Correct:
<input type="text" id="city" name="city" placeholder="Your city">
Always double-check that every input that needs to be submitted has a name attribute. The id is for CSS and JavaScript; the name is for form submission.
Mistake 2: Using GET Method for Sensitive Data
When method="GET" is used, the form data is appended to the URL — for example: https://example.com/[email protected]&password=12345. This is a serious security risk. Passwords, CNIC numbers, and phone numbers should never appear in the URL.
Wrong (for a login form):
<form action="/login" method="GET">
Correct:
<form action="/login" method="POST">
Rule of thumb: Use GET only for search forms where it is acceptable for the query to appear in the URL (like a search box). Use POST for everything else.
Mistake 3: Skipping <label> Tags
Many beginners write placeholder text as a substitute for labels. This is wrong. Placeholders disappear when the user starts typing — so if the user is filling out a long form and forgets what a field was for, they have no way to check.
Wrong:
<input type="text" name="phone" placeholder="Phone Number">
Correct:
<label for="phone">Phone Number:</label>
<input type="text" id="phone" name="phone" placeholder="e.g. 0311-1234567">
Labels also improve accessibility for screen readers — an important consideration for building inclusive websites.
Practice Exercises
Exercise 1: Build a Job Application Form
Problem: Create an HTML form for a junior web developer job at a tech company in Karachi. The form should collect the applicant's full name, email, years of experience (number input, minimum 0, maximum 20), expected salary in PKR (number input), a cover letter (textarea), and a CV upload (file input, accept PDF only). Add a submit button labelled "Apply Now".
Solution:
<form action="/apply" method="POST" enctype="multipart/form-data">

  <label for="appName">Full Name:</label>
  <input type="text" id="appName" name="fullName"
         placeholder="Ali Hassan" required>
  <br><br>

  <label for="appEmail">Email:</label>
  <input type="email" id="appEmail" name="email"
         placeholder="[email protected]" required>
  <br><br>

  <label for="experience">Years of Experience:</label>
  <input type="number" id="experience" name="experience"
         min="0" max="20" required>
  <br><br>

  <label for="salary">Expected Salary (PKR):</label>
  <input type="number" id="salary" name="expectedSalary"
         min="30000" placeholder="e.g. 80000" required>
  <br><br>

  <label for="coverLetter">Cover Letter:</label>
  <textarea id="coverLetter" name="coverLetter"
            rows="6" cols="50"
            placeholder="Why are you the right person for this role?"></textarea>
  <br><br>

  <label for="cv">Upload CV (PDF only):</label>
  <input type="file" id="cv" name="cv" accept=".pdf" required>
  <br><br>

  <button type="submit">Apply Now</button>

</form>
Note: When a form includes file uploads, always addenctype="multipart/form-data"to the<form>tag. Without it, the file will not be submitted.
Exercise 2: Add HTML5 Form Validation to a Contact Form
Problem: You have a basic contact form below with no validation. Add appropriate required, minlength, maxlength, and type attributes to ensure: the name is at least 3 characters long, the email is a valid email format, and the message is between 20 and 500 characters.
Starting code:
<form>
  <input name="name" placeholder="Your Name">
  <input name="email" placeholder="Your Email">
  <textarea name="message" placeholder="Your message"></textarea>
  <button type="submit">Send</button>
</form>
Solution:
<form action="/contact" method="POST">

  <label for="cName">Your Name:</label>
  <input type="text" id="cName" name="name"
         placeholder="e.g. Fatima Malik"
         minlength="3" maxlength="60" required>
  <br><br>

  <label for="cEmail">Your Email:</label>
  <input type="email" id="cEmail" name="email"
         placeholder="[email protected]" required>
  <br><br>

  <label for="cMessage">Your Message:</label>
  <textarea id="cMessage" name="message"
            rows="5" cols="40"
            minlength="20" maxlength="500"
            placeholder="Write at least 20 characters..." required></textarea>
  <br><br>

  <button type="submit">Send Message</button>

</form>
The minlength and maxlength attributes work on both <input> and <textarea>. The browser will prevent submission if the character count falls outside the specified range.
Frequently Asked Questions
What is the difference between GET and POST in HTML forms?
GET sends form data as part of the URL, making it visible and bookmarkable — suitable for search forms. POST sends data in the HTTP request body, keeping it hidden from the URL — essential for login forms, payment forms, and any form handling sensitive information like passwords or personal details.
How do I make a form field required in HTML?
Simply add the required attribute to any <input>, <select>, or <textarea> element. The browser will automatically block form submission and display a warning message if the user tries to submit without filling in required fields. This is the simplest form of built-in form validation.
What is the action attribute in an HTML form?
The action attribute specifies the URL or server-side script that will receive and process the form data when the user submits it. For example, action="/submit" sends data to the /submit route on your server. If action is left empty or omitted, the form submits to the same page it is on.
How do I allow users to upload files in an HTML form?
Use <input type="file"> for file uploads. You must also add enctype="multipart/form-data" to the <form> tag, or the file data will not be transmitted. To restrict accepted file types, use the accept attribute — for example, accept=".pdf,.docx" for documents or accept="image/*" for all image types.
What is the <fieldset> element and when should I use it?
<fieldset> groups related form inputs together visually and semantically, drawing a box around them in the browser. It is commonly used with the <legend> tag (which provides a caption for the group) for radio buttons and checkboxes. Using <fieldset> improves both the visual organisation of complex forms and their accessibility for screen readers.
Summary & Key Takeaways
- The
<form>element wraps all form controls and usesaction(where to send data) andmethod(GET or POST) to control submission behaviour. - The
<input>element is highly versatile — changing thetypeattribute (text,email,password,number,file,radio,checkbox, etc.) creates completely different controls with built-in browser behaviour. - Always use
<label>tags paired withforandidattributes — they improve usability and accessibility far better than relying on placeholders alone. - The
nameattribute on every input is mandatory for form data to be submitted to the server — without it, the field is invisible to the backend. - HTML5 provides powerful built-in form validation attributes —
required,minlength,maxlength,min,max,pattern, andtype-based validation — that reduce the need for JavaScript validation for simple cases. - Always use
method="POST"andenctype="multipart/form-data"for forms that handle sensitive data or file uploads.
Next Steps & Related Tutorials
Now that you have a solid understanding of HTML forms, here are the natural next steps in your learning journey on theiqra.edu.pk:
- CSS Styling for HTML Forms — Learn how to make your forms look professional and responsive using CSS, including custom button styles, input focus effects, and mobile-friendly layouts.
- JavaScript Form Validation — Go beyond HTML5 validation and write custom JavaScript to display real-time error messages, validate CNIC formats, and check password strength before submission.
- HTML Tables: Structure and Styling — Master another essential HTML element for displaying structured data in rows and columns, complementing your form-building skills.
- Introduction to PHP: Processing HTML Forms — Take the next big step and learn how to receive, validate, and store form data on the server side using PHP — the most common backend language for Pakistani web developers.
Written for theiqra.edu.pk — Pakistan's programming education platform. Have a question? Drop it in the comments below!
Test Your Python Knowledge!
Finished reading? Take a quick quiz to see how much you've learned from this tutorial.