IoT Programming Raspberry Pi MicroPython & Arduino Guide
Introduction
IoT programming — combining Raspberry Pi, MicroPython, and Arduino — is one of the most exciting and practical skills for modern developers. This iot tutorial will guide you through building smart, connected systems that interact with the real world.
In simple terms, the Internet of Things (IoT) refers to devices that collect data from sensors, process it, and send it over the internet. These devices can be as simple as a temperature monitor or as complex as a smart city system.
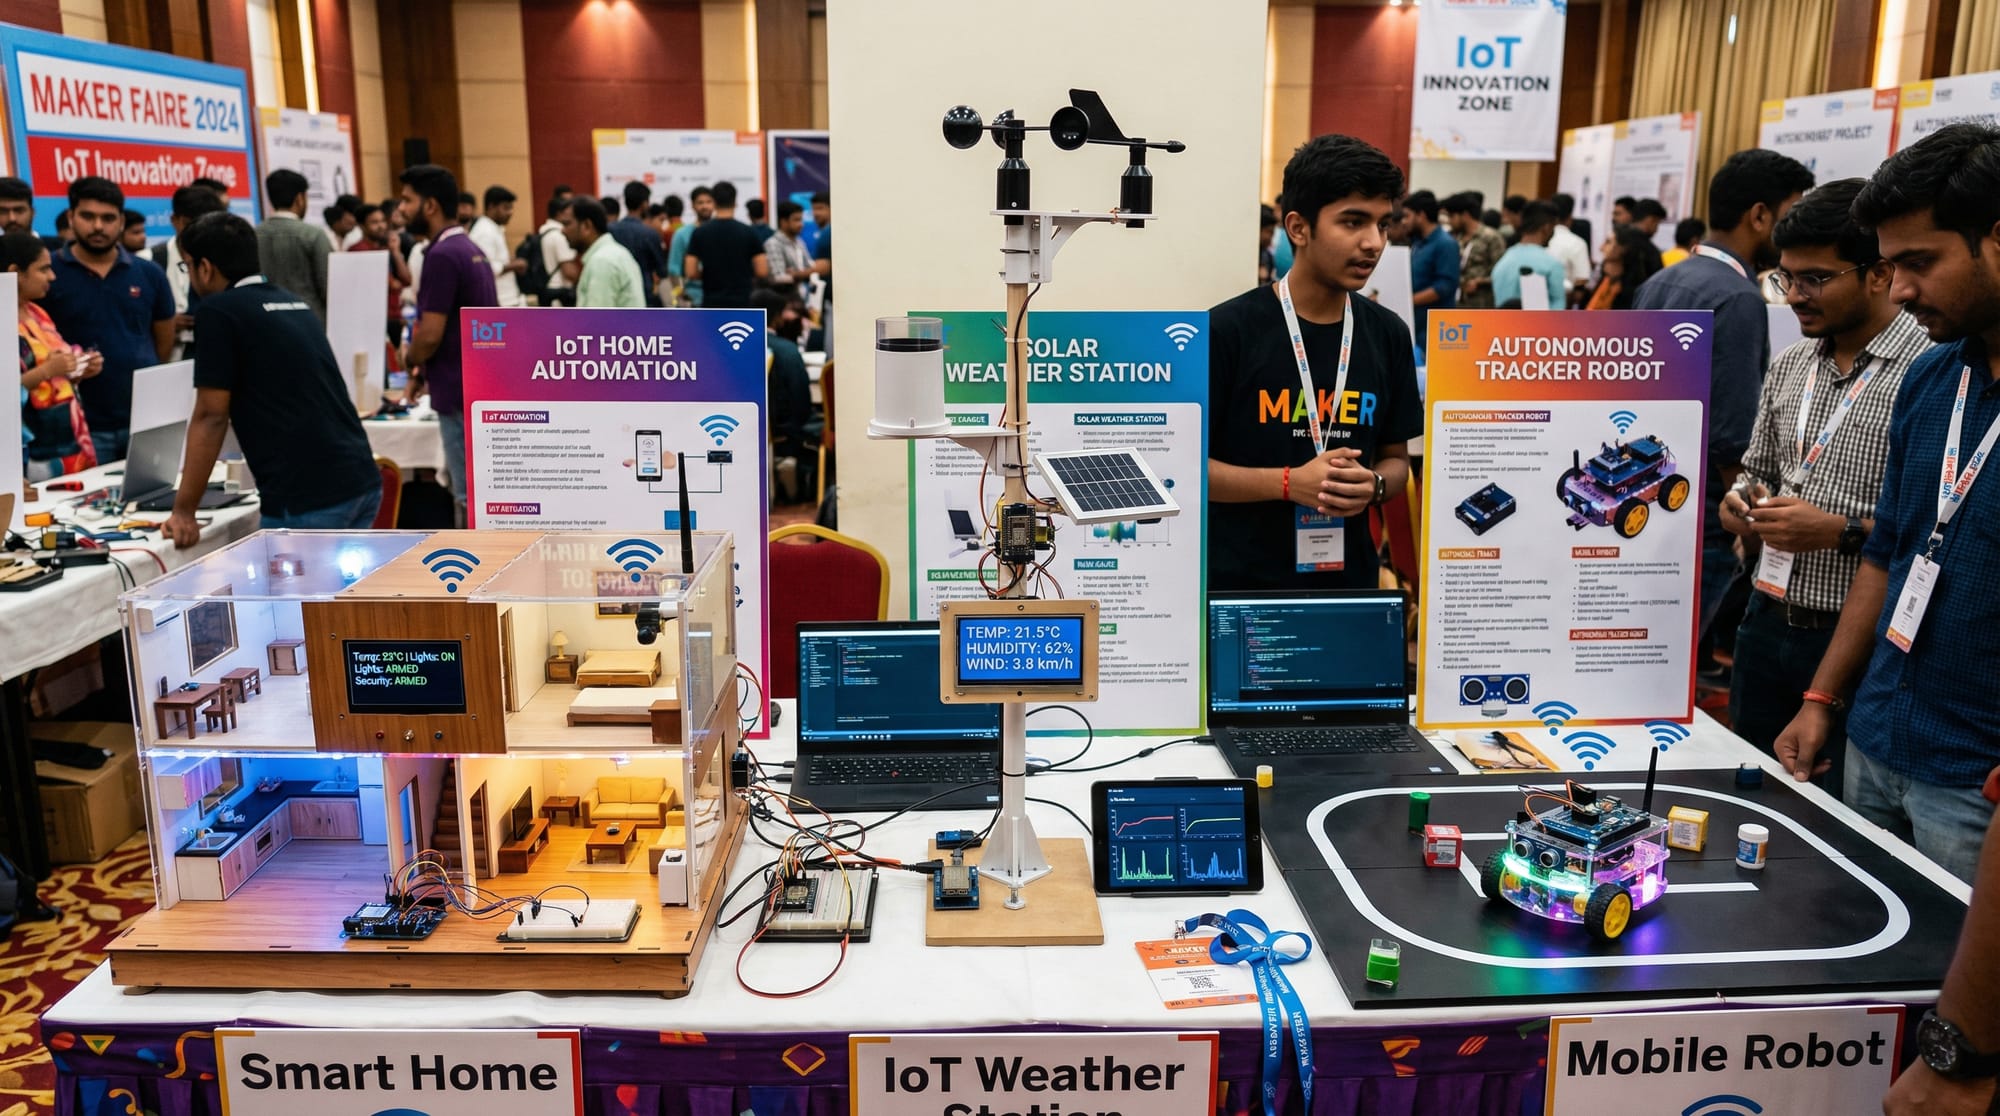
For Pakistani students in cities like Lahore, Karachi, and Islamabad, learning IoT opens doors to:
- Smart agriculture solutions for rural areas
- Home automation projects for energy savings
- Industrial monitoring systems
- Freelancing and startup opportunities
This guide focuses on:
- Raspberry Pi programming (Linux-based mini computer)
- MicroPython tutorial concepts (lightweight Python for microcontrollers)
- Arduino integration (hardware-level control)
Prerequisites
Before starting this tutorial, you should have:
- Basic knowledge of Python programming
- Understanding of electronics basics (voltage, current, resistors)
- Familiarity with Linux commands (helpful for Raspberry Pi)
- A beginner-level understanding of networking concepts
- Hardware (recommended):
- Raspberry Pi (3, 4, or newer)
- Arduino Uno or Nano
- Breadboard, jumper wires
- LED, resistor (220Ω), DHT11/DHT22 sensor
Core Concepts & Explanation
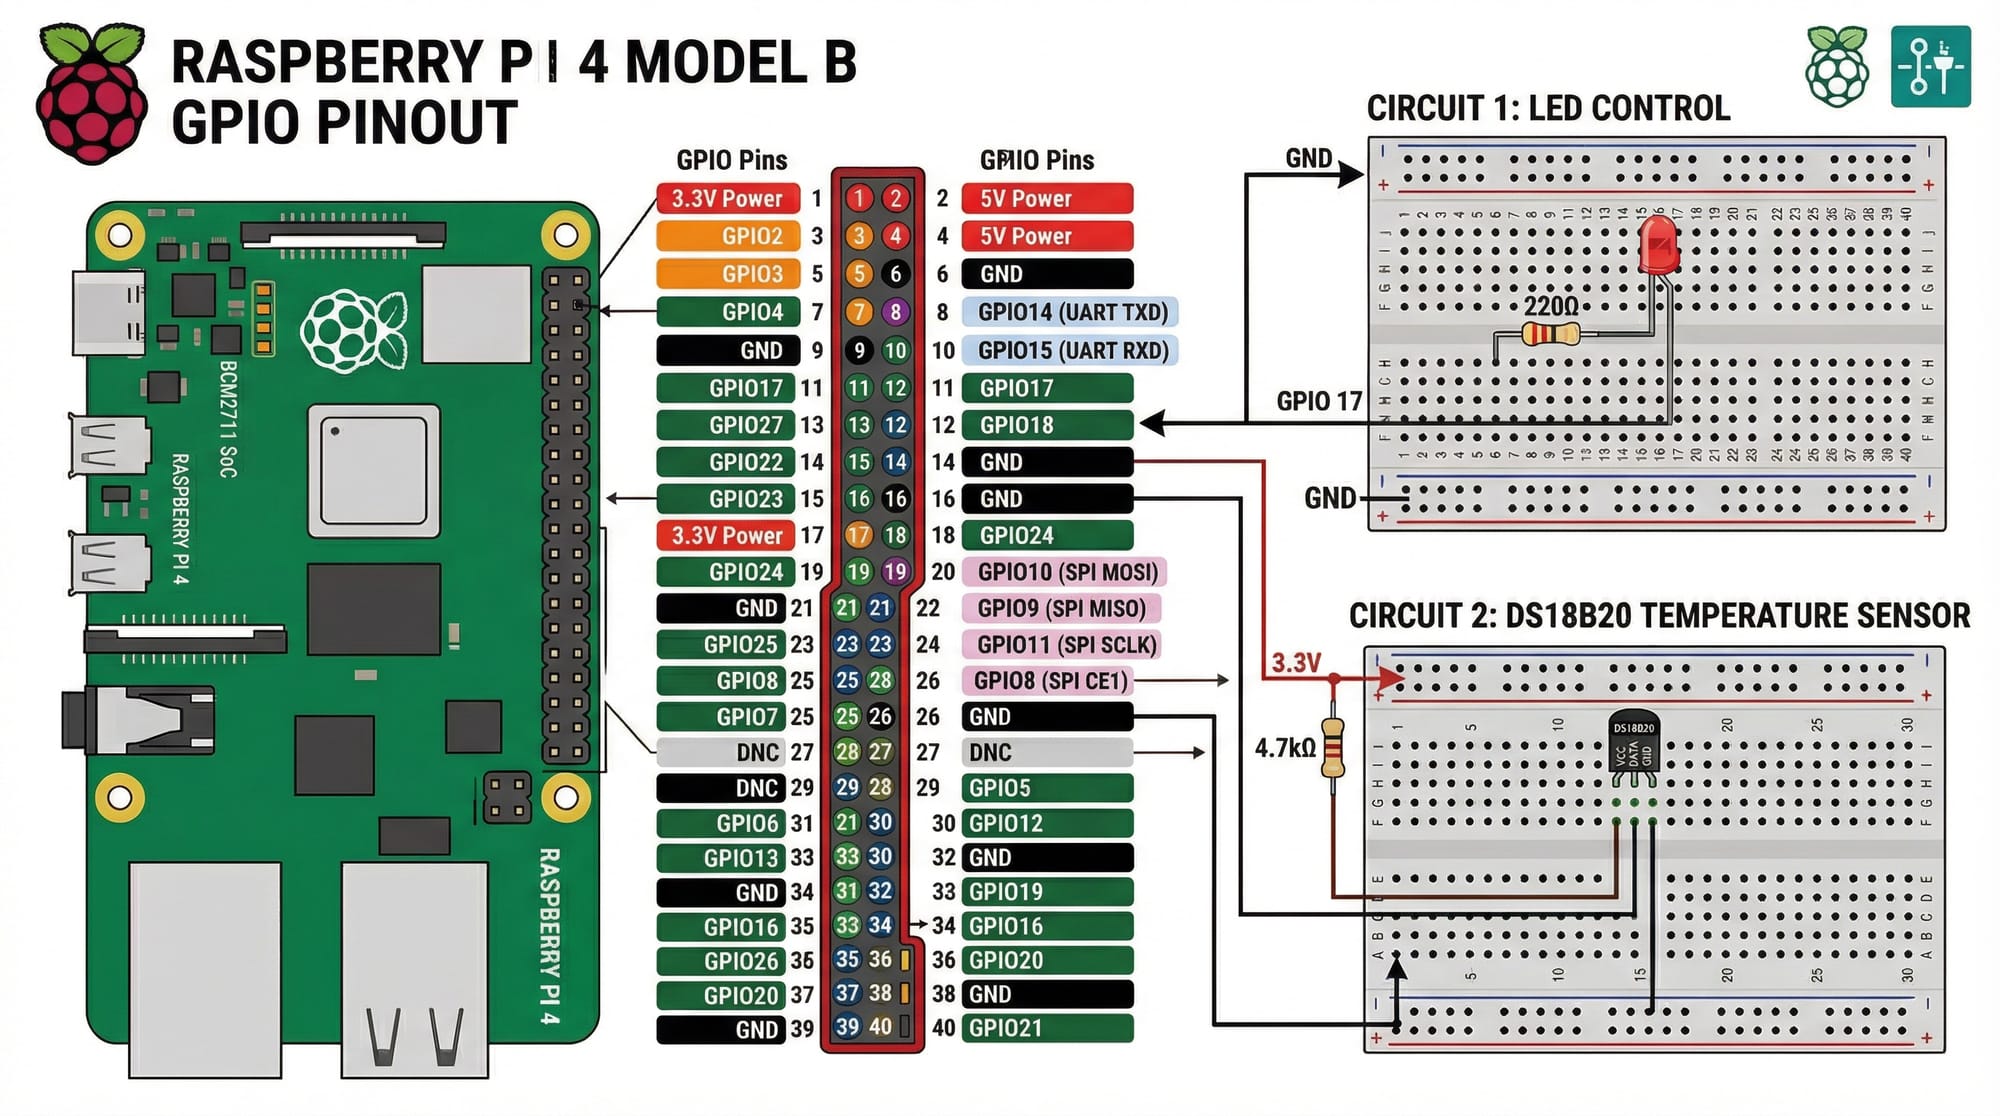
GPIO Programming with Raspberry Pi
GPIO (General Purpose Input/Output) pins allow Raspberry Pi to interact with sensors and actuators.
Example:
Ahmad connects an LED to GPIO pin 18 and controls it using Python.
Key ideas:
- GPIO pins can be INPUT or OUTPUT
- HIGH = ON (3.3V), LOW = OFF (0V)
- Controlled using Python libraries like
RPi.GPIO
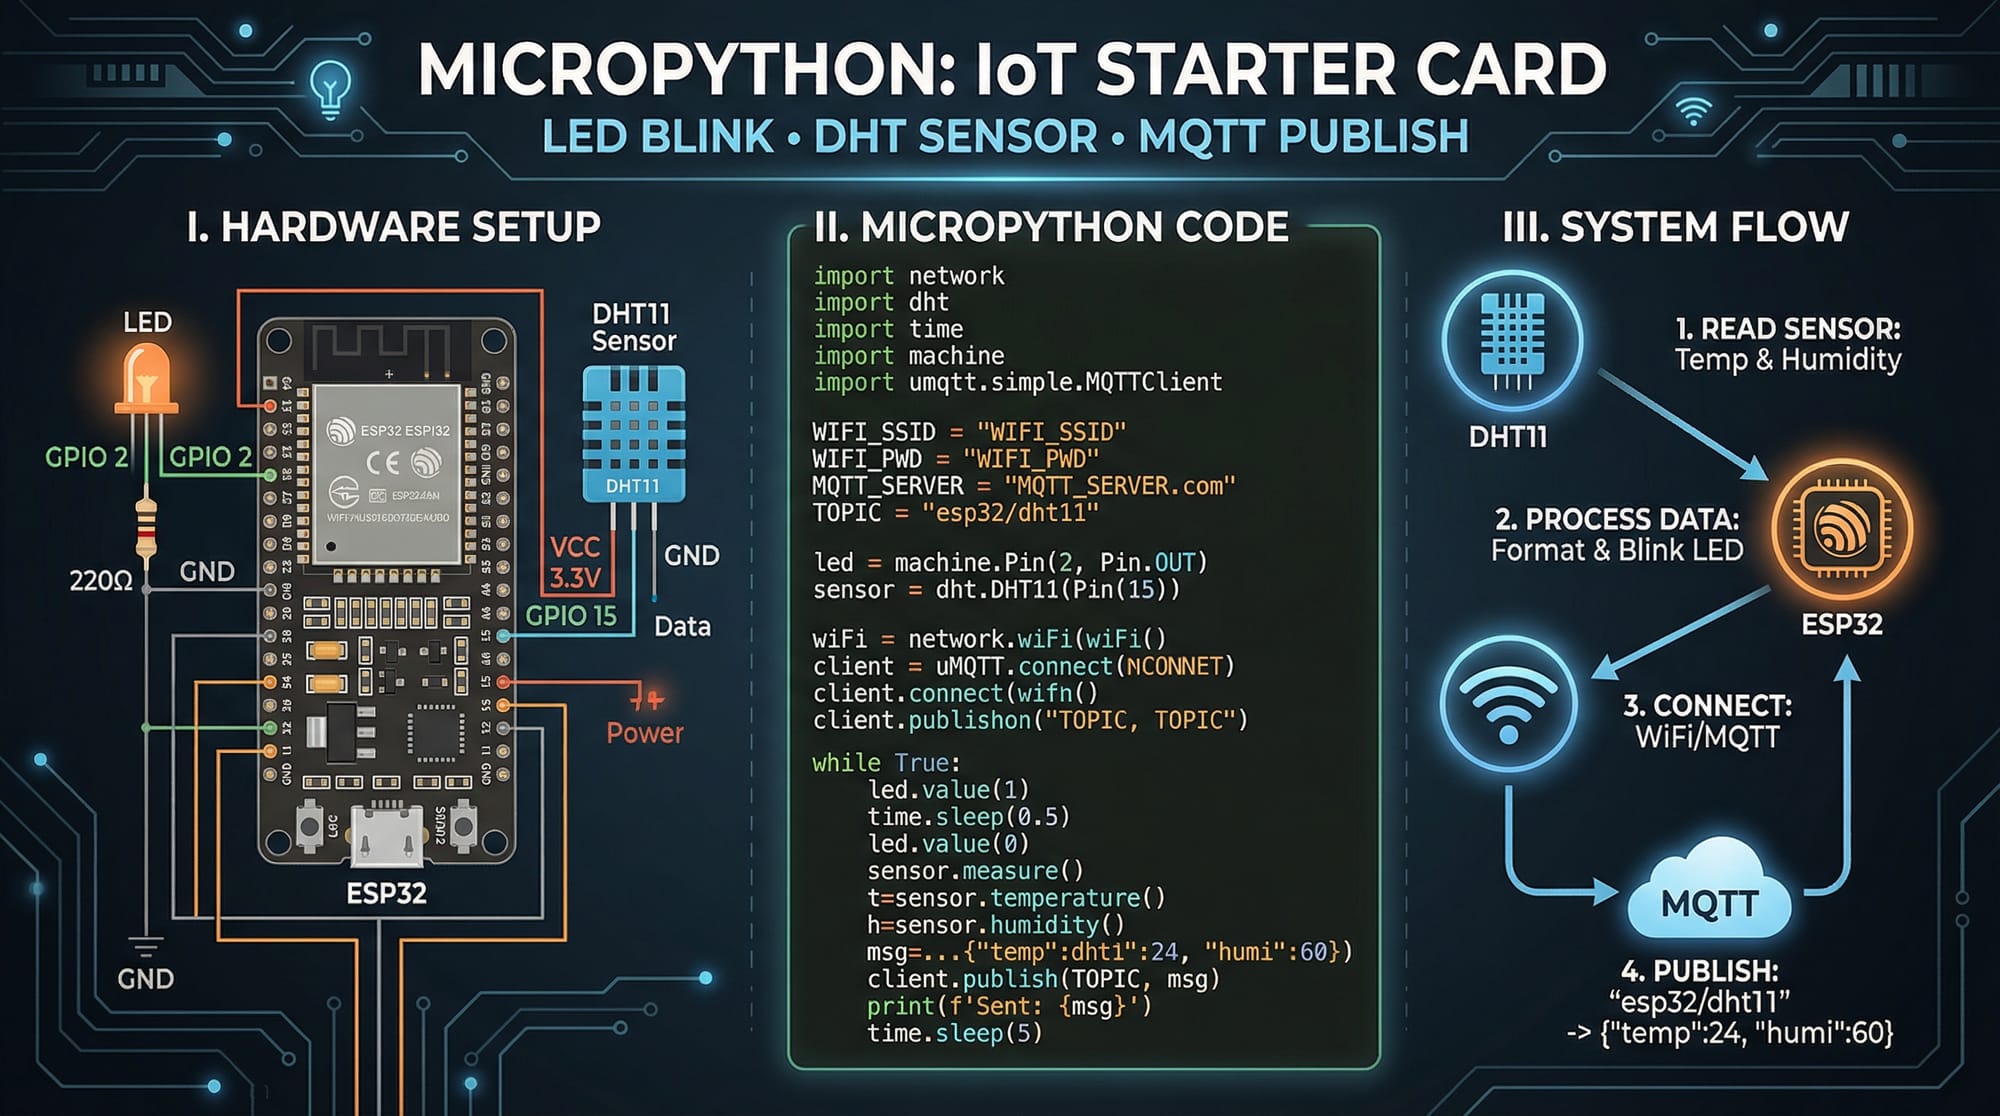
MicroPython for Embedded Systems
MicroPython is a lightweight version of Python designed for microcontrollers like ESP8266, ESP32, and some Arduino-compatible boards.
Why MicroPython?
- Easy to learn (Python syntax)
- Fast prototyping
- Ideal for students
Example:
Fatima uses MicroPython on an ESP32 to read temperature data and send it to a server.
Arduino vs Raspberry Pi
Understanding the difference is crucial:
| Feature | Arduino | Raspberry Pi |
|---|---|---|
| Type | Microcontroller | Mini Computer |
| OS | No OS | Linux |
| Use Case | Real-time control | Data processing |
| Programming | C/C++ | Python, C, etc. |
Best Practice:
- Use Arduino for sensor control
- Use Raspberry Pi for data processing and networking
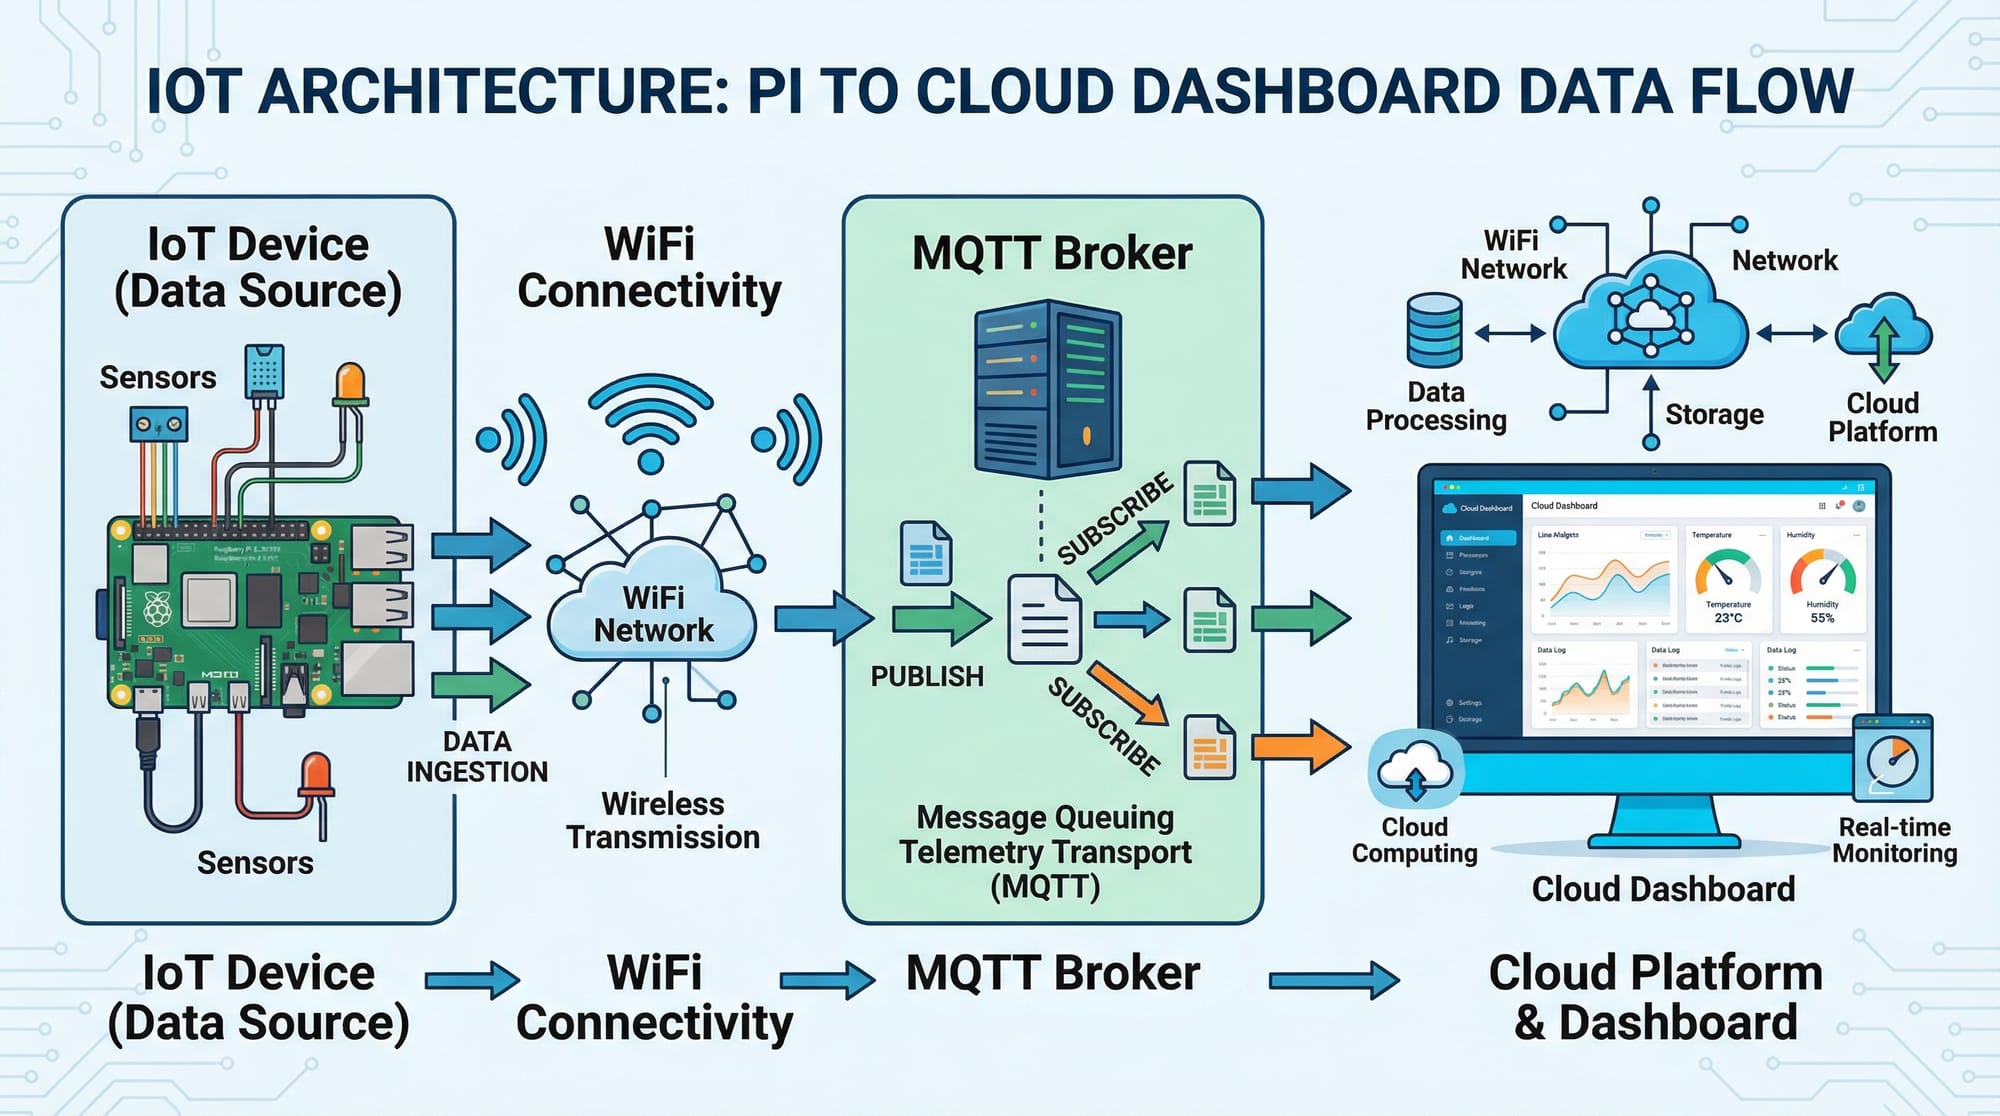
IoT Communication (MQTT Protocol)
MQTT (Message Queuing Telemetry Transport) is a lightweight protocol for IoT.
- Devices publish data
- Server (broker) distributes it
- Clients subscribe to topics
Example:
Ali sends temperature data from his hostel room in Islamabad to a cloud dashboard.
Practical Code Examples
Example 1: LED Blink with Raspberry Pi
import RPi.GPIO as GPIO
import time

GPIO.setmode(GPIO.BCM)
GPIO.setup(18, GPIO.OUT)

while True:
    GPIO.output(18, GPIO.HIGH)
    time.sleep(1)
    GPIO.output(18, GPIO.LOW)
    time.sleep(1)
Line-by-line explanation:
import RPi.GPIO as GPIO→ Import GPIO libraryimport time→ Import time module for delaysGPIO.setmode(GPIO.BCM)→ Use BCM pin numberingGPIO.setup(18, GPIO.OUT)→ Set pin 18 as outputwhile True:→ Infinite loopGPIO.output(18, GPIO.HIGH)→ Turn LED ONtime.sleep(1)→ Wait 1 secondGPIO.output(18, GPIO.LOW)→ Turn LED OFFtime.sleep(1)→ Wait again
Example 2: Real-World Application — Temperature Monitoring System
import machine
import dht
import time
from umqtt.simple import MQTTClient

sensor = dht.DHT11(machine.Pin(4))
client = MQTTClient("client1", "broker.hivemq.com")

client.connect()

while True:
    sensor.measure()
    temp = sensor.temperature()
    humidity = sensor.humidity()

    message = f"Temp:{temp}, Humidity:{humidity}"
    client.publish("home/weather", message)

    print(message)
    time.sleep(5)
Line-by-line explanation:
import machine→ Access hardware pinsimport dht→ DHT sensor libraryimport time→ Delay functionsfrom umqtt.simple import MQTTClient→ MQTT librarysensor = dht.DHT11(machine.Pin(4))→ Connect sensor to pin 4client = MQTTClient(...)→ Create MQTT clientclient.connect()→ Connect to brokersensor.measure()→ Read sensor datatemp = sensor.temperature()→ Get temperaturehumidity = sensor.humidity()→ Get humiditymessage = f"...→ Format dataclient.publish(...)→ Send data to cloudprint(message)→ Display outputtime.sleep(5)→ Wait 5 seconds
Common Mistakes & How to Avoid Them
Mistake 1: Incorrect GPIO Pin Usage
Problem:
Students often mix BCM and BOARD numbering.
Fix:
GPIO.setmode(GPIO.BCM)
Always double-check pin mapping before wiring.
Mistake 2: Power Supply Issues
Problem:
Devices reset due to insufficient power.
Fix:
- Use a 5V 3A adapter for Raspberry Pi
- Avoid powering sensors directly from GPIO if high current
Mistake 3: MQTT Connection Failures
Problem:
Code fails when internet drops.
Fix:
try:
    client.connect()
except:
    print("Connection failed")
Mistake 4: Sensor Misreading
Problem:
DHT sensors give incorrect values.
Fix:
- Add delay between readings
- Ensure proper wiring
- Use pull-up resistor
Practice Exercises
Exercise 1: LED Control with Button
Problem:
Turn ON an LED when a button is pressed.
Solution:
import RPi.GPIO as GPIO

GPIO.setmode(GPIO.BCM)
GPIO.setup(18, GPIO.OUT)
GPIO.setup(23, GPIO.IN)

while True:
    if GPIO.input(23):
        GPIO.output(18, GPIO.HIGH)
    else:
        GPIO.output(18, GPIO.LOW)
Explanation:
- Pin 23 reads button input
- If pressed → LED ON
- Otherwise → OFF
Exercise 2: Smart Room Temperature Alert
Problem:
Send alert if temperature exceeds 30°C.
Solution:
if temp > 30:
    client.publish("alert", "High temperature!")
Explanation:
- Condition checks temperature
- Sends MQTT alert when threshold exceeded
Frequently Asked Questions
What is IoT programming?
IoT programming involves writing software that connects physical devices (like sensors and motors) to the internet. It allows real-time data collection and automation.
How do I start Raspberry Pi programming?
Start by installing Raspberry Pi OS, connecting basic components like LEDs, and writing simple Python scripts using GPIO libraries.
What is MicroPython used for?
MicroPython is used for programming microcontrollers like ESP32. It allows Python-based control of sensors, WiFi, and IoT communication.
Can Arduino and Raspberry Pi work together?
Yes, Arduino can handle hardware-level tasks while Raspberry Pi processes data and connects to the internet.
What are real IoT projects for Pakistani students?
Examples include smart irrigation systems for farms, electricity monitoring for homes, and low-cost weather stations.
Summary & Key Takeaways
- IoT combines hardware + software + internet connectivity
- Raspberry Pi is ideal for processing and networking
- Arduino is best for real-time control
- MicroPython makes embedded programming simple and accessible
- MQTT is a lightweight and essential protocol for IoT communication
- Practical projects can solve real problems in Pakistan
Next Steps & Related Tutorials
To continue your learning journey, explore these tutorials on theiqra.edu.pk:
- Learn programming fundamentals with Python Tutorial
- Understand system operations via Linux Basics
- Build intelligent systems with Machine Learning for Beginners
- Explore hardware integration in Embedded Systems Guide
Start small, experiment often, and build projects relevant to your environment — whether it's a smart home in Karachi or an agriculture solution in rural Punjab.
Test Your Python Knowledge!
Finished reading? Take a quick quiz to see how much you've learned from this tutorial.