JavaScript DOM Manipulation Select Create & Modify
Introduction
Every time you visit a website and click a button that shows a dropdown menu, submit a form that displays a success message, or watch an image slide across the screen — that's JavaScript DOM manipulation happening in real time. It is one of the most powerful and practical skills a web developer can learn.
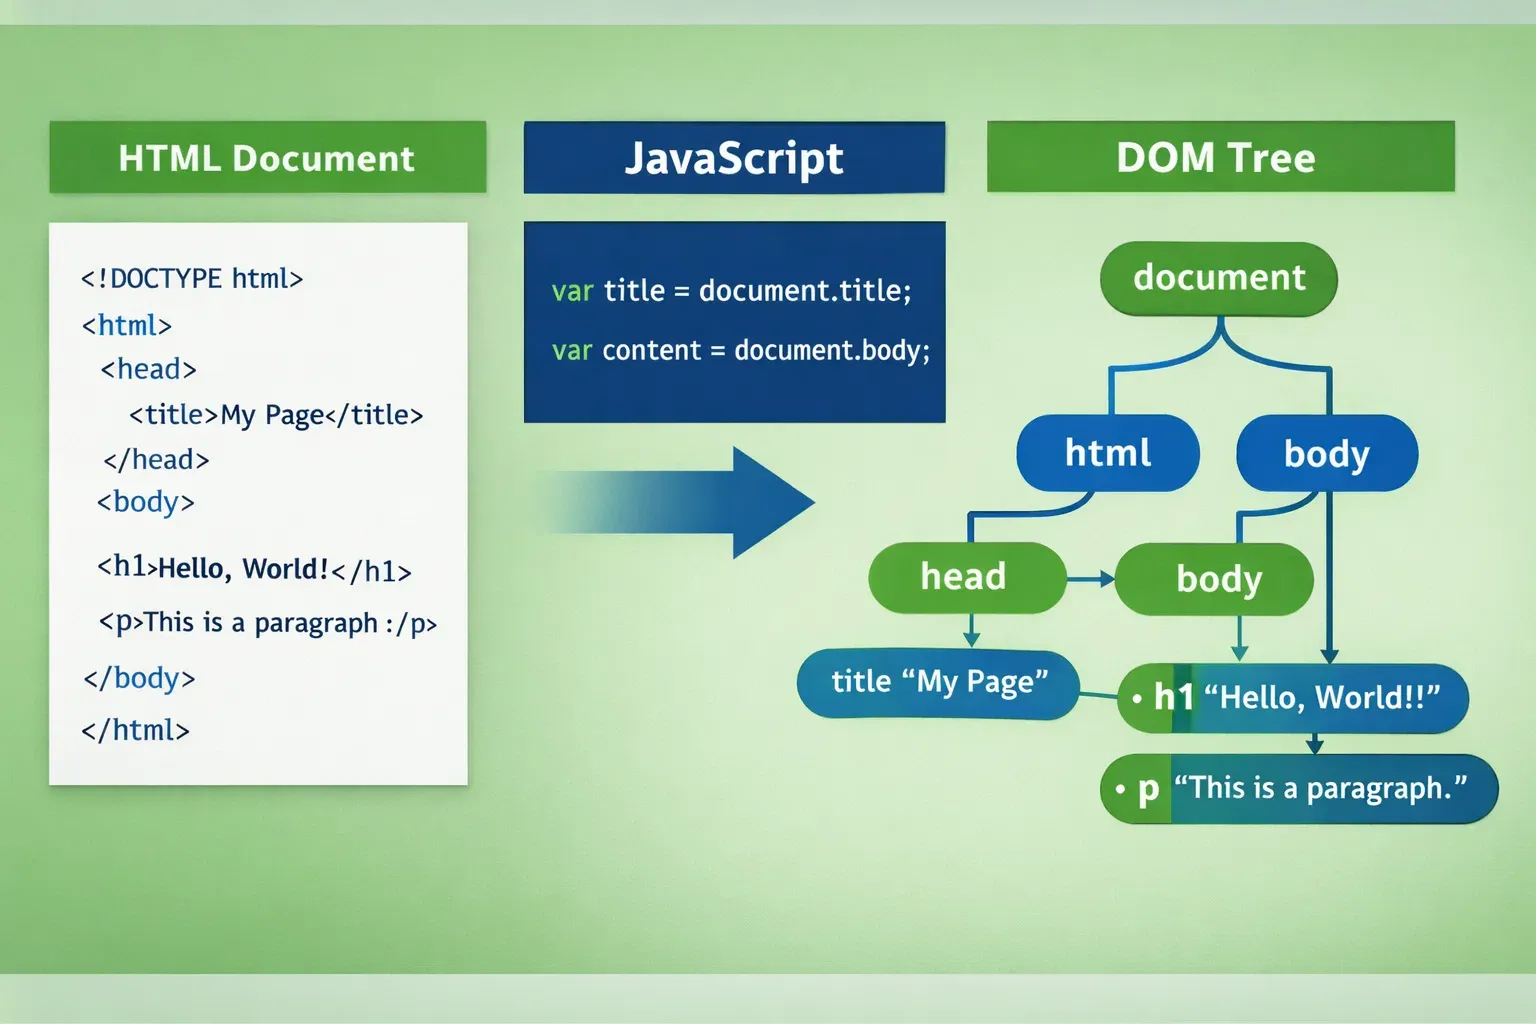
DOM stands for Document Object Model. When a browser loads an HTML page, it converts every HTML tag — every <div>, <p>, <h1>, <button> — into a structured tree of objects called the DOM. JavaScript can then read, add, remove, and modify any node in that tree, making web pages dynamic and interactive.
For students in Pakistan learning web development, mastering the JavaScript DOM is not optional — it is essential. Whether you are building a freelance portfolio on platforms like Upwork, creating an e-commerce site selling products in PKR, or developing a web app for a Lahore-based startup, every interactive feature you build relies on DOM manipulation.
In this tutorial, we will cover:
- What the DOM tree looks like and how to navigate it
- How to select elements using
querySelector,getElementById, and other powerful methods - How to create new elements and insert them into the page
- How to modify existing elements — their content, styles, and attributes
- Common mistakes that trip up intermediate developers and how to avoid them
- Hands-on practice exercises to solidify your understanding
By the end, you will be writing clean, confident DOM manipulation code from scratch.
Prerequisites
Before diving into this tutorial, make sure you are comfortable with the following concepts:
- HTML & CSS basics — You should understand how tags, attributes, classes, and IDs work. If you need a refresher, check out our HTML fundamentals guide on theiqra.edu.pk.
- JavaScript fundamentals — Variables (
let,const), functions, conditionals, and loops. Our JavaScript basics tutorial is the perfect starting point. - A code editor — VS Code is recommended (free download). You can also use the browser's built-in Developer Tools console to run small snippets instantly.
- A modern web browser — Google Chrome or Mozilla Firefox, both of which have excellent developer tools.
You do not need any frameworks like React or Vue. Everything in this tutorial uses plain, vanilla JavaScript — the universal language of the browser.
Core Concepts & Explanation
Understanding the DOM Tree Structure
Before you can manipulate the DOM, you need to see it. Consider this simple HTML document:
<!DOCTYPE html>
<html>
  <head>
    <title>My Page</title>
  </head>
  <body>
    <h1 id="main-title">Welcome</h1>
    <p class="intro">Hello from Lahore!</p>
    <ul>
      <li>Item One</li>
      <li>Item Two</li>
    </ul>
  </body>
</html>
The browser parses this and builds a tree structure in memory:
Document
└── html
    ├── head
    │   └── title → "My Page"
    └── body
        ├── h1#main-title → "Welcome"
        ├── p.intro → "Hello from Lahore!"
        └── ul
            ├── li → "Item One"
            └── li → "Item Two"
Every item in this tree is called a node. Nodes that correspond to HTML tags are called element nodes. The text inside a tag is a text node. JavaScript gives you tools to reach any node in this tree and do almost anything with it.
The entry point to the whole tree is the global document object. Type document in your browser console right now — you will see the entire page represented as a JavaScript object.
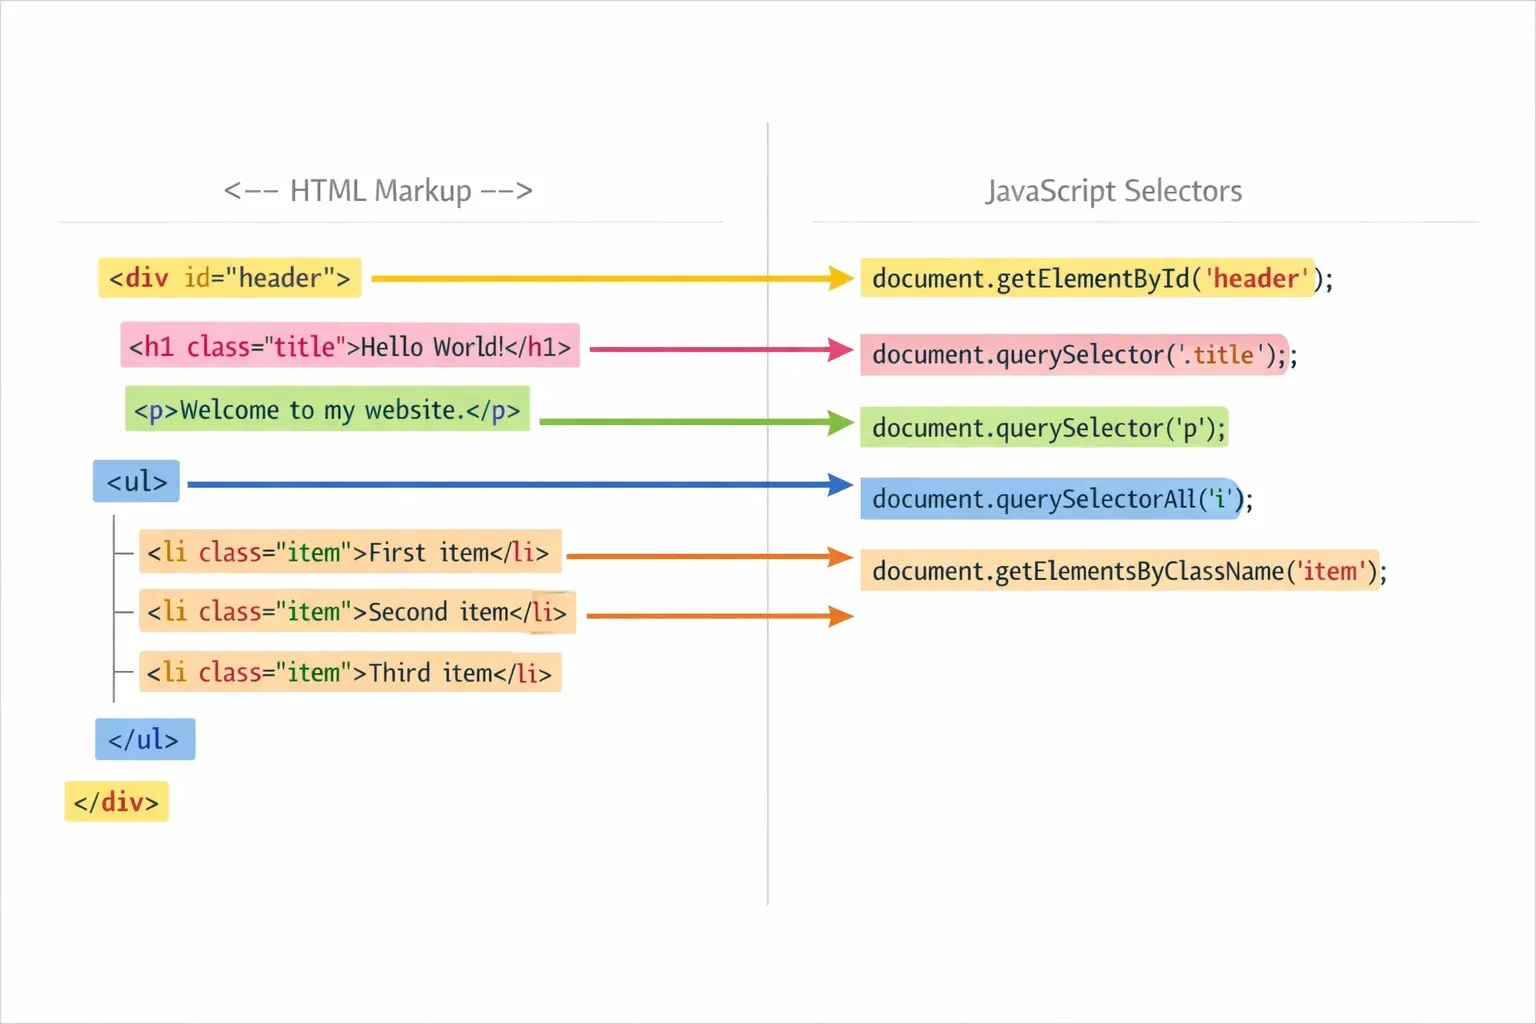
Selecting Elements from the DOM
Selecting the right element is the first step in any DOM manipulation task. JavaScript provides several methods, each suited to different situations.
document.getElementById()
The fastest and most direct way to grab an element when you know its unique ID:
// Selects the element with id="main-title"
const title = document.getElementById("main-title");
console.log(title); // <h1 id="main-title">Welcome</h1>
Returns a single element or null if not found. IDs must be unique per page — if two elements share an ID, only the first is returned.
document.querySelector()
The most versatile selector. It accepts any valid CSS selector and returns the first matching element:
// Select by tag name
const firstParagraph = document.querySelector("p");

// Select by class
const intro = document.querySelector(".intro");

// Select by ID (equivalent to getElementById)
const title = document.querySelector("#main-title");

// Select a nested element (li inside ul)
const firstItem = document.querySelector("ul li");

// Select by attribute
const input = document.querySelector("input[type='email']");
document.querySelectorAll()
Returns a NodeList (similar to an array) of all elements matching the selector:
// Select ALL list items
const allItems = document.querySelectorAll("li");

// Loop through them
allItems.forEach(function(item) {
  console.log(item.textContent);
});
Other Useful Selection Methods
// Returns HTMLCollection of all elements with this class
const cards = document.getElementsByClassName("card");

// Returns HTMLCollection of all <p> tags
const paragraphs = document.getElementsByTagName("p");

// Select all children of an element
const listItems = document.querySelector("ul").children;
Quick Reference Table:
| Method | Returns | Accepts |
|---|---|---|
getElementById |
Single element / null | ID string |
querySelector |
First matching element / null | CSS selector |
querySelectorAll |
NodeList (all matches) | CSS selector |
getElementsByClassName |
Live HTMLCollection | Class string |
getElementsByTagName |
Live HTMLCollection | Tag string |
Pro Tip for Pakistani Students: In professional projects, preferquerySelectorandquerySelectorAllbecause they use CSS syntax you already know. They are also the most readable for other developers on your team.
Modifying Elements — Content, Styles & Attributes
Once you have selected an element, you can read or change almost anything about it.
Changing Text Content
const heading = document.querySelector("h1");

// Read current text
console.log(heading.textContent); // "Welcome"

// Update text
heading.textContent = "Welcome to theiqra.edu.pk!";
Use textContent when you want to set plain text. It is safe because it treats everything as text (no HTML parsing).
Changing HTML Content
const intro = document.querySelector(".intro");

// innerHTML parses HTML tags
intro.innerHTML = "Hello from <strong>Karachi</strong>!";
innerHTML is powerful but use it carefully — never insert untrusted user input through innerHTML as it can create security vulnerabilities (called XSS attacks).
Changing CSS Styles
const box = document.querySelector(".card");

// Direct style property (camelCase, not kebab-case)
box.style.backgroundColor = "#1a73e8";   // NOT background-color
box.style.fontSize = "18px";
box.style.marginTop = "20px";
box.style.display = "none";   // Hide element
box.style.display = "block";  // Show element
Working with CSS Classes (Recommended)
Rather than setting inline styles directly, the best practice is to toggle CSS classes:
const btn = document.querySelector(".submit-btn");

// Add a class
btn.classList.add("active");

// Remove a class
btn.classList.remove("disabled");

// Toggle (adds if absent, removes if present)
btn.classList.toggle("highlighted");

// Check if class exists
if (btn.classList.contains("active")) {
  console.log("Button is active!");
}
This approach keeps your styling in CSS files where it belongs and makes your JavaScript cleaner.
Reading and Setting Attributes
const link = document.querySelector("a");

// Read an attribute
console.log(link.getAttribute("href"));  // "https://example.com"

// Set an attribute
link.setAttribute("href", "https://theiqra.edu.pk");
link.setAttribute("target", "_blank");

// Remove an attribute
link.removeAttribute("disabled");

// Read/set the id or class directly
console.log(link.id);
console.log(link.className);
Creating and Inserting New Elements
This is where DOM manipulation becomes truly powerful — you can build entirely new page content with JavaScript, not just modify what is already there.
document.createElement()
// Step 1: Create the element
const newParagraph = document.createElement("p");

// Step 2: Set its content and attributes
newParagraph.textContent = "This paragraph was created with JavaScript!";
newParagraph.classList.add("dynamic-text");
newParagraph.setAttribute("id", "js-para");

// Step 3: Insert it into the page
document.body.appendChild(newParagraph);
appendChild() inserts the element as the last child of the target element.
Other Insertion Methods
const container = document.querySelector(".container");
const newDiv = document.createElement("div");

// Insert as last child (same as appendChild)
container.append(newDiv);

// Insert as first child
container.prepend(newDiv);

// Insert before a specific element
const reference = document.querySelector(".existing-item");
container.insertBefore(newDiv, reference);

// Modern method: insertAdjacentElement
// Positions: 'beforebegin', 'afterbegin', 'beforeend', 'afterend'
container.insertAdjacentElement("afterbegin", newDiv);
Removing Elements
const elementToRemove = document.querySelector(".old-notice");

// Modern, clean way
elementToRemove.remove();

// Older method (still used for compatibility)
elementToRemove.parentNode.removeChild(elementToRemove);
Cloning Elements
const original = document.querySelector(".product-card");

// shallow clone (element only, no children)
const shallowCopy = original.cloneNode(false);

// deep clone (element + all children)
const deepCopy = original.cloneNode(true);

document.querySelector(".products-grid").appendChild(deepCopy);
Practical Code Examples
Example 1: Dynamic Student Grade Display
This example builds a function that takes a student's name and marks, then renders their grade on the page. This is a realistic pattern used in educational dashboards and school management systems — highly relevant for Pakistani developers building apps for schools.
<!-- HTML Structure -->
<!DOCTYPE html>
<html lang="en">
<head>
  <meta charset="UTF-8">
  <title>Grade Checker</title>
  <style>
    .grade-card { padding: 16px; border-radius: 8px; margin: 8px 0; font-family: Arial, sans-serif; }
    .pass  { background-color: #d4edda; color: #155724; }
    .fail  { background-color: #f8d7da; color: #721c24; }
  </style>
</head>
<body>
  <h2>Student Results</h2>
  <div id="results-container"></div>

  <script src="grades.js"></script>
</body>
</html>
// grades.js

// Array of student results for a class in Islamabad
const students = [
  { name: "Ahmad",  marks: 87 },
  { name: "Fatima", marks: 54 },
  { name: "Ali",    marks: 72 },
  { name: "Sana",   marks: 38 },
];

// Step 1: Select the container where results will be shown
const container = document.getElementById("results-container");

// Step 2: Loop through each student
students.forEach(function(student) {

  // Step 3: Create a new <div> for each student
  const card = document.createElement("div");

  // Step 4: Add the base class
  card.classList.add("grade-card");

  // Step 5: Determine pass or fail and add appropriate class
  const passed = student.marks >= 50;
  card.classList.add(passed ? "pass" : "fail");

  // Step 6: Set the card's text content
  const grade = passed ? "PASS ✓" : "FAIL ✗";
  card.textContent = `${student.name}: ${student.marks}/100 — ${grade}`;

  // Step 7: Append the card to the container
  container.appendChild(card);
});
Line-by-line explanation:
- Line 4–9: We define our student data as an array of objects — each has a
nameandmarks. - Line 12:
getElementById("results-container")grabs the<div>where we will inject our results. - Line 15:
forEachloops through every student object. - Line 18:
createElement("div")makes a fresh, empty<div>in memory (not on the page yet). - Line 21: We add the base
"grade-card"class for shared styling. - Line 24–25: A ternary operator checks if marks are 50 or above.
classList.addapplies either"pass"(green) or"fail"(red). - Line 28: A template literal combines the student's name, marks, and result into one readable string.
- Line 31:
appendChildfinally inserts the card into the DOM, making it visible on screen.
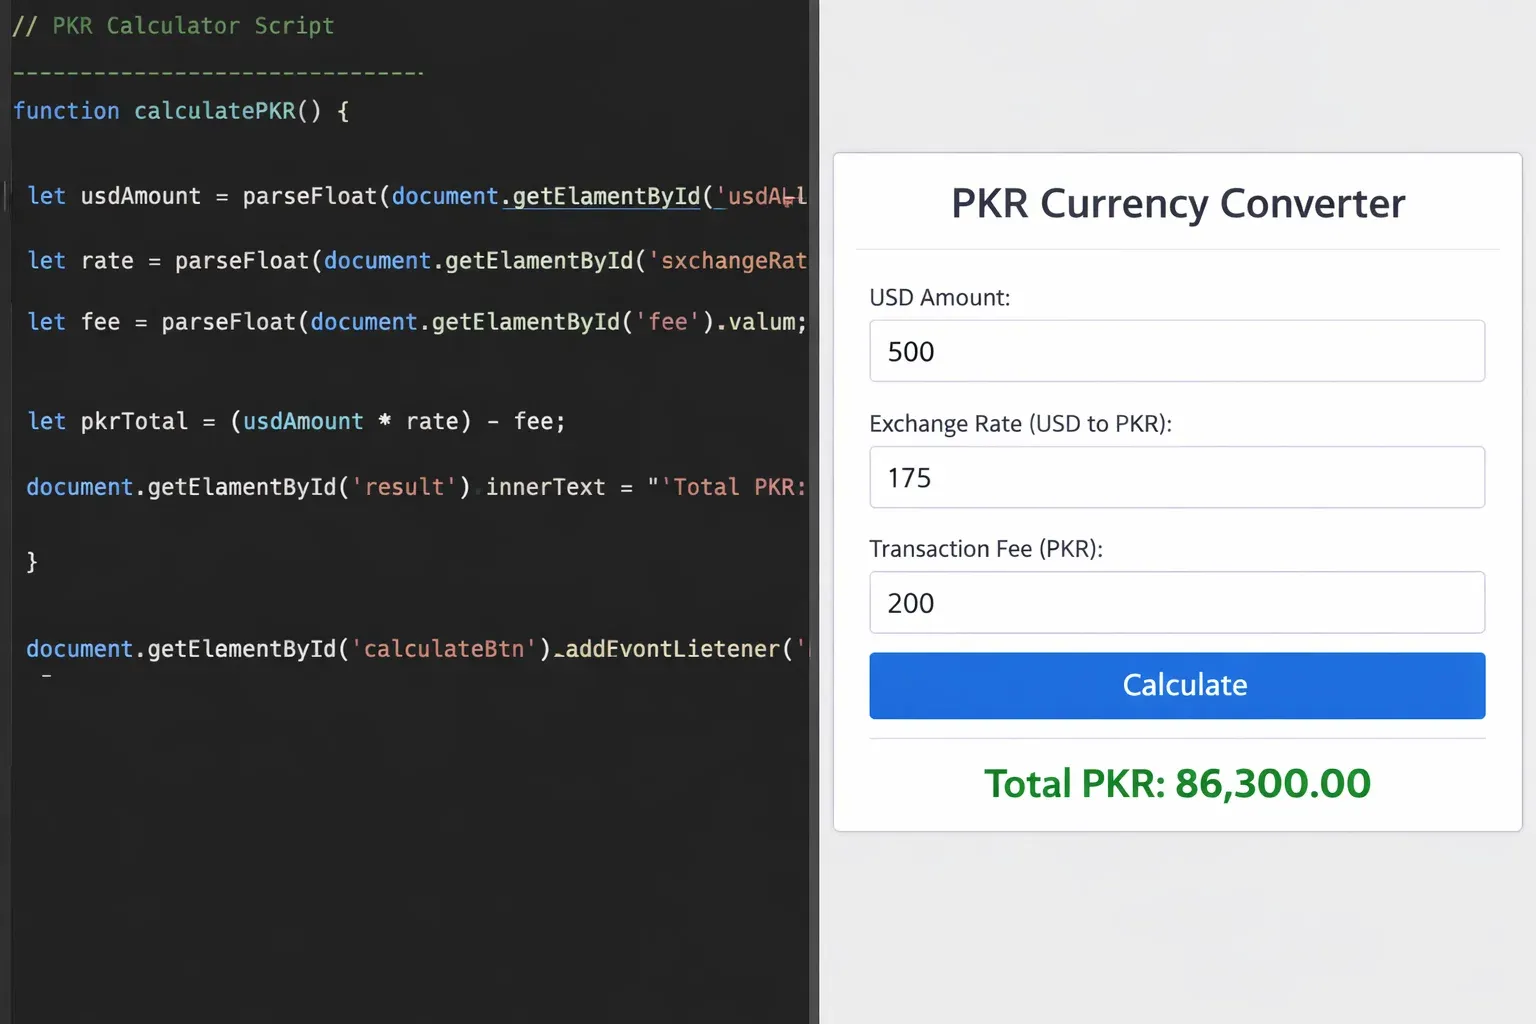
Example 2: Real-World Application — PKR Price Calculator
This example simulates a simple product price calculator — the kind used on e-commerce sites selling goods in Pakistani Rupees. It demonstrates reading user input, performing calculations, and updating the DOM in response to user actions.
<!-- HTML -->
<div id="calculator">
  <h3>Fabric Price Calculator (PKR)</h3>

  <label for="price-per-meter">Price per Meter (PKR):</label>
  <input type="number" id="price-per-meter" placeholder="e.g. 850" />

  <label for="meters">Meters Required:</label>
  <input type="number" id="meters" placeholder="e.g. 5" />

  <button id="calculate-btn">Calculate Total</button>

  <p id="result-display"></p>
</div>
// JavaScript

// Step 1: Select all needed elements
const calculateBtn = document.getElementById("calculate-btn");
const priceInput    = document.getElementById("price-per-meter");
const metersInput   = document.getElementById("meters");
const resultDisplay = document.getElementById("result-display");

// Step 2: Attach a click event listener to the button
calculateBtn.addEventListener("click", function() {

  // Step 3: Read values from inputs and convert to numbers
  const pricePerMeter = parseFloat(priceInput.value);
  const meters        = parseFloat(metersInput.value);

  // Step 4: Validate — check if inputs are valid numbers
  if (isNaN(pricePerMeter) || isNaN(meters) || pricePerMeter <= 0 || meters <= 0) {
    resultDisplay.textContent = "⚠️ Please enter valid positive numbers.";
    resultDisplay.style.color = "#dc3545";
    return; // Stop execution here
  }

  // Step 5: Perform the calculation
  const total = pricePerMeter * meters;

  // Step 6: Format with Pakistani number formatting and update the DOM
  const formatted = total.toLocaleString("en-PK");
  resultDisplay.textContent = `Total Cost: PKR ${formatted}`;
  resultDisplay.style.color = "#28a745";

  // Step 7: Add a CSS class for visual feedback
  resultDisplay.classList.add("result-visible");
});
Line-by-line explanation:
- Lines 3–6: We select all four DOM elements we need: two inputs, one button, and one output paragraph.
- Line 9:
addEventListener("click", ...)registers a function that fires every time the button is clicked. This is the standard, modern way to handle events. - Lines 12–13:
.valuereads the current text in an input field.parseFloat()converts it from a string to a decimal number. - Lines 16–20: Validation is critical.
isNaN()(is Not a Number) checks for invalid input. If anything is wrong, we show a warning andreturnearly to stop the calculation. - Line 23: The actual math — straightforward multiplication.
- Line 26:
toLocaleString("en-PK")formats the number with thousands separators appropriate for Pakistan (e.g., 4,250). - Line 27: We write the result directly into
resultDisplay.textContent. The user immediately sees their answer. - Line 30: We add a class for a CSS animation or highlight effect — good UX practice.
Common Mistakes & How to Avoid Them
Mistake 1: Running DOM Code Before the Page Has Loaded
This is the most common error among beginners and even intermediate developers. If your JavaScript file is linked in <head> and you try to select an element, the element does not exist yet when the script runs.
The broken code:
<head>
  <script src="app.js"></script>  <!-- ❌ Runs before body is parsed -->
</head>
<body>
  <div id="my-box">Hello</div>
</body>
// app.js
const box = document.getElementById("my-box");
box.style.color = "red";  // ❌ TypeError: Cannot set properties of null
box is null because when this script ran, the <div> had not been parsed yet.
The fixes:
<!-- Fix 1: Move <script> to just before </body> -->
<body>
  <div id="my-box">Hello</div>
  <script src="app.js"></script>  <!-- ✅ Runs after all elements exist -->
</body>
<!-- Fix 2: Add 'defer' attribute — modern recommended approach -->
<head>
  <script src="app.js" defer></script>  <!-- ✅ Defers until DOM is ready -->
</head>
// Fix 3: Wrap code in DOMContentLoaded event
document.addEventListener("DOMContentLoaded", function() {
  const box = document.getElementById("my-box");
  box.style.color = "red";  // ✅ Runs after DOM is fully loaded
});
The defer attribute (Fix 2) is the cleanest modern solution — it downloads the script in parallel but executes it only after the HTML is fully parsed.
Mistake 2: Using innerHTML with User Input (XSS Vulnerability)
innerHTML is convenient, but inserting untrusted user input through it opens your site to Cross-Site Scripting (XSS) attacks. This is a real security threat that affects Pakistani websites just as much as any other.
Dangerous code:
const userInput = `<img src="x" onerror="alert('Your site is hacked!')">`; // Malicious input
document.querySelector(".output").innerHTML = userInput;  // ❌ Executes the script!
Safe alternatives:
// ✅ Use textContent — treats everything as plain text, never executes HTML
document.querySelector(".output").textContent = userInput;  // Displays the raw text safely

// ✅ Create elements programmatically
const p = document.createElement("p");
p.textContent = userInput;   // textContent escapes all HTML characters
document.querySelector(".output").appendChild(p);
Only use innerHTML when you are inserting your own trusted HTML strings — never when the content comes from user input, URL parameters, or any external source.
Mistake 3: Forgetting that querySelectorAll Returns a NodeList, Not an Array
A NodeList looks like an array and even has a forEach method, but it is missing many array methods like map, filter, and reduce. This surprises developers who try to chain these methods.
Broken code:
const items = document.querySelectorAll(".product");
const names = items.map(item => item.textContent);  // ❌ TypeError: items.map is not a function
The fix — convert to a real Array first:
// Method 1: Array.from()
const items = Array.from(document.querySelectorAll(".product"));
const names = items.map(item => item.textContent);  // ✅ Works perfectly

// Method 2: Spread operator
const items2 = [...document.querySelectorAll(".product")];
const names2 = items2.filter(item => item.classList.contains("sale"));  // ✅ Works
Both Array.from() and the spread operator [...] are clean, modern ways to convert a NodeList into a true Array with all array methods available.
Practice Exercises
Exercise 1: Build a To-Do List
Problem: Create an interactive to-do list where users can type a task into an input field, click "Add Task", and see it appear in a list below. Each task should have a "Done" button that strikes through the text when clicked.
This is a classic exercise that tests element creation, event handling, and class toggling all at once.
Solution:
<!-- HTML -->
<div id="todo-app">
  <h3>My Tasks</h3>
  <input type="text" id="task-input" placeholder="Add a task..." />
  <button id="add-btn">Add Task</button>
  <ul id="task-list"></ul>
</div>

<style>
  .done { text-decoration: line-through; color: #888; }
  #task-list li { margin: 8px 0; display: flex; align-items: center; gap: 10px; }
</style>
const addBtn    = document.getElementById("add-btn");
const taskInput = document.getElementById("task-input");
const taskList  = document.getElementById("task-list");

// Function to add a new task
function addTask() {
  const taskText = taskInput.value.trim();  // .trim() removes whitespace

  // Do nothing if input is empty
  if (taskText === "") return;

  // Create list item
  const li = document.createElement("li");

  // Create a span for the task text
  const span = document.createElement("span");
  span.textContent = taskText;

  // Create "Done" button
  const doneBtn = document.createElement("button");
  doneBtn.textContent = "Done";
  doneBtn.addEventListener("click", function() {
    span.classList.toggle("done");  // Toggle strikethrough on click
  });

  // Assemble and insert
  li.appendChild(span);
  li.appendChild(doneBtn);
  taskList.appendChild(li);

  // Clear the input for the next task
  taskInput.value = "";
  taskInput.focus();  // Return cursor to input
}

// Listen for button click
addBtn.addEventListener("click", addTask);

// Also allow pressing Enter to add a task
taskInput.addEventListener("keypress", function(event) {
  if (event.key === "Enter") addTask();
});
What this demonstrates: Creating multiple elements and assembling them, event listeners on dynamically created elements, classList.toggle, and clearing/refocusing inputs — all in one practical example.
Exercise 2: Dynamic Product Listing with Filter
Problem: You have an array of products (clothing items sold in PKR). Display them as cards on the page. Add two buttons — "Show All" and "Show Sale Items" — that filter which cards are visible without reloading the page.
Solution:
// Data: clothing products from a Karachi fashion store
const products = [
  { name: "Lawn Suit",    price: 2500,  onSale: true  },
  { name: "Khaddar Shirt",price: 1800,  onSale: false },
  { name: "Embroidered Dupatta", price: 3200, onSale: true },
  { name: "Denim Jeans",  price: 4500,  onSale: false },
  { name: "Chiffon Saree",price: 6800,  onSale: true  },
];

const grid       = document.getElementById("products-grid");
const showAllBtn = document.getElementById("show-all");
const showSaleBtn= document.getElementById("show-sale");

// Function to render products based on a filter
function renderProducts(filter) {
  // Clear the grid first
  grid.innerHTML = "";

  // Filter the array
  const toShow = filter === "sale"
    ? products.filter(p => p.onSale)
    : products;

  // Create and insert a card for each product
  toShow.forEach(function(product) {
    const card = document.createElement("div");
    card.classList.add("product-card");
    if (product.onSale) card.classList.add("on-sale");

    card.innerHTML = `
      <h4>${product.name}</h4>
      <p>PKR ${product.price.toLocaleString("en-PK")}</p>
      ${product.onSale ? '<span class="sale-badge">SALE</span>' : ""}
    `;

    grid.appendChild(card);
  });
}

// Initial render — show everything
renderProducts("all");

// Button event listeners
showAllBtn.addEventListener("click",  () => renderProducts("all"));
showSaleBtn.addEventListener("click", () => renderProducts("sale"));
What this demonstrates: Clearing and re-rendering a section of the page, Array.filter() combined with DOM creation, conditional class addition, and template literals for building multi-line HTML strings. This exact pattern is used in real e-commerce product filter systems.
Frequently Asked Questions
What is the difference between the DOM and HTML?
HTML is the raw text markup that you write in a .html file — it is just text with angle-bracket tags. The DOM is the live, structured, object-based representation that the browser builds from that HTML and keeps in memory. When JavaScript modifies the DOM (changes a class, adds an element), the page updates instantly — but the original HTML file on the server is not changed. The DOM is the interface JavaScript uses to interact with the rendered page.
How does querySelector differ from getElementById?
getElementById is faster and simpler but only works for selecting by a single ID string. querySelector accepts any valid CSS selector — classes, IDs, attributes, pseudo-selectors, descendant combinators — making it far more flexible. In modern codebases, querySelector is preferred because its CSS-style syntax is familiar and consistent. Use getElementById when you specifically need the absolute fastest selection of a uniquely identified element and performance is critical.
Is innerHTML safe to use for DOM manipulation?
innerHTML is safe only when the content comes from your own code (trusted strings). It becomes dangerous — creating XSS security vulnerabilities — when you insert content that comes from user input, URL parameters, third-party APIs, or any source you do not fully control. For displaying user-generated text, always use textContent. For building your own trusted HTML strings programmatically, innerHTML is acceptable. When in doubt, prefer createElement + textContent — it is always safe.
What is event delegation and why does it matter?
Event delegation is a technique where instead of attaching an event listener to every individual element (like every <li> in a list), you attach a single listener to a parent element and let events bubble up to it. It is more memory-efficient and works automatically for elements added dynamically to the DOM. Example: attach one click listener to a <ul> and use event.target to determine which <li> was clicked.
Can I use DOM manipulation in frameworks like React or Vue?
In frameworks like React and Vue, you generally should not manipulate the DOM directly using the methods in this tutorial. These frameworks manage their own virtual DOM and sync it to the real DOM — manually changing the real DOM can cause the framework's state to become out of sync, leading to bugs. However, understanding the native DOM is foundational knowledge that makes you a better framework developer. React's useRef, for instance, gives you a safe, controlled way to access real DOM nodes when you genuinely need to.
Summary & Key Takeaways
Congratulations on working through this tutorial! Here is a summary of the essential points to remember:
- The DOM is a tree of objects built by the browser from your HTML. JavaScript interacts with the page by reading and modifying this tree — not the HTML file directly.
querySelectorandquerySelectorAllare the modern, flexible go-to selection tools. They accept any CSS selector, making your JavaScript consistent with your CSS knowledge.- Always modify classes instead of inline styles wherever possible. Use
classList.add(),classList.remove(), andclassList.toggle()to keep your styling logic in CSS and your JavaScript clean. - The create–configure–insert pattern (
createElement→ set content/attributes/classes →appendChild) is the safe, structured way to build new DOM nodes without security risks. - Never insert untrusted user input via
innerHTML— this is the number one DOM-related security mistake. UsetextContentfor user-generated text. - Use
deferon your script tags (or place<script>before</body>) to guarantee the DOM is fully loaded before your JavaScript tries to select elements.
Next Steps & Related Tutorials
Now that you can confidently select, create, and modify DOM elements, here are the natural next steps to keep building your JavaScript skills:
- JavaScript Events & Event Listeners — theiqra.edu.pk
Dive deep intoaddEventListener, event objects, event propagation (bubbling and capturing), and advanced patterns like event delegation. Events are the backbone of all user interaction. - JavaScript Fetch API & AJAX — theiqra.edu.pk
Learn how to load data from APIs and servers without refreshing the page, then use DOM manipulation to render that data dynamically — the core skill behind modern web apps. - CSS Transitions & JavaScript Animations — theiqra.edu.pk
Combine class toggling and inline style changes with CSS transitions to build smooth, polished UI animations — a highly valued skill for Pakistani freelance developers. - Introduction to React.js — theiqra.edu.pk
Once you are confident with the native DOM, React will feel much more intuitive. Learn how React's component model and virtual DOM build on the same concepts you have practised in this tutorial.
Written for theiqra.edu.pk | Last updated: March 2026
Have a question or found an error? Use the comments section below — our teaching team responds to every message.
Test Your Python Knowledge!
Finished reading? Take a quick quiz to see how much you've learned from this tutorial.