JavaScript Events Click Submit Mouseover & More
Introduction
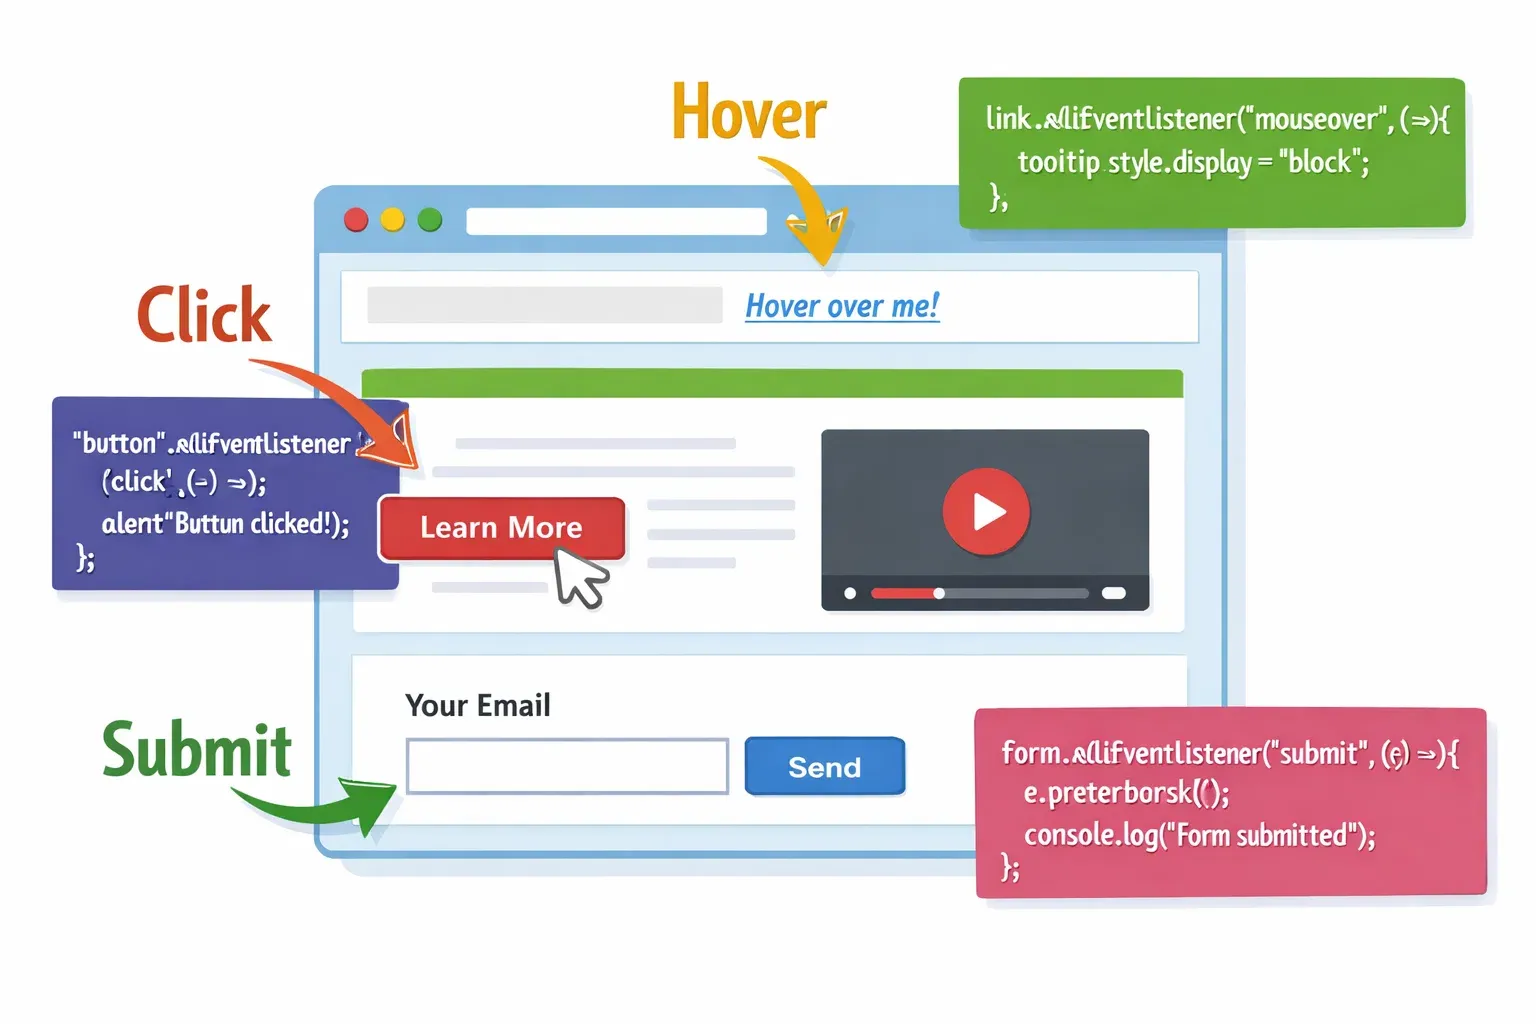
Imagine you are visiting a website and you click a button — a form appears. You hover over a menu — it expands. You submit a login form — the page validates your credentials. All of this magic happens because of JavaScript events.
A JavaScript event is an action or occurrence that happens in the browser — triggered either by the user or by the browser itself. When Ahmad clicks a button on a Pakistani e-commerce site, when Fatima submits a registration form on a university portal, or when Ali moves his mouse over a navigation menu, JavaScript is listening and responding to those actions through a system called event handling.
Events are the backbone of interactive web development. Without them, websites would be nothing more than static pages — like a book that cannot respond when you touch it. Understanding JavaScript events and event listeners is what separates a basic web page from a dynamic, responsive web application.
In this tutorial, you will learn what events are, how to listen for them, how to handle them properly, and how to use them to build real-world features you will actually need as a Pakistani developer — whether you are building a school management system in Lahore, an online store in Karachi, or a government service portal in Islamabad.
Prerequisites
Before diving into this tutorial, make sure you are comfortable with the following concepts:
- HTML Basics — You should know how to write HTML tags like
<button>,<form>,<input>, and<div>. - CSS Fundamentals — Basic styling knowledge is helpful for the visual examples.
- JavaScript Variables & Functions — You should understand
let,const, and how to define and call functions. - The DOM (Document Object Model) — You should have a basic idea that JavaScript can access and modify HTML elements. If you are new to the DOM, read our tutorial Introduction to the JavaScript DOM first.
- Basic
console.log()usage — Knowing how to open your browser's developer console (pressF12) will help you follow along.
If you are comfortable with all of the above, let's get started!
Core Concepts & Explanation
What Is a JavaScript Event?
A JavaScript event is a signal that something has happened. The browser constantly monitors the web page for interactions — mouse movements, keyboard presses, form submissions, page loads, and more. Each of these interactions fires an event.
Events are categorised into several types:
- Mouse Events —
click,dblclick,mouseover,mouseout,mousemove - Keyboard Events —
keydown,keyup,keypress - Form Events —
submit,change,focus,blur,input - Window Events —
load,resize,scroll,unload - Touch Events —
touchstart,touchend,touchmove(important for mobile users!)
Think of events like a notification system. You register your interest in a specific notification ("tell me when this button is clicked"), and when that thing happens, your code runs.
Here is a simple mental model:
USER ACTION → BROWSER FIRES EVENT → YOUR EVENT LISTENER RUNS → SOMETHING HAPPENS
For example:
Ali clicks "Buy Now" → browser fires "click" event → your function runs → item added to cart
The Three Ways to Handle Events
JavaScript gives you three different ways to attach events to elements. Understanding all three is important because you will encounter all of them in real codebases.
Method 1: Inline HTML Attribute (Oldest Method)
<button onclick="showMessage()">Click Me</button>

<script>
  function showMessage() {
    alert("Button was clicked!");
  }
</script>
This approach mixes HTML and JavaScript together. It works but is considered poor practice today because it makes your code harder to maintain. Avoid this in professional projects.
Method 2: DOM Property Assignment
<button id="myBtn">Click Me</button>

<script>
  const btn = document.getElementById("myBtn");
  btn.onclick = function() {
    alert("Button was clicked!");
  };
</script>
This is better — the JavaScript is separated from the HTML. However, the limitation is that you can only assign one handler per event this way. If you write btn.onclick = ... twice, the second one overwrites the first.
Method 3: addEventListener() — The Modern Standard
<button id="myBtn">Click Me</button>

<script>
  const btn = document.getElementById("myBtn");
  btn.addEventListener("click", function() {
    alert("Button was clicked!");
  });
</script>
This is the recommended method. It allows you to:
- Attach multiple listeners to the same event
- Remove listeners when needed with
removeEventListener() - Control event propagation (covered below)
For the rest of this tutorial, we will use addEventListener() exclusively.
Understanding the Event Object
Every time an event fires, JavaScript automatically creates an event object and passes it to your handler function. This object contains useful information about the event.
document.addEventListener("click", function(event) {
  console.log(event.type);        // "click"
  console.log(event.target);      // the element that was clicked
  console.log(event.clientX);     // X coordinate of mouse click
  console.log(event.clientY);     // Y coordinate of mouse click
});
By convention, developers name this parameter event, evt, or simply e:
btn.addEventListener("click", function(e) {
  console.log(e.target);  // same thing — "e" is short for "event"
});
Two of the most important methods on the event object are:
event.preventDefault()— Stops the browser's default behaviour (e.g., stops a form from submitting, stops a link from navigating)event.stopPropagation()— Stops the event from bubbling up to parent elements
Event Bubbling and Capturing
This is a concept that confuses many intermediate developers, so pay close attention.
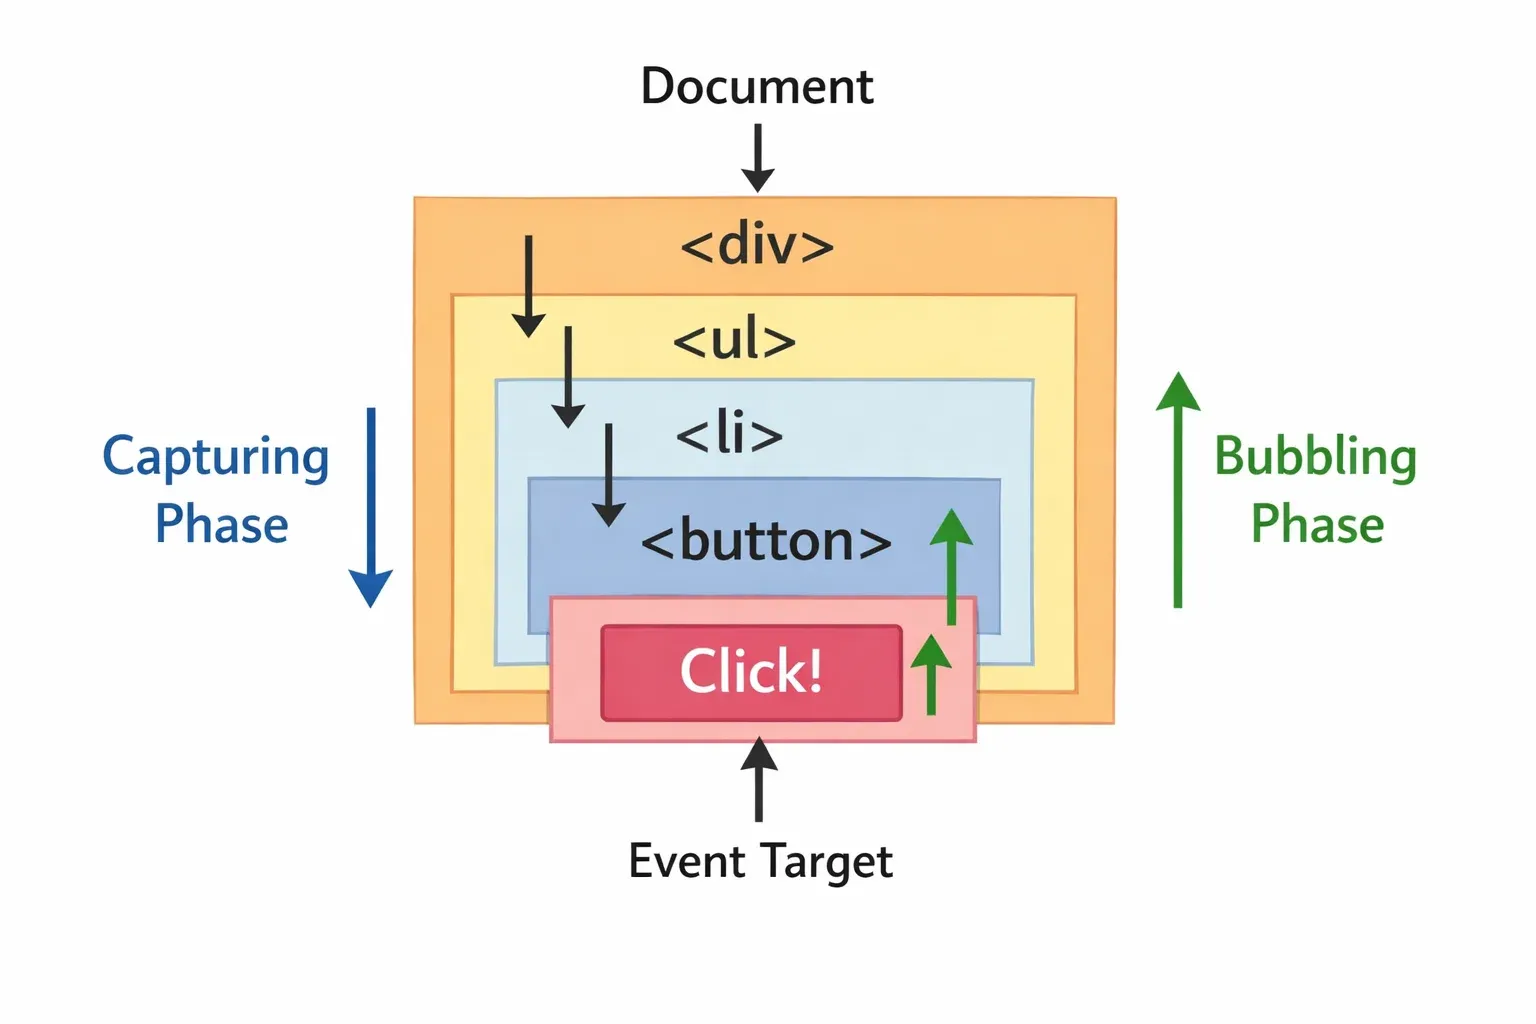
When you click a button inside a <div>, you are technically clicking both the button and the div. JavaScript handles this through a process called event propagation, which has two phases:
- Capturing Phase — The event travels down from the
documentroot to the target element - Bubbling Phase — After reaching the target, the event "bubbles" back up through all parent elements
By default, event listeners run during the bubbling phase. This means if you click a button inside a div, the button's click handler runs first, then the div's click handler runs, then the body's, and so on up to the document.
<div id="outer">
  <button id="inner">Click Me</button>
</div>

<script>
  document.getElementById("outer").addEventListener("click", function() {
    console.log("Outer div clicked");
  });

  document.getElementById("inner").addEventListener("click", function() {
    console.log("Inner button clicked");
  });
</script>
Output when button is clicked:
Inner button clicked
Outer div clicked
To stop this bubbling, use event.stopPropagation():
document.getElementById("inner").addEventListener("click", function(e) {
  e.stopPropagation();  // Stops the event from reaching the outer div
  console.log("Inner button clicked");
});
Practical Code Examples
Example 1: Building an Interactive Product Card for a Pakistani Online Store
Let's build something practical — a product card for an online store selling mobile phones, with hover effects, a click-to-expand description, and a working "Add to Cart" button with feedback.
<!DOCTYPE html>
<html lang="en">
<head>
  <meta charset="UTF-8">
  <title>Product Card Example</title>
  <style>
    .card {
      border: 1px solid #ddd;
      padding: 20px;
      width: 300px;
      font-family: Arial, sans-serif;
      cursor: pointer;
      transition: box-shadow 0.3s;
    }
    .card:hover { box-shadow: 0 4px 12px rgba(0,0,0,0.15); }
    .description { display: none; color: #666; margin-top: 10px; }
    .description.visible { display: block; }
    .add-btn {
      background: #2ecc71;
      color: white;
      border: none;
      padding: 10px 20px;
      cursor: pointer;
      margin-top: 10px;
      border-radius: 4px;
      font-size: 14px;
    }
    .feedback { color: #27ae60; font-weight: bold; display: none; margin-top: 8px; }
  </style>
</head>
<body>

  <div class="card" id="productCard">
    <h3>Samsung Galaxy A54</h3>
    <p>Price: <strong>PKR 89,999</strong></p>
    <p id="toggleHint">👆 Click to see description</p>
    <p class="description" id="desc">
      6.4-inch Super AMOLED display, 50MP main camera, 5000mAh battery.
      Available at all major mobile markets in Lahore and Karachi.
    </p>
    <button class="add-btn" id="cartBtn">Add to Cart</button>
    <p class="feedback" id="feedback">✅ Added to cart successfully!</p>
  </div>

  <script>
    // 1. Select all the elements we need
    const card = document.getElementById("productCard");
    const desc = document.getElementById("desc");
    const hint = document.getElementById("toggleHint");
    const cartBtn = document.getElementById("cartBtn");
    const feedback = document.getElementById("feedback");

    // 2. Click on the card to toggle description visibility
    card.addEventListener("click", function() {
      desc.classList.toggle("visible");
      hint.textContent = desc.classList.contains("visible")
        ? "👆 Click to hide description"
        : "👆 Click to see description";
    });

    // 3. Mouseover event — change card border color on hover
    card.addEventListener("mouseover", function() {
      card.style.borderColor = "#2ecc71";
    });

    // 4. Mouseout event — restore original border on mouse leave
    card.addEventListener("mouseout", function() {
      card.style.borderColor = "#ddd";
    });

    // 5. Cart button click — CRITICAL: stop propagation so card doesn't toggle
    cartBtn.addEventListener("click", function(e) {
      e.stopPropagation();      // Prevent the card's click handler from firing
      feedback.style.display = "block";
      cartBtn.textContent = "Added ✓";
      cartBtn.style.background = "#27ae60";
      cartBtn.disabled = true;

      // Reset after 3 seconds
      setTimeout(function() {
        feedback.style.display = "none";
        cartBtn.textContent = "Add to Cart";
        cartBtn.style.background = "#2ecc71";
        cartBtn.disabled = false;
      }, 3000);
    });
  </script>

</body>
</html>
Line-by-line explanation:
- Lines 1–8 (CSS) — Basic styles for the card, including a smooth box-shadow transition on hover.
- Line 26 (HTML) — The product card container with
id="productCard". - Line 33 (HTML) — The "Add to Cart" button that we will listen for clicks on.
- Line 38 — We select all the DOM elements using
getElementById. - Lines 44–49 — A
clicklistener on the card that toggles the.visibleCSS class on the description, showing or hiding it. - Lines 52–54 — A
mouseoverlistener that changes the border colour to green when the mouse enters the card area. - Lines 57–59 — A
mouseoutlistener that restores the grey border when the mouse leaves. - Line 63 —
e.stopPropagation()is the key line here. Without it, clicking the button would also trigger the card's click listener, accidentally toggling the description. - Lines 64–67 — We show feedback, change button text, and disable the button temporarily.
- Lines 70–74 —
setTimeoutresets everything after 3 seconds.
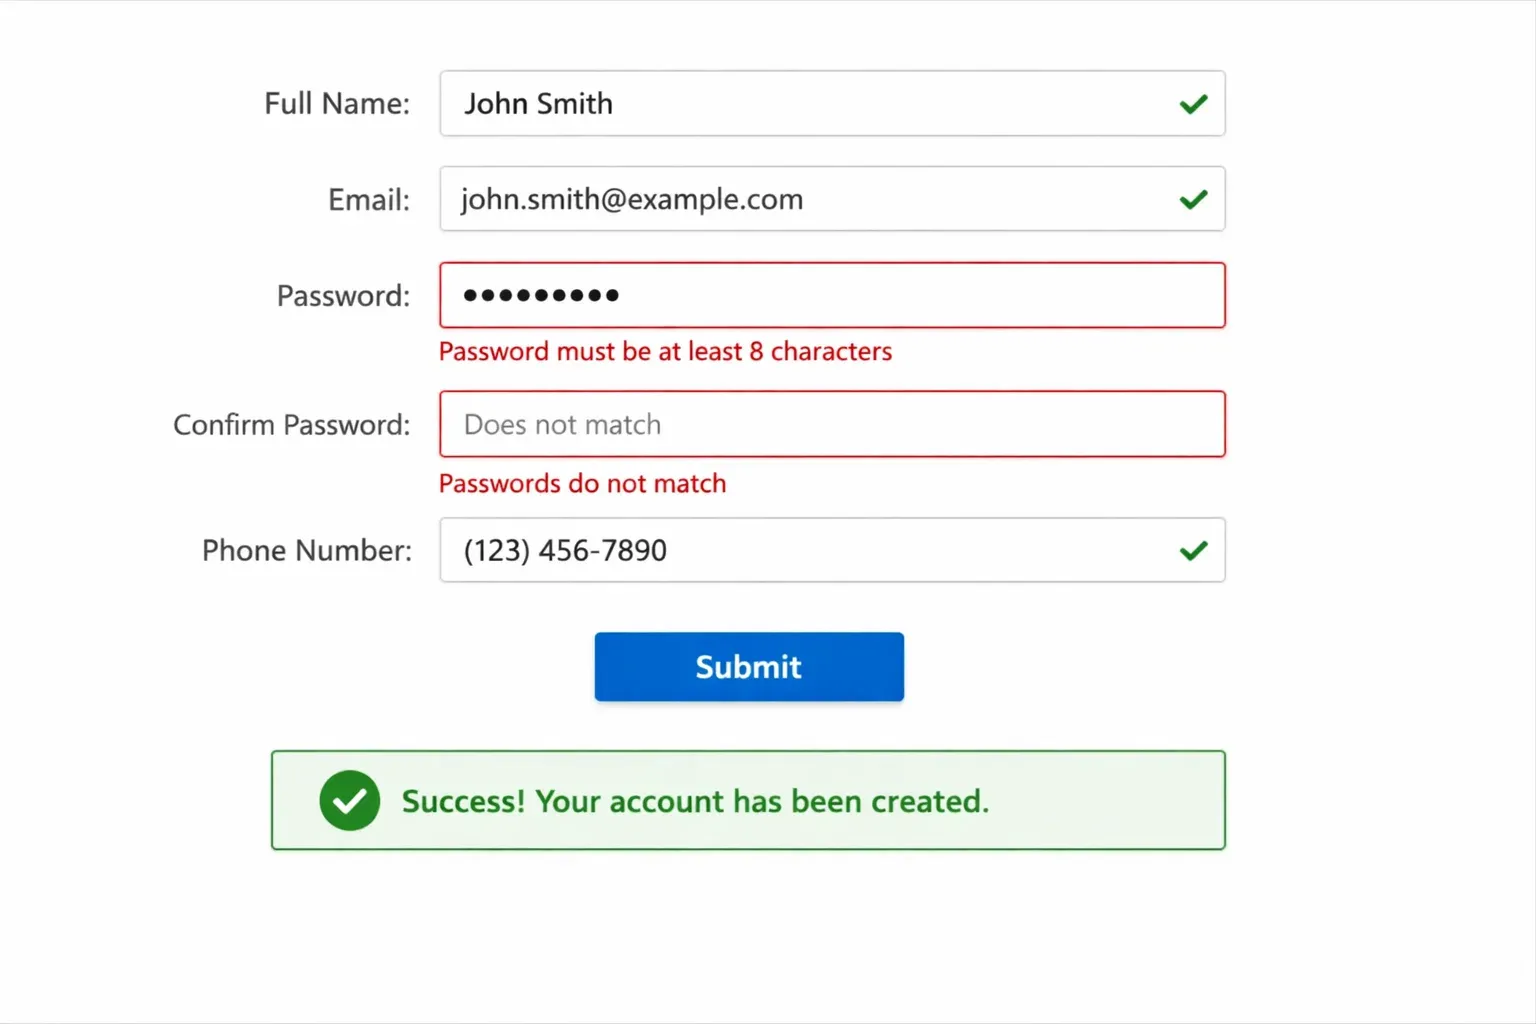
Example 2: Real-World Application — Student Registration Form with Validation
This is a practical example directly relevant to Pakistani students: a university registration form with real-time input validation using JavaScript events.
<!DOCTYPE html>
<html lang="en">
<head>
  <meta charset="UTF-8">
  <title>Student Registration — FAST University</title>
  <style>
    body { font-family: Arial, sans-serif; max-width: 500px; margin: 40px auto; padding: 20px; }
    label { display: block; margin-top: 15px; font-weight: bold; }
    input { width: 100%; padding: 8px; margin-top: 5px; border: 2px solid #ccc; border-radius: 4px; box-sizing: border-box; }
    input.valid   { border-color: #2ecc71; }
    input.invalid { border-color: #e74c3c; }
    .error { color: #e74c3c; font-size: 13px; margin-top: 4px; display: none; }
    .error.show { display: block; }
    button[type="submit"] { margin-top: 20px; background: #3498db; color: white; border: none; padding: 12px 24px; border-radius: 4px; cursor: pointer; font-size: 16px; }
    button[type="submit"]:hover { background: #2980b9; }
    #successMsg { display: none; background: #d5f5e3; border: 1px solid #2ecc71; padding: 15px; margin-top: 15px; border-radius: 4px; color: #1e8449; }
  </style>
</head>
<body>

  <h2>Student Registration</h2>
  <p>FAST-NUCES, Islamabad Campus</p>

  <form id="registrationForm" novalidate>

    <label for="studentName">Full Name</label>
    <input type="text" id="studentName" placeholder="e.g. Fatima Malik" />
    <p class="error" id="nameError">Please enter your full name (minimum 3 characters).</p>

    <label for="rollNumber">Roll Number</label>
    <input type="text" id="rollNumber" placeholder="e.g. 22L-5678" />
    <p class="error" id="rollError">Roll number must follow the format: 22L-1234</p>

    <label for="email">University Email</label>
    <input type="email" id="email" placeholder="e.g. [email protected]" />
    <p class="error" id="emailError">Please enter a valid email address.</p>

    <button type="submit">Register Now</button>
  </form>

  <div id="successMsg">
    ✅ Registration successful! Welcome to FAST-NUCES, Islamabad.
  </div>

  <script>

    // --- Helper Functions ---

    function showError(inputEl, errorEl) {
      inputEl.classList.remove("valid");
      inputEl.classList.add("invalid");
      errorEl.classList.add("show");
    }

    function showSuccess(inputEl, errorEl) {
      inputEl.classList.remove("invalid");
      inputEl.classList.add("valid");
      errorEl.classList.remove("show");
    }

    // --- Real-time validation using "input" and "blur" events ---

    // NAME: validate on every keystroke using the "input" event
    const nameInput = document.getElementById("studentName");
    const nameError = document.getElementById("nameError");

    nameInput.addEventListener("input", function() {
      if (nameInput.value.trim().length >= 3) {
        showSuccess(nameInput, nameError);
      } else {
        showError(nameInput, nameError);
      }
    });

    // ROLL NUMBER: validate when the user leaves the field using "blur"
    const rollInput = document.getElementById("rollNumber");
    const rollError = document.getElementById("rollError");
    const rollPattern = /^\d{2}[A-Z]-\d{4}$/;  // Matches: 22L-5678

    rollInput.addEventListener("blur", function() {
      if (rollPattern.test(rollInput.value)) {
        showSuccess(rollInput, rollError);
      } else {
        showError(rollInput, rollError);
      }
    });

    // EMAIL: validate on blur
    const emailInput = document.getElementById("email");
    const emailError = document.getElementById("emailError");
    const emailPattern = /^[^\s@]+@[^\s@]+\.[^\s@]+$/;

    emailInput.addEventListener("blur", function() {
      if (emailPattern.test(emailInput.value)) {
        showSuccess(emailInput, emailError);
      } else {
        showError(emailInput, emailError);
      }
    });

    // --- Form Submit Event ---

    const form = document.getElementById("registrationForm");
    const successMsg = document.getElementById("successMsg");

    form.addEventListener("submit", function(e) {
      e.preventDefault();  // STOP the browser from reloading the page

      // Re-validate all fields on submit
      const isNameValid   = nameInput.value.trim().length >= 3;
      const isRollValid   = rollPattern.test(rollInput.value);
      const isEmailValid  = emailPattern.test(emailInput.value);

      if (!isNameValid)  showError(nameInput, nameError);
      if (!isRollValid)  showError(rollInput, rollError);
      if (!isEmailValid) showError(emailInput, emailError);

      // Only proceed if ALL fields are valid
      if (isNameValid && isRollValid && isEmailValid) {
        form.style.display = "none";
        successMsg.style.display = "block";
      }
    });

  </script>

</body>
</html>
Key concepts demonstrated:
inputevent — Fires on every single keystroke. Used for the name field so the user gets instant feedback as they type.blurevent — Fires when the user clicks away from a field (loses focus). Better for roll number and email because you don't want to show an error message mid-typing.submitevent on the form — This is critical. We listen on the<form>element itself, not the button.e.preventDefault()— Without this, the browser would submit the form to a server URL and reload the page. This line stops that default behaviour.- Final re-validation on submit — Even if a user never touched a field, we validate all fields when they click "Register Now."
Common Mistakes & How to Avoid Them
Mistake 1: Forgetting event.preventDefault() on Form Submit
This is the single most common beginner mistake. When a form is submitted, the browser's default behaviour is to send the form data to a URL and reload the page. If you do not call preventDefault(), your JavaScript validation runs for a split second and then the page reloads — undoing everything.
Wrong — page reloads:
form.addEventListener("submit", function() {
  // Page reloads before this code can do anything useful
  validateForm();
});
Correct — page does not reload:
form.addEventListener("submit", function(e) {
  e.preventDefault();  // 👈 This line is essential
  validateForm();
});
Always remember: e.preventDefault() — without it, form handling in JavaScript simply does not work as expected.
Mistake 2: Using onclick Attribute Instead of addEventListener
Many tutorials online still show the inline onclick approach. It works for simple demos but causes real problems in production code.
Wrong — limits you to one handler:
<!-- Only ONE onclick handler is possible per element -->
<button onclick="doSomething()">Click</button>
Also wrong — second assignment overwrites first:
btn.onclick = function() { console.log("First handler"); };
btn.onclick = function() { console.log("Second handler"); };
// Only "Second handler" will ever run
Correct — multiple handlers, full control:
btn.addEventListener("click", function() { console.log("First handler"); });
btn.addEventListener("click", function() { console.log("Second handler"); });
// BOTH handlers run — output: "First handler", then "Second handler"
Use addEventListener for everything in professional code.
Mistake 3: Attaching Events Before the DOM Is Ready
If your <script> tag is in the <head> and you try to select an element that comes later in the <body>, the element does not exist yet when your JavaScript runs.
Wrong — element is null:
<head>
  <script>
    // ERROR: document.getElementById returns null here
    // because the button hasn't been parsed yet
    const btn = document.getElementById("myBtn");
    btn.addEventListener("click", doSomething);  // TypeError!
  </script>
</head>
<body>
  <button id="myBtn">Click</button>
</body>
Solution 1 — Put script at the bottom of <body>:
<body>
  <button id="myBtn">Click</button>
  <script>
    const btn = document.getElementById("myBtn");
    btn.addEventListener("click", doSomething);  // Works fine!
  </script>
</body>
Solution 2 — Use the DOMContentLoaded event:
<head>
  <script>
    document.addEventListener("DOMContentLoaded", function() {
      const btn = document.getElementById("myBtn");
      btn.addEventListener("click", doSomething);  // Works fine!
    });
  </script>
</head>
Practice Exercises
Exercise 1: Live Character Counter for an SMS App
Problem: Build a text area that counts characters in real time and warns the user (with a colour change) when they exceed 160 characters — the standard SMS limit. This is useful for Pakistani apps that use SMS-based notifications.
Requirements:
- Counter updates live on every keystroke
- Counter turns red when over 160 characters
- Counter displays as "X / 160"
Solution:
<!DOCTYPE html>
<html>
<head>
  <style>
    textarea { width: 100%; padding: 10px; font-size: 16px; height: 100px; }
    #counter { margin-top: 8px; font-size: 14px; color: #555; }
    #counter.over-limit { color: #e74c3c; font-weight: bold; }
  </style>
</head>
<body>

  <h3>SMS Message Composer</h3>
  <textarea id="smsText" placeholder="Type your message here..."></textarea>
  <p id="counter">0 / 160</p>

  <script>
    const textarea = document.getElementById("smsText");
    const counter  = document.getElementById("counter");

    // "input" event fires on every keystroke, paste, cut, etc.
    textarea.addEventListener("input", function() {
      const length = textarea.value.length;
      counter.textContent = length + " / 160";

      if (length > 160) {
        counter.classList.add("over-limit");
      } else {
        counter.classList.remove("over-limit");
      }
    });
  </script>

</body>
</html>
Key concepts practised: input event, dynamic text update, conditional class toggling.
Exercise 2: Keyboard Shortcut Handler
Problem: Build a page that detects keyboard shortcuts. When the user presses Ctrl + S, display "Document saved!" instead of opening the browser's save dialog. When the user presses Escape, close a notification panel.
Solution:
<!DOCTYPE html>
<html>
<head>
  <style>
    #notification {
      background: #3498db; color: white; padding: 15px 20px;
      position: fixed; top: 20px; right: 20px; border-radius: 6px;
      display: none; font-family: Arial, sans-serif;
    }
    #panel {
      background: #ecf0f1; padding: 20px; margin: 30px;
      border-radius: 8px; font-family: Arial, sans-serif;
    }
  </style>
</head>
<body>

  <div id="panel">
    <h3>Document Editor</h3>
    <p>Press <strong>Ctrl + S</strong> to save. Press <strong>Escape</strong> to dismiss notifications.</p>
    <textarea style="width:100%; height:80px; padding:8px;">Dear Ali, regarding your order of PKR 15,000...</textarea>
  </div>

  <div id="notification" id="notification">✅ Document saved!</div>

  <script>
    const notification = document.getElementById("notification");

    // keydown fires when any key is pressed
    document.addEventListener("keydown", function(e) {

      // Ctrl + S shortcut
      if (e.ctrlKey && e.key === "s") {
        e.preventDefault();  // Stops browser's "Save Page" dialog
        notification.style.display = "block";
        notification.textContent = "✅ Document saved!";

        // Auto-hide after 2 seconds
        setTimeout(function() {
          notification.style.display = "none";
        }, 2000);
      }

      // Escape key
      if (e.key === "Escape") {
        notification.style.display = "none";
      }
    });
  </script>

</body>
</html>
Key concepts practised: keydown event, e.key and e.ctrlKey properties, preventDefault() for keyboard shortcuts.
Frequently Asked Questions
What is the difference between onclick and addEventListener("click")?
Both listen for click events, but addEventListener is far more powerful. With onclick, you can only attach one handler per element — assigning it a second time overwrites the first. addEventListener lets you attach as many handlers as you need to the same event, and it also gives you control over event propagation through the optional third parameter. In modern JavaScript development, addEventListener is always preferred.
How do I remove an event listener in JavaScript?
To remove a listener, you must use removeEventListener() with a reference to the exact same named function you attached. This is why inline anonymous functions cannot be removed — you have no reference to them. Always store your handler in a named variable or function if you think you will need to remove it later. Example: btn.removeEventListener("click", myHandler) removes the handler you added with btn.addEventListener("click", myHandler).
What does event.preventDefault() actually prevent?
It prevents the browser's built-in default behaviour for that event. Different events have different defaults: a form submit event's default is to send data to a URL and reload the page; a link's click event's default is to navigate to the href; a keydown of Ctrl+S defaults to opening the browser save dialog. Calling preventDefault() cancels only that default browser action, while still allowing your own JavaScript code to run normally.
What is event delegation and why is it useful?
Event delegation is a technique where you attach a single event listener to a parent element instead of attaching separate listeners to many child elements. Since events bubble up, the parent's listener fires for all clicks on its children. This is highly efficient — for example, instead of attaching click listeners to 100 table rows, you attach one listener to the table itself and check event.target to determine which row was clicked. It also works for dynamically created elements that did not exist when the page loaded.
Why does my event listener run multiple times?
The most common reason is that addEventListener is being called inside a loop or inside another event handler, causing it to register the same function multiple times. Each call to addEventListener adds a new registration, so if you call it 5 times, the handler fires 5 times per event. Move your addEventListener calls outside of loops and functions that run repeatedly. You can also use removeEventListener before re-adding, or use the { once: true } option to automatically remove a listener after it fires once: btn.addEventListener("click", handler, { once: true }).
Summary & Key Takeaways
- Events are the core of interactivity. Everything users do in a browser — clicking, typing, hovering, submitting — fires a JavaScript event that you can listen for and respond to.
- Always use
addEventListener()instead of inlineonclickattributes or DOM property assignment. It is more flexible, supports multiple handlers, and follows modern best practices. - The event object is your friend. Every handler receives an
eparameter with crucial information:e.target(what was clicked),e.key(what key was pressed),e.preventDefault()(stops default browser behaviour), ande.stopPropagation()(stops event bubbling). event.preventDefault()is essential for forms. Without it, form submit handlers are nearly useless because the page reloads instantly.- Understand event bubbling. Events travel up through parent elements by default. Use
stopPropagation()when you need to isolate an event to a specific element, and use event delegation when you want one listener to handle many children efficiently. - Choose the right event for the job. Use
inputfor real-time feedback on every keystroke,blurfor validation when a user leaves a field,submitfor form handling,mouseover/mouseoutfor hover effects, andkeydownfor keyboard shortcuts.
Next Steps & Related Tutorials
Now that you have a solid understanding of JavaScript events, here are some recommended next steps to continue building your skills on theiqra.edu.pk:
- JavaScript DOM Manipulation — Events and the DOM go hand in hand. Learn how to dynamically create, modify, and delete HTML elements in response to user actions.
- JavaScript Fetch API & AJAX — Learn how to use the
submitevent together withfetch()to send form data to a server without reloading the page — essential for building modern Pakistani web apps. - JavaScript ES6 Arrow Functions — Simplify your event handler syntax by replacing
function(e) {}with the cleaner(e) => {}arrow function syntax. - Building a Complete Form with JavaScript Validation — A step-by-step project tutorial where you build a full student registration form for a Pakistani university — combining all the event handling skills from this tutorial into one polished project.
Have questions? Leave a comment below or join the theiqra.edu.pk community forum. Happy coding! 🚀
— theiqra.edu.pk | Pakistan's Premier Programming Education Platform
Test Your Python Knowledge!
Finished reading? Take a quick quiz to see how much you've learned from this tutorial.