Phaser js Tutorial HTML5 2D Game Framework Guide

Introduction
The phaser.js tutorial: HTML5 2D game framework guide is your complete pathway into modern html5 game development using one of the most powerful JavaScript libraries available today—Phaser.js (especially Phaser 3).
Phaser.js is an open-source framework that allows developers to create 2D browser-based games using JavaScript and HTML5 technologies like Canvas and WebGL. Whether you want to build a simple arcade game or a full-featured platformer, Phaser gives you everything: physics, animation, input handling, and more.
For Pakistani students in cities like Lahore, Karachi, and Islamabad, learning Phaser.js can open doors to:
- Freelancing opportunities (earning in USD/PKR 💰)
- Indie game development careers
- Web-based interactive projects for education or startups
With growing demand for interactive content, mastering Phaser.js can help students like Ahmad or Fatima build real-world projects—such as educational games for schools or startup prototypes.
Prerequisites
Before starting this phaser 3 tutorial, you should have:
- Basic understanding of HTML and CSS
- Intermediate knowledge of JavaScript (ES6+)
- Familiarity with concepts like:
- Variables, functions, arrays, objects
- DOM manipulation
- Basic programming logic (loops, conditions)
- A code editor (e.g., VS Code)
- Browser (Chrome recommended)
Optional but helpful:
- Basic understanding of game development concepts
- Experience with canvas or animations
Core Concepts & Explanation
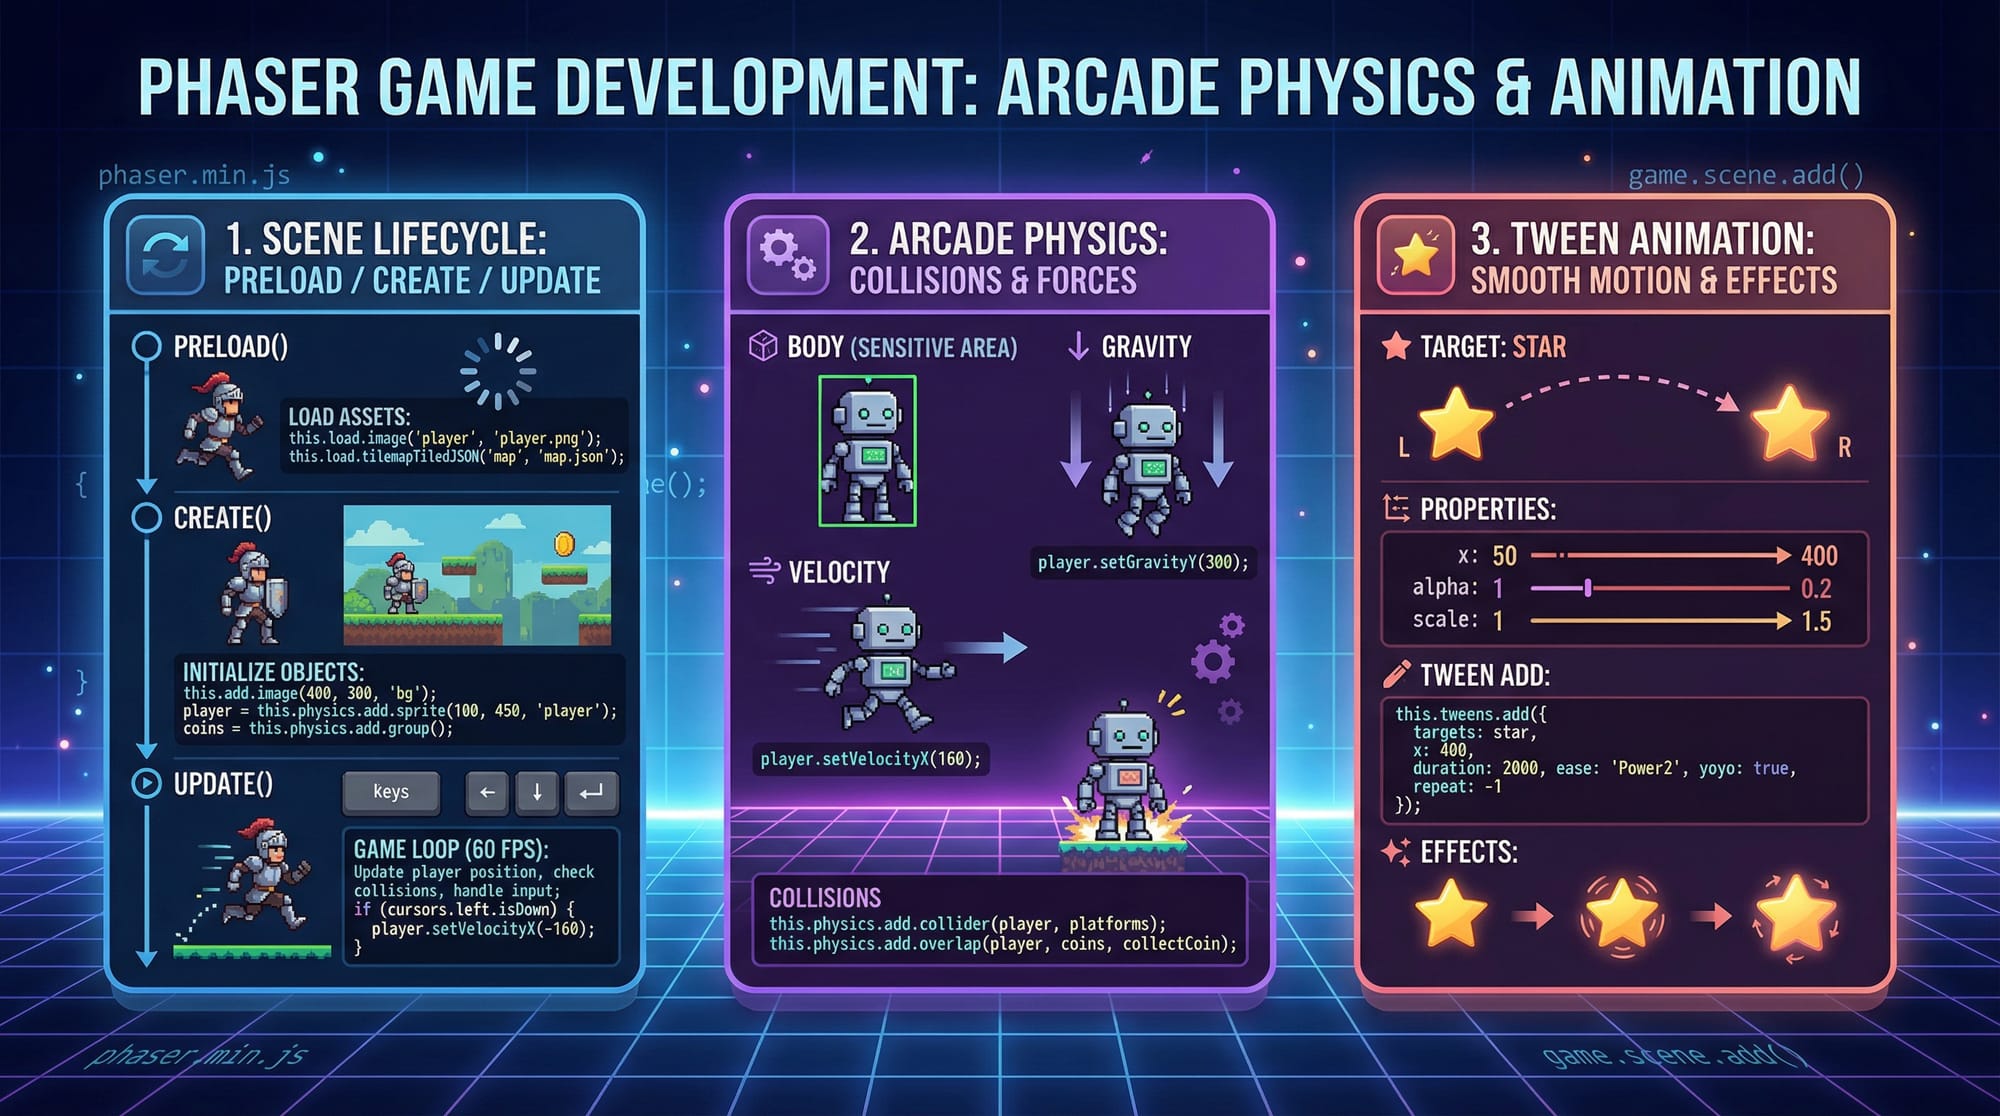
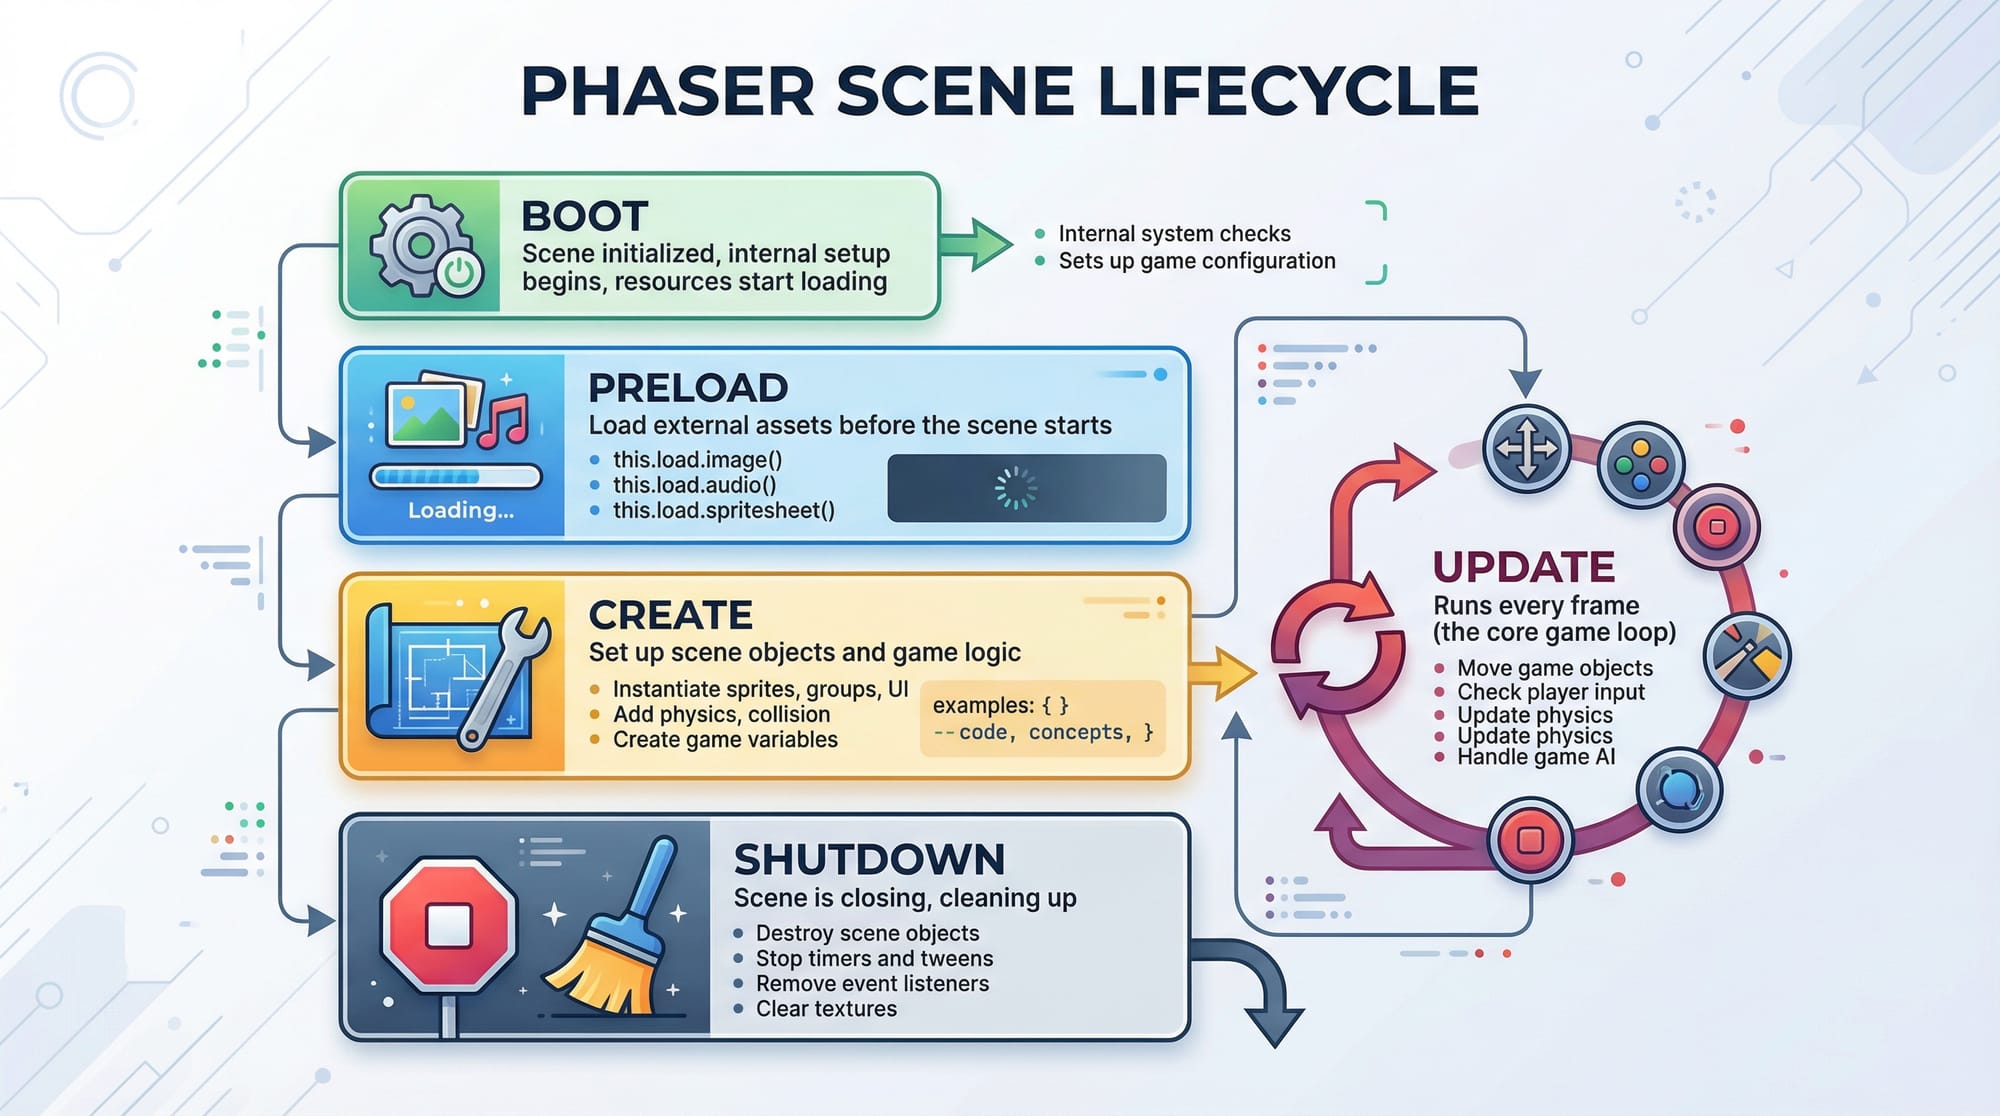
Phaser Scene System (Game Structure)
In Phaser, everything revolves around Scenes. A Scene controls what happens in a specific part of your game.
Each scene has three main lifecycle methods:
preload()→ Load assets (images, sounds)create()→ Initialize objectsupdate()→ Game loop (runs every frame)
Example:
class GameScene extends Phaser.Scene {
  constructor() {
    super({ key: 'GameScene' });
  }

  preload() {
    this.load.image('player', 'assets/player.png');
  }

  create() {
    this.player = this.add.image(100, 100, 'player');
  }

  update() {
    this.player.x += 1;
  }
}
Explanation:
class GameScene→ Defines a scenesuper()→ Registers the scenepreload()→ Loads player imagecreate()→ Adds player to screenupdate()→ Moves player every frame
Arcade Physics & Movement System
Phaser includes built-in Arcade Physics, which is lightweight and perfect for beginners.
You can:
- Add gravity
- Detect collisions
- Move characters
Example:
this.player = this.physics.add.sprite(100, 100, 'player');
this.player.setVelocityX(200);
this.player.setBounce(0.2);
this.player.setCollideWorldBounds(true);
Explanation:
physics.add.sprite()→ Adds physics-enabled spritesetVelocityX(200)→ Moves player horizontallysetBounce(0.2)→ Adds bounce effectsetCollideWorldBounds(true)→ Prevents leaving screen
Tween Animations (Smooth Effects)
Tweens allow smooth animations like movement, scaling, fading.
this.tweens.add({
  targets: this.player,
  x: 400,
  duration: 1000,
  ease: 'Power2'
});
Explanation:
targets→ Object to animatex: 400→ Move to positionduration→ Time in msease→ Animation style
Practical Code Examples
Example 1: Basic Phaser Game Setup
const config = {
  type: Phaser.AUTO,
  width: 800,
  height: 600,
  physics: {
    default: 'arcade',
    arcade: {
      gravity: { y: 300 },
      debug: false
    }
  },
  scene: {
    preload: preload,
    create: create,
    update: update
  }
};

const game = new Phaser.Game(config);

function preload() {
  this.load.image('player', 'assets/player.png');
}

function create() {
  this.player = this.physics.add.sprite(400, 300, 'player');
}

function update() {
  if (this.input.keyboard.isDown(Phaser.Input.Keyboard.KeyCodes.LEFT)) {
    this.player.setVelocityX(-160);
  } else if (this.input.keyboard.isDown(Phaser.Input.Keyboard.KeyCodes.RIGHT)) {
    this.player.setVelocityX(160);
  } else {
    this.player.setVelocityX(0);
  }
}
Line-by-line Explanation:
config→ Game configuration objecttype→ Auto chooses WebGL or Canvaswidth/height→ Game resolutionphysics→ Enables Arcade Physicsscene→ Links lifecycle functionsnew Phaser.Game()→ Starts the gamepreload()→ Loads player imagecreate()→ Creates player spriteupdate()→ Handles keyboard movement
Example 2: Real-World Application — Coin Collection Game
Let’s create a simple game where Ali collects coins to increase score.
let score = 0;

function create() {
  this.player = this.physics.add.sprite(100, 450, 'player');
  this.coins = this.physics.add.group({
    key: 'coin',
    repeat: 5,
    setXY: { x: 50, y: 0, stepX: 120 }
  });

  this.scoreText = this.add.text(16, 16, 'Score: 0', {
    fontSize: '20px',
    fill: '#fff'
  });

  this.physics.add.overlap(this.player, this.coins, collectCoin, null, this);
}

function collectCoin(player, coin) {
  coin.disableBody(true, true);
  score += 10;
  this.scoreText.setText('Score: ' + score);
}
Line-by-line Explanation:
score = 0→ Initializes scorephysics.add.sprite()→ Creates playerphysics.add.group()→ Creates multiple coinsrepeat: 5→ Creates 6 coins totalsetXY→ Positions coinsadd.text()→ Displays scoreoverlap()→ Detects player-coin collisioncollectCoin()→ Callback functiondisableBody()→ Removes collected coinscore += 10→ Increases score
💡 Real-world idea: You can adapt this for:
- Educational quiz games for schools in Islamabad
- E-commerce mini-games for startups
- Kids learning apps in Urdu
Common Mistakes & How to Avoid Them
Mistake 1: Not Preloading Assets Properly
❌ Problem:
Game crashes or shows blank screen.
this.add.image(100, 100, 'player');
✔ Fix:
Always preload assets first.
this.load.image('player', 'assets/player.png');
Mistake 2: Misusing this Context
❌ Problem:
Functions can't access scene variables.
function collectCoin() {
  this.score += 10; // error
}
✔ Fix:
Bind context properly.
this.physics.add.overlap(this.player, this.coins, collectCoin, null, this);
Practice Exercises
Exercise 1: Player Jump Mechanic
Problem: Add a jump feature using the spacebar.
Solution:
if (this.input.keyboard.isDown(Phaser.Input.Keyboard.KeyCodes.SPACE)) {
  this.player.setVelocityY(-300);
}
Explanation:
- Detects spacebar press
- Applies upward velocity
- Simulates jumping
Exercise 2: Enemy Collision Game Over
Problem: End game when player hits enemy.
Solution:
this.physics.add.collider(this.player, enemy, gameOver, null, this);

function gameOver() {
  this.physics.pause();
  this.player.setTint(0xff0000);
}
Explanation:
collider()→ Detects collisionpause()→ Stops gamesetTint()→ Changes color (visual feedback)
Frequently Asked Questions
What is Phaser.js used for?
Phaser.js is used for creating 2D games that run in web browsers. It supports physics, animation, and input systems, making it ideal for beginners and professionals alike.
How do I start learning Phaser 3?
Start by learning JavaScript basics, then follow a structured phaser.js tutorial like this one. Build small projects such as a coin collector or platformer to gain confidence.
Is Phaser.js good for freelancing in Pakistan?
Yes, many freelancers use Phaser to create browser games, ads, and educational tools. Platforms like Fiverr and Upwork offer opportunities to earn in PKR or USD.
Can I build mobile games with Phaser?
Yes, Phaser games can be wrapped using tools like Cordova or Capacitor to run on Android and iOS devices.
Do I need advanced math for Phaser?
No, basic math (coordinates, movement) is enough. Advanced math is only needed for complex physics or game mechanics.
Summary & Key Takeaways
- Phaser.js is a powerful framework for html5 game development
- Scenes (
preload,create,update) are the core structure - Arcade Physics makes movement and collisions easy
- Tween animations enhance visual experience
- Real-world projects (like coin games) build practical skills
- Avoid common mistakes like missing asset loading and incorrect context
Next Steps & Related Tutorials
To continue your journey, explore these tutorials on theiqra.edu.pk:
- Learn JavaScript fundamentals with our JavaScript Tutorial (essential for Phaser)
- Explore 3D game development with our Three.js Tutorial
- Build backend logic with Node.js for multiplayer games
- Understand animations deeply with CSS & Canvas tutorials
💡 Tip: Start building small games like:
- Endless runner (Karachi traffic theme 🚗)
- Quiz game for students (Islamabad schools)
- Puzzle game using Urdu alphabets
This phaser 3 tutorial is your starting point—now it’s your turn to build something amazing.
Test Your Python Knowledge!
Finished reading? Take a quick quiz to see how much you've learned from this tutorial.