React js Basics Components Props & JSX

Introduction
React.js has become one of the most in-demand frontend technologies in the world — and Pakistan's tech industry is no exception. Whether you are a student in Lahore looking to land your first web development job, a freelancer in Karachi building client projects, or a developer in Islamabad preparing for a role at a software house, learning React is one of the smartest investments you can make in your programming career.
React is a JavaScript library created by Meta (formerly Facebook) for building fast, interactive user interfaces. It powers some of the largest websites on the internet and is widely used at Pakistani companies like Systems Limited, Netsol Technologies, and hundreds of software houses across the country.
In this tutorial, you will learn the three core building blocks of every React application: components, JSX, and props. These concepts form the foundation of React development. Once you understand them, everything else — state management, hooks, routing — will feel much more intuitive.
By the end of this tutorial, you will be able to:
- Understand what React components are and how to write them
- Read and write JSX syntax confidently
- Pass data between components using props
- Build small, real-world UI pieces with React
Prerequisites
Before diving into this react tutorial, make sure you are comfortable with the following:
- HTML & CSS basics — You should know how to structure a webpage and apply basic styles
- JavaScript fundamentals — Variables, functions, arrays, objects, and ES6 features like arrow functions and destructuring
- Node.js and npm — You should have Node.js installed on your computer. You can download it from nodejs.org
- Basic command line usage — Running simple terminal commands like
cd,mkdir, andnpm install
If you are not yet comfortable with JavaScript, we recommend starting with our JavaScript Fundamentals for Beginners tutorial first, then coming back here.
Core Concepts & Explanation
What is JSX and Why Does React Use It?
JSX stands for JavaScript XML. It is a special syntax extension for JavaScript that allows you to write HTML-like code directly inside your JavaScript files. At first glance, it looks strange — HTML inside JavaScript? But once you get used to it, JSX makes writing UI components feel very natural and readable.
Here is a simple example of JSX:
const greeting = <h1>Assalam-o-Alaikum, Ahmad!</h1>;
This single line is JSX. It looks like HTML, but it is actually JavaScript. Behind the scenes, React converts this into a regular JavaScript function call:
const greeting = React.createElement('h1', null, 'Assalam-o-Alaikum, Ahmad!');
JSX is much easier to read than nested createElement calls, which is why the entire React community uses it.
Key JSX Rules to Remember:
- Every JSX expression must have one root element. You cannot return two sibling elements without wrapping them. Use a
<div>or React's empty tag<>...</>(called a Fragment). - Use
classNameinstead ofclass. Sinceclassis a reserved word in JavaScript, JSX usesclassNamefor CSS classes. - Close all tags. In HTML, you might write
<br>or<img>. In JSX, you must always close them:<br />and<img />. - Embed JavaScript expressions with curly braces
{}. Any valid JavaScript expression can be placed inside{}in JSX.
const studentName = "Fatima";
const age = 22;

const profile = (
  <div>
    <h2>{studentName}</h2>
    <p>Age: {age}</p>
    <p>University: {age >= 18 ? "Enrolled" : "Not enrolled"}</p>
  </div>
);
What are React Components?
A component is the heart of React. In simple terms, a component is a reusable, self-contained piece of your user interface. Think of it like a LEGO block — you build small, independent blocks and combine them to create a complete application.
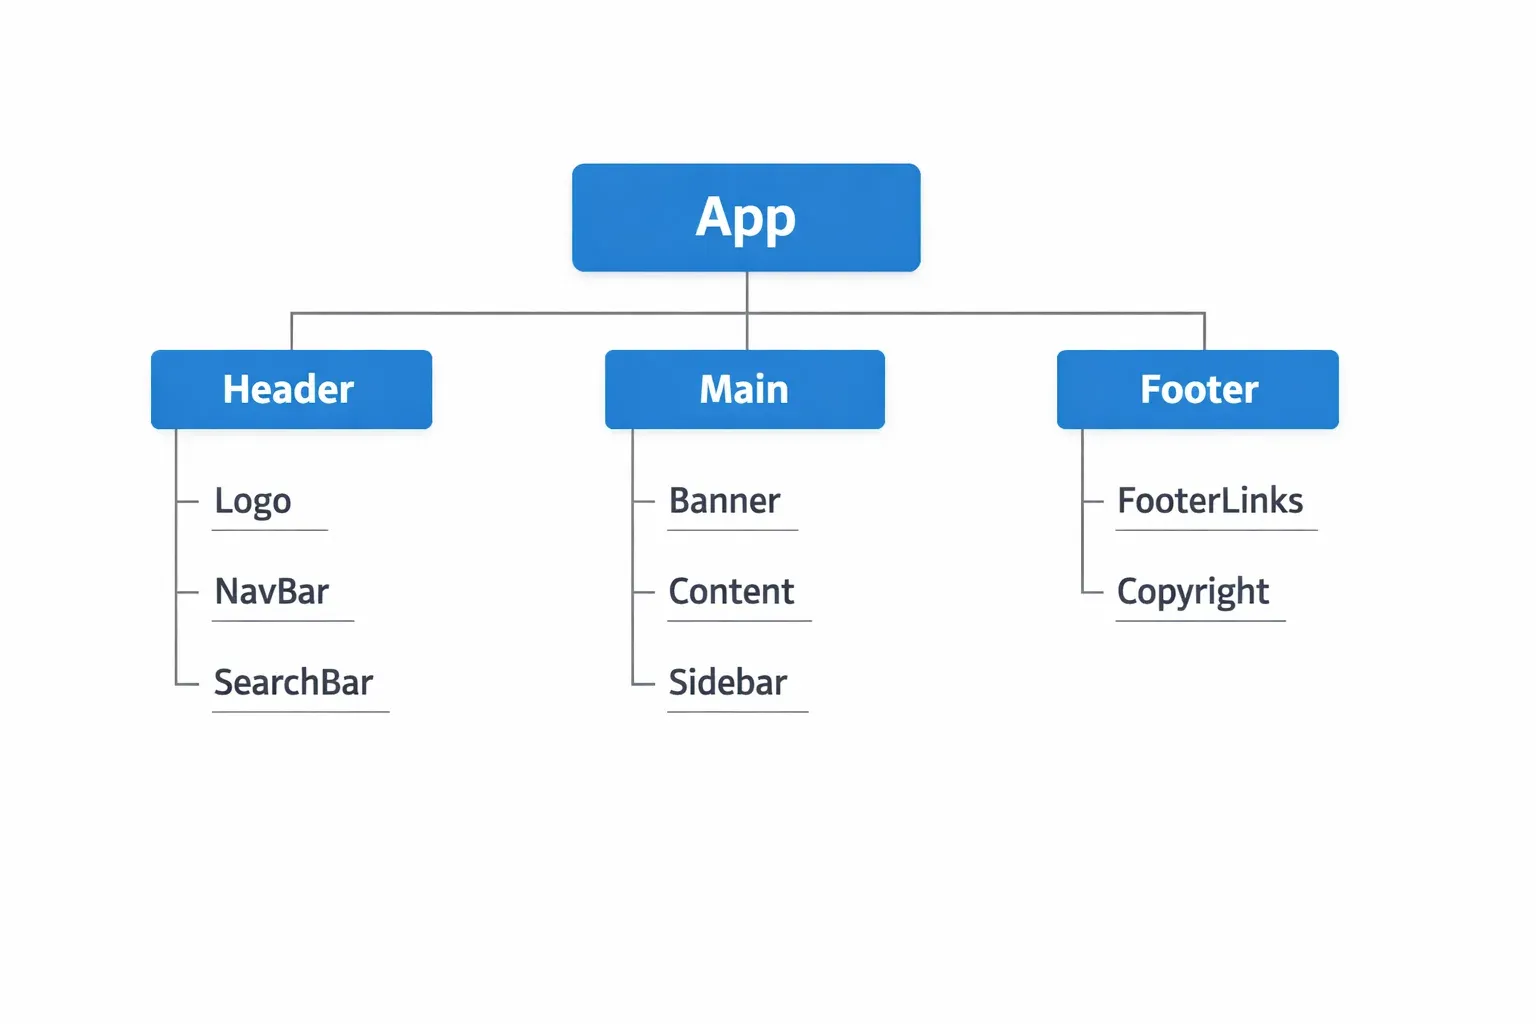
Every React application is made up of a tree of components. The topmost component is usually called App, and all other components are nested inside it.
There are two ways to write components in React:
1. Function Components (Modern — Recommended)
function WelcomeMessage() {
  return <h1>Welcome to theiqra.edu.pk!</h1>;
}
2. Class Components (Older — Still Works)
class WelcomeMessage extends React.Component {
  render() {
    return <h1>Welcome to theiqra.edu.pk!</h1>;
  }
}
Today, function components are the standard. React Hooks (introduced in React 16.8) made function components just as powerful as class components, so the entire industry has moved toward them. This tutorial will use function components throughout.
Component Naming Rules:
- Component names must start with a capital letter. React uses this to distinguish between HTML tags (lowercase) and React components (uppercase).
<button>is an HTML element.<Button>is a React component.
Composing Components:
The real power of React comes from composing multiple components together. You can use one component inside another:
function Header() {
  return <header><h1>theiqra.edu.pk</h1></header>;
}

function Footer() {
  return <footer><p>© 2025 theiqra.edu.pk — Learning for Pakistan</p></footer>;
}

function App() {
  return (
    <div>
      <Header />
      <main><p>Course content goes here.</p></main>
      <Footer />
    </div>
  );
}
Notice how App uses <Header /> and <Footer /> as if they were HTML tags. This is component composition — the core of building React applications.
Understanding React Props
Props (short for "properties") are the way you pass data from a parent component to a child component. Think of props like the parameters you pass to a function — they allow components to be dynamic and reusable instead of static and hard-coded.
Without props, every component would always show the same content. With props, you can pass different data to the same component and get different output each time.
Passing Props:
// Parent component passes props
function App() {
  return (
    <div>
      <StudentCard name="Ahmad Khan" city="Lahore" score={92} />
      <StudentCard name="Fatima Malik" city="Karachi" score={88} />
      <StudentCard name="Ali Raza" city="Islamabad" score={95} />
    </div>
  );
}
Receiving Props:
// Child component receives props as a parameter
function StudentCard(props) {
  return (
    <div className="card">
      <h2>{props.name}</h2>
      <p>City: {props.city}</p>
      <p>Score: {props.score}/100</p>
    </div>
  );
}
In this example, the StudentCard component is reused three times with different data. This is the beauty of props — write the component once, use it many times with different data.
Destructuring Props (Cleaner Syntax):
Most developers use destructuring to make prop access cleaner:
function StudentCard({ name, city, score }) {
  return (
    <div className="card">
      <h2>{name}</h2>
      <p>City: {city}</p>
      <p>Score: {score}/100</p>
    </div>
  );
}
This is functionally identical to using props.name, but it is easier to read, especially when you have many props.
Default Props:
You can define default values for props using default parameter syntax:
function PriceTag({ item, price = 0, currency = "PKR" }) {
  return (
    <div>
      <span>{item}</span>
      <strong>{currency} {price.toLocaleString()}</strong>
    </div>
  );
}

// Usage:
<PriceTag item="Python Course" price={4999} />
// Renders: Python Course — PKR 4,999
// currency defaults to "PKR" if not provided
Important: Props are Read-Only
A core rule in React is that a component must never modify its own props. Props flow in one direction — from parent to child — and the child should treat them as immutable. If you need to change data, that is what React State is for (covered in a later tutorial).
Practical Code Examples
Example 1: Building a Course Card Component
Let's build something realistic — a course listing card like you might see on an educational platform. This example combines JSX, components, and props together.
// CourseCard.jsx

function CourseCard({ title, instructor, duration, price, level }) {
  // Determine badge color based on difficulty level
  const levelColor = {
    Beginner: "green",
    Intermediate: "orange",
    Advanced: "red"
  };

  return (
    <div className="course-card">
      {/* Course header */}
      <div className="course-header">
        <h3 className="course-title">{title}</h3>
        <span
          className="level-badge"
          style={{ backgroundColor: levelColor[level] }}
        >
          {level}
        </span>
      </div>

      {/* Course details */}
      <div className="course-details">
        <p><strong>Instructor:</strong> {instructor}</p>
        <p><strong>Duration:</strong> {duration}</p>
      </div>

      {/* Price and CTA */}
      <div className="course-footer">
        <span className="price">PKR {price.toLocaleString()}</span>
        <button className="enroll-btn">Enroll Now</button>
      </div>
    </div>
  );
}

// App.jsx — Using CourseCard

function App() {
  return (
    <div className="course-grid">
      <CourseCard
        title="React.js for Beginners"
        instructor="Usman Ahmed"
        duration="12 hours"
        price={3499}
        level="Beginner"
      />
      <CourseCard
        title="Advanced JavaScript"
        instructor="Sara Qureshi"
        duration="18 hours"
        price={5999}
        level="Advanced"
      />
      <CourseCard
        title="Python & Django"
        instructor="Bilal Hassan"
        duration="20 hours"
        price={4999}
        level="Intermediate"
      />
    </div>
  );
}

export default App;
Line-by-Line Explanation:
- Line 3 —
CourseCardis a function component. It uses destructuring to receive 5 props:title,instructor,duration,price, andlevel. - Lines 6–10 — We create a
levelColorobject that maps difficulty levels to colors. This lets us dynamically style the badge. - Line 14 — The outer
<div>is the card container.className="course-card"applies CSS styling. - Line 16 —
{title}embeds thetitleprop inside the heading. The curly braces tell JSX to evaluate this as JavaScript. - Lines 17–21 — The
styleprop accepts a JavaScript object (notice double curly braces — outer for JSX expression, inner for the object). We dynamically setbackgroundColorbased on the level. - Line 30 —
price.toLocaleString()formats the number with commas:3499becomes3,499. - Lines 39–53 — In
App, we render threeCourseCardcomponents with different prop values. React renders each independently.
Example 2: Real-World Application — Student Results Dashboard
Here is a more complete example: a student results display that a Pakistani school or university might use. This demonstrates rendering lists of components from data arrays — a very common real-world pattern.
// resultsData.js — Your data (normally from an API)
const studentResults = [
  { id: 1, name: "Ahmad Khan",   subject: "Mathematics", marks: 87, total: 100 },
  { id: 2, name: "Fatima Noor",  subject: "Physics",     marks: 92, total: 100 },
  { id: 3, name: "Ali Hussain",  subject: "Computer Science", marks: 95, total: 100 },
  { id: 4, name: "Zara Sheikh",  subject: "English",     marks: 78, total: 100 },
  { id: 5, name: "Omar Farooq",  subject: "Chemistry",   marks: 83, total: 100 },
];

// ResultRow.jsx — Component for a single row
function ResultRow({ name, subject, marks, total }) {
  const percentage = ((marks / total) * 100).toFixed(1);
  const grade = percentage >= 90 ? "A+" :
                percentage >= 80 ? "A"  :
                percentage >= 70 ? "B"  :
                percentage >= 60 ? "C"  : "F";

  const rowStyle = {
    backgroundColor: grade === "F" ? "#ffe6e6" : "white"
  };

  return (
    <tr style={rowStyle}>
      <td>{name}</td>
      <td>{subject}</td>
      <td>{marks}/{total}</td>
      <td>{percentage}%</td>
      <td><strong>{grade}</strong></td>
    </tr>
  );
}

// ResultsTable.jsx — Parent component that renders all rows
function ResultsTable({ results }) {
  return (
    <div className="results-container">
      <h2>Exam Results — Spring 2025</h2>
      <table className="results-table">
        <thead>
          <tr>
            <th>Student Name</th>
            <th>Subject</th>
            <th>Marks</th>
            <th>Percentage</th>
            <th>Grade</th>
          </tr>
        </thead>
        <tbody>
          {results.map((student) => (
            <ResultRow
              key={student.id}
              name={student.name}
              subject={student.subject}
              marks={student.marks}
              total={student.total}
            />
          ))}
        </tbody>
      </table>
    </div>
  );
}

// App.jsx
function App() {
  return <ResultsTable results={studentResults} />;
}

export default App;
Key Concepts in This Example:
results.map()— One of the most important patterns in React. The.map()function transforms each item in the array into aResultRowcomponent. React renders all of them.key={student.id}— Whenever you render a list in React, each item needs a uniquekeyprop. React uses this to efficiently update the DOM when data changes. Always use a stable, unique identifier (like a database ID) as the key.- Conditional logic in JSX — The ternary operators for
gradeandrowStyleshow how to write conditional rendering and styling inside JSX without needingifstatements. - Passing the full array as a prop —
ResultsTablereceives the entireresultsarray as a single prop and maps over it internally. This is a clean separation of concerns.
Common Mistakes & How to Avoid Them
Mistake 1: Missing the key Prop in Lists
The Problem:
// ❌ WRONG — No key prop
function StudentList({ students }) {
  return (
    <ul>
      {students.map((student) => (
        <li>{student.name}</li>  // React warning: Each child needs a unique key
      ))}
    </ul>
  );
}
When you forget the key prop on list items, React shows a warning in the console and may behave unexpectedly when the list is updated, filtered, or reordered.
The Fix:
// ✅ CORRECT — Use a unique key
function StudentList({ students }) {
  return (
    <ul>
      {students.map((student) => (
        <li key={student.id}>{student.name}</li>
      ))}
    </ul>
  );
}
Always use a stable, unique identifier as the key. If your data has an id field (from a database), use that. Avoid using the array index (like key={index}) because if items are reordered or deleted, React can get confused.
Mistake 2: Mutating Props Inside a Component
The Problem:
// ❌ WRONG — Trying to change a prop directly
function DiscountPrice({ price }) {
  price = price * 0.9;  // This seems to work, but it's wrong!
  return <span>PKR {price}</span>;
}
Props should never be modified. Even though JavaScript lets you reassign the parameter, it goes against React's data flow principles. It makes your components unpredictable and difficult to debug.
The Fix:
// ✅ CORRECT — Create a new variable, don't mutate the prop
function DiscountPrice({ price }) {
  const discountedPrice = price * 0.9;  // New variable, original prop unchanged
  return <span>PKR {discountedPrice}</span>;
}
If you need to transform prop data, always create a new variable. This keeps the component pure and predictable.
Mistake 3: Using class Instead of className
The Problem:
// ❌ WRONG — 'class' is a reserved JavaScript keyword
function Button({ label }) {
  return <button class="primary-btn">{label}</button>;
}
// React warns: Invalid DOM property 'class'. Did you mean 'className'?
The Fix:
// ✅ CORRECT — Use className in JSX
function Button({ label }) {
  return <button className="primary-btn">{label}</button>;
}
Similarly, use htmlFor instead of for on <label> elements in JSX.
Practice Exercises
Exercise 1: Build a Product Card for an Online Store
Problem: You are building a small e-commerce website for a Pakistani online store. Create a ProductCard component that accepts the following props:
productName(string) — e.g., "Shalwar Kameez"price(number) — in PKRinStock(boolean) — whether the item is availablerating(number) — out of 5
The component should:
- Display the product name and price (formatted with PKR)
- Show "In Stock" in green or "Out of Stock" in red based on
inStock - Display star rating as a number out of 5
Solution:
function ProductCard({ productName, price, inStock, rating }) {
  const stockStyle = {
    color: inStock ? "green" : "red",
    fontWeight: "bold"
  };

  return (
    <div className="product-card">
      <h3>{productName}</h3>
      <p className="price">PKR {price.toLocaleString()}</p>
      <p style={stockStyle}>
        {inStock ? "✓ In Stock" : "✗ Out of Stock"}
      </p>
      <p>⭐ {rating}/5</p>
      <button disabled={!inStock}>
        {inStock ? "Add to Cart" : "Notify Me"}
      </button>
    </div>
  );
}

// Test it:
function App() {
  return (
    <div>
      <ProductCard
        productName="Shalwar Kameez (White)"
        price={2500}
        inStock={true}
        rating={4.5}
      />
      <ProductCard
        productName="Embroidered Dupatta"
        price={1800}
        inStock={false}
        rating={4.2}
      />
    </div>
  );
}
Exercise 2: Render a Dynamic Navigation Menu
Problem: Create a NavBar component that accepts a links prop — an array of objects, each with a label and href. Render each link as an <a> tag inside a <nav>.
Solution:
// Data to pass as a prop
const menuLinks = [
  { id: 1, label: "Home",     href: "/" },
  { id: 2, label: "Courses",  href: "/courses" },
  { id: 3, label: "Blog",     href: "/blog" },
  { id: 4, label: "Contact",  href: "/contact" },
];

// NavLink — renders a single link
function NavLink({ label, href }) {
  return (
    <li>
      <a href={href} className="nav-link">{label}</a>
    </li>
  );
}

// NavBar — renders all links
function NavBar({ links }) {
  return (
    <nav className="navbar">
      <ul className="nav-list">
        {links.map((link) => (
          <NavLink
            key={link.id}
            label={link.label}
            href={link.href}
          />
        ))}
      </ul>
    </nav>
  );
}

// App
function App() {
  return <NavBar links={menuLinks} />;
}
Notice how this example has three levels of components: App → NavBar → NavLink. This is called a component hierarchy, and it is how most real React applications are structured.
Frequently Asked Questions
What is the difference between React and a framework like Angular or Vue?
React is technically a library, not a full framework. It handles only the view layer — building and updating the UI. Angular is a complete framework that includes routing, forms, HTTP, and more out of the box. Vue sits somewhere in between. React's advantage is its flexibility: you choose your own tools for routing (React Router), state management (Redux or Zustand), and so on. This makes React very popular for both small and large applications.
Do I need to use JSX to write React?
JSX is technically optional — React can be written with plain React.createElement() calls. However, JSX is the universal standard in the React community because it is far more readable and maintainable. Almost every React tutorial, job, and project you encounter will use JSX. There is no practical reason to avoid it.
How are props different from state in React?
Props are data passed into a component from its parent. They are external and read-only from the component's perspective. State is data that lives inside a component and can change over time (for example, whether a dropdown is open, or what text a user has typed). You will learn about state in the next tutorial using the useState hook. A useful mental model: props are like function arguments, state is like local variables inside the function.
Can a child component send data back to its parent?
Not directly via props, since props only flow downward (parent to child). However, a parent can pass a callback function as a prop to the child. The child can then call that function and pass data back up. This pattern is called "lifting state up" and it is a fundamental React technique covered in our React State & Event Handling tutorial.
Is React good for job opportunities in Pakistan?
Absolutely. React is one of the most requested frontend skills in Pakistani tech job listings on platforms like Rozee.pk and LinkedIn. Software houses in Lahore, Karachi, and Islamabad actively hire React developers, and React knowledge is also highly valuable for freelancing on platforms like Upwork and Fiverr. Learning React opens doors to both local employment and international remote work.
Summary & Key Takeaways
Here is a quick recap of everything covered in this react tutorial:
- JSX is a syntax extension that lets you write HTML-like code inside JavaScript. It gets compiled to
React.createElement()calls. Always useclassNameinstead ofclass, close all tags, and use{}to embed JavaScript expressions. - Components are the building blocks of React applications. A component is a JavaScript function that returns JSX. Name components with a capital letter, and compose them together to build complex UIs.
- Props are how you pass data from parent components to child components. They make components reusable and dynamic. Always treat props as read-only — never mutate them inside the receiving component.
- Lists in React should be rendered using
.map(), and each list item must have a uniquekeyprop to help React efficiently update the DOM. - Component hierarchy — real React apps are made of many nested components. Think of your UI as a tree, with a root
Appcomponent and smaller, more specific components below it. - Function components are the modern standard — use them instead of class components for all new React code.
Next Steps & Related Tutorials
Now that you have a solid foundation in React components, JSX, and props, you are ready to explore more advanced topics. Here are the recommended next steps available on theiqra.edu.pk:
- React State & the useState Hook — Learn how to make your components dynamic and interactive by managing data that changes over time. This is the natural next step after props.
- React Event Handling & Forms — Discover how to handle button clicks, form submissions, and user input in React. You will build a complete form with validation.
- JavaScript ES6 Features Every React Developer Needs — A focused review of destructuring, spread operators, arrow functions, and template literals as they apply to React development.
- React Router: Building Multi-Page Applications — Once you are comfortable with components and state, learn how to add navigation and multiple pages to your React application using React Router.
Keep practicing, build small projects, and remember — every senior React developer in Pakistan started exactly where you are right now. Keep going!
Tutorial published on theiqra.edu.pk — Pakistan's trusted platform for programming education.
Test Your Python Knowledge!
Finished reading? Take a quick quiz to see how much you've learned from this tutorial.