Building a Complete React Project Todo App

Introduction
Building a complete React project is one of the most valuable skills you can develop as a Pakistani programmer entering the global tech industry. React, developed by Facebook (now Meta), has become the dominant JavaScript library for building user interfaces, powering applications for companies ranging from startups in Lahore to tech giants in Silicon Valley. When you learn to build a React project from scratch, you are not just learning syntax—you are mastering an entire ecosystem of tools, patterns, and best practices that employers actively seek in candidates from Karachi to Islamabad.
For Pakistani students, understanding how to build a complete React application opens doors to freelance opportunities on platforms like Upwork and Fiverr, remote positions with international companies, and local employment at growing tech firms in cities like Lahore, Karachi, and Islamabad. Many Pakistani developers, including Ahmad and Fatima from Lahore's tech hub, have built successful careers by mastering React fundamentals through hands-on project experience. The Todo application we will build together represents more than just a simple project—it encapsulates the core concepts you need to understand for professional React development.
This tutorial will guide you through creating a fully functional Todo application using React best practices. You will learn component architecture, state management, event handling, and proper code organization—skills that transfer directly to real-world projects. Whether you are a student at a university in Punjab or a self-taught developer in Sindh, this comprehensive guide will equip you with practical knowledge you can immediately apply to your portfolio.
Prerequisites
Before diving into this React tutorial project, you should have a solid foundation in several key areas. Think of these prerequisites as the tools in your development toolkit—having them ready will ensure you can focus on learning React concepts rather than struggling with basic JavaScript syntax. Students from Pakistani universities like FAST, NUST, and LUMS typically cover these topics in their early programming courses, but self-taught developers may need to review some concepts.
• HTML Fundamentals: Understanding of HTML elements, attributes, and document structure. You should be comfortable with semantic HTML tags, forms, and basic accessibility concepts.
• CSS Styling: Basic knowledge of CSS selectors, properties, flexbox, and responsive design principles. Experience with CSS frameworks like Bootstrap or Tailwind is helpful but not required.
• JavaScript ES6+: Proficiency with modern JavaScript including arrow functions, destructuring, template literals, spread operator, and modules. Understanding of asynchronous programming with promises and async/await is essential.
• Node.js and npm: Basic familiarity with Node.js runtime and npm (Node Package Manager) for installing dependencies. If you have not installed Node.js, download it from nodejs.org before starting.
• Command Line Basics: Comfort with terminal commands for navigating directories, creating files, and running scripts. Pakistani developers using Windows should be familiar with PowerShell or Command Prompt, while macOS and Linux users should know basic bash commands.
If you need to strengthen any of these areas, theiqra.edu.pk offers excellent foundational tutorials on JavaScript ES6 features and HTML/CSS basics that you can complete before this tutorial. Remember, building a strong foundation now will save you countless hours of confusion later.
Core Concepts & Explanation
Understanding Component-Based Architecture
React's component-based architecture is the foundation upon which all React applications are built. Think of components as reusable building blocks—similar to how a house in Lahore might be constructed from individual bricks, tiles, and windows, a React application is constructed from individual components. Each component is responsible for rendering a specific piece of the user interface and managing its own state and behavior. This modular approach makes code more maintainable, testable, and reusable across different parts of your application.
In our Todo application, we will create multiple components working together seamlessly. The App component will serve as the main container, the TodoList component will display all tasks, the TodoItem component will represent individual tasks, and the TodoForm component will handle new task creation. This separation of concerns follows React best practices and makes our code easier to understand and modify. When Ali, a developer from Karachi, needs to add a new feature to the application, he can focus on the specific component that needs modification without affecting other parts of the system.
Components in React can be either functional or class-based. Modern React development strongly favors functional components because they are simpler, easier to test, and work beautifully with React Hooks. We will use functional components throughout this tutorial, which is the industry standard for new React projects. Functional components are essentially JavaScript functions that return JSX (JavaScript XML), which describes what the UI should look like.
State Management Fundamentals
State management is at the heart of every React application, and understanding it thoroughly will distinguish you as a competent React developer. State represents the data that can change over time in your application—when state changes, React automatically re-renders the affected components to reflect those changes in the user interface. In our Todo application, state includes the list of tasks, the text of a new task being typed, and filter settings that determine which tasks are visible.
React provides the useState hook for managing component state. When Fatima, a student from Islamabad, calls useState in her component, she gets back two things: the current state value and a function to update that state. This is fundamentally different from regular JavaScript variables because React tracks state changes and triggers re-renders when state updates. Consider how a todo list works: when Ahmad adds a new task, the state must update to include that task, and React must re-render the list to show the new item.
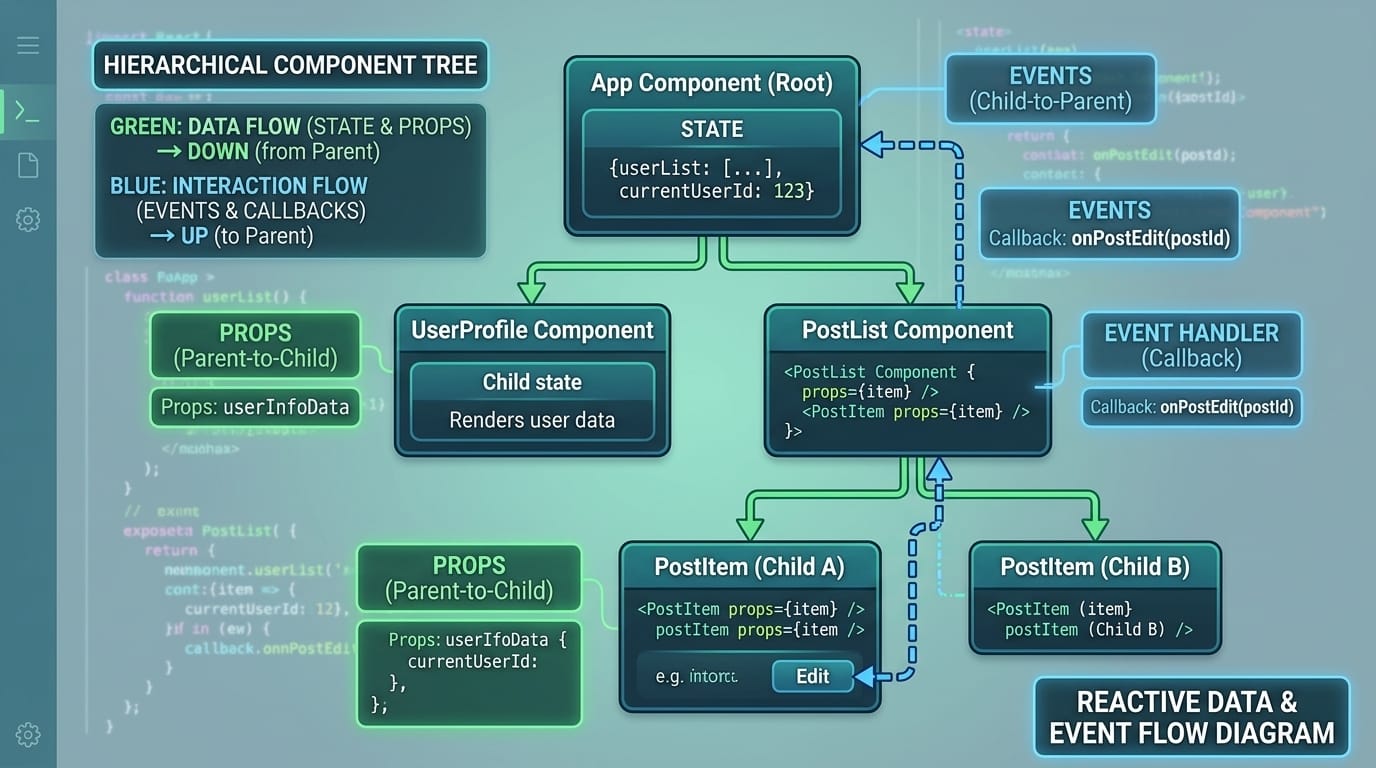
Understanding the difference between props and state is crucial for React development. Props (short for properties) are passed down from parent components to child components and cannot be modified by the child—they are read-only. State, on the other hand, is managed within a component and can be updated using the setter function provided by useState. This unidirectional data flow—where data flows down through props and actions flow up through event handlers—is a core React principle that makes applications predictable and easier to debug.
Practical Code Examples
Example 1: Setting Up the Project Structure
Let us begin by creating the project structure for our Todo application. We will use Create React App, which sets up a modern development environment with all the necessary tools configured for you. Open your terminal and navigate to the directory where you want to create your project, then run the following command:
npx create-react-app todo-app
This command creates a new React application in a folder called "todo-app" with all the necessary configuration files. Once the installation completes, navigate into the project directory and start the development server:
cd todo-app npm start
Your default browser should open automatically showing the React welcome page at localhost:3000. Now let us examine the main App component file. Open src/App.js in your code editor and replace its contents with the following code:
// src/App.js - Main Application Component import React, { useState } from 'react'; import './App.css'; function App() { // State for storing all todo items const [todos, setTodos] = useState([]); // State for the input field value const [inputValue, setInputValue] = useState(''); return ( <div className="app-container"> <h1>My Todo App</h1> {/* Todo form will go here */} {/* Todo list will go here */} </div> ); } export default App;
Line-by-line explanation: Line 1 imports React and the useState hook from the React library. The useState hook is essential for managing component state in functional components. Line 2 imports our CSS file for styling. Line 4 declares our App component as a function that returns JSX. Lines 6-7 use the useState hook to create two state variables: todos (an array that will hold all our tasks) and inputValue (a string that stores what the user is currently typing). Each useState call returns an array with two elements—the current value and a function to update it. Lines 9-14 return JSX that describes what our component should render. The curly braces in lines 6-7 are array destructuring, a JavaScript ES6 feature.
Example 2: Building the Complete Todo Component
Now let us build the complete Todo application with all the essential functionality: adding tasks, marking them complete, and deleting them. This real-world example demonstrates how Pakistani developers structure production-ready React code. We will create a complete working application that you can use as a portfolio piece.
// src/App.js - Complete Todo Application import React, { useState } from 'react'; import './App.css'; function App() { const [todos, setTodos] = useState([]); const [inputValue, setInputValue] = useState(''); // Function to add a new todo item const addTodo = () => { if (inputValue.trim() === '') return; // Prevent empty tasks const newTodo = { id: Date.now(), // Unique identifier using timestamp text: inputValue, completed: false, createdAt: new Date().toLocaleDateString('en-PK') }; setTodos([...todos, newTodo]); // Add new todo to array setInputValue(''); // Clear input field }; // Function to toggle completion status const toggleComplete = (id) => { setTodos(todos.map(todo => todo.id === id ? { ...todo, completed: !todo.completed } : todo )); }; // Function to delete a todo item const deleteTodo = (id) => { setTodos(todos.filter(todo => todo.id !== id)); }; // Handle Enter key press const handleKeyPress = (e) => { if (e.key === 'Enter') { addTodo(); } }; return ( <div className="app-container"> <h1>Todo App - Built by Ahmad from Lahore</h1> <div className="input-section"> <input type="text" value={inputValue} onChange={(e) => setInputValue(e.target.value)} onKeyPress={handleKeyPress} placeholder="What needs to be done?" className="todo-input" /> <button onClick={addTodo} className="add-btn"> Add Task </button> </div> <div className="todo-list"> {todos.length === 0 ? ( <p className="empty-message">No tasks yet. Add one above!</p> ) : ( todos.map(todo => ( <div key={todo.id} className={`todo-item ${todo.completed ? 'completed' : ''}`}> <input type="checkbox" checked={todo.completed} onChange={() => toggleComplete(todo.id)} /> <span className="todo-text">{todo.text}</span> <span className="todo-date">{todo.createdAt}</span> <button onClick={() => deleteTodo(todo.id)} className="delete-btn" > Delete </button> </div> )) )} </div> <div className="stats"> <p>Total tasks: {todos.length}</p> <p>Completed: {todos.filter(t => t.completed).length}</p> </div> </div> ); } export default App;
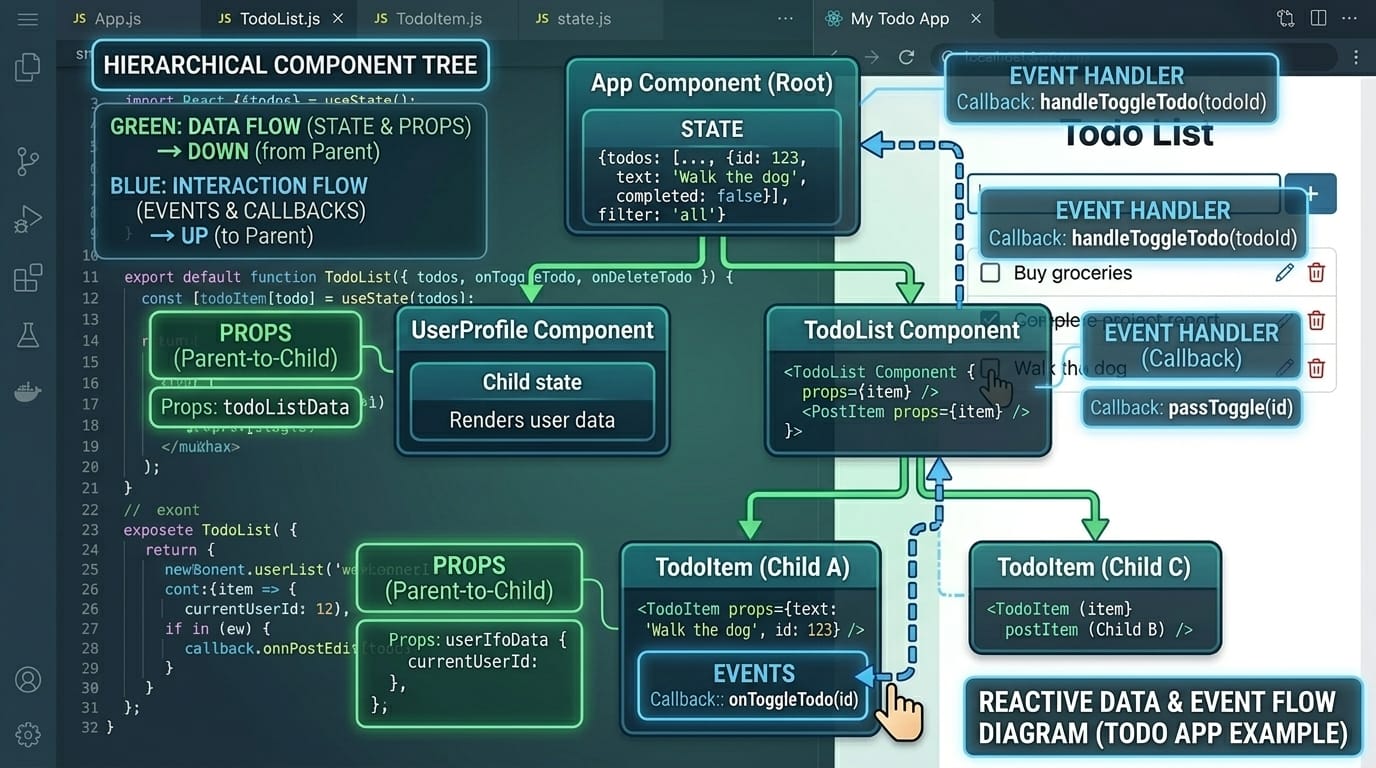
Let us examine the key functions in detail. The addTodo function (lines 10-19) creates a new todo object with a unique ID (using Date.now() which gives us a timestamp), the task text, completion status, and creation date formatted for Pakistani locale. We use the spread operator [...todos, newTodo] to create a new array containing all existing todos plus the new one—this is crucial because React state should never be mutated directly. The toggleComplete function (lines 22-26) maps through all todos and flips the completed flag for the one with the matching ID. The deleteTodo function (lines 29-31) uses filter to create a new array excluding the deleted item.
Common Mistakes & How to Avoid Them
Mistake 1: Mutating State Directly
One of the most common mistakes Pakistani students make when learning React is mutating state directly instead of creating new copies. This mistake causes subtle bugs because React relies on object reference equality to determine if state has changed. When you modify state directly, React may not detect the change and therefore won't trigger a re-render, leaving your UI out of sync with your data.
Incorrect approach (never do this):
// WRONG - Direct mutation todos.push(newTodo); // Mutates the original array setTodos(todos); // React may not detect this change
Correct approach:
// CORRECT - Create new array setTodos([...todos, newTodo]); // Creates new array with spread operator
The spread operator [...] creates a shallow copy of the array, giving React a new reference to detect. This is why we use setTodos([...todos, newTodo]) instead of todos.push(newTodo). Similarly, when updating objects, always create new objects: setTodo({ ...todo, completed: true }) rather than todo.completed = true.
Mistake 2: Missing Key Props in Lists
Another critical mistake that causes warnings and performance issues is forgetting to provide unique key props when rendering lists. React uses keys to identify which items have changed, been added, or been removed, enabling efficient updates to the DOM. Without proper keys, React may incorrectly reorder elements or lose component state during updates.
Incorrect approach:
// WRONG - No key or using index todos.map((todo, index) => ( <div className="todo-item"> {todo.text} </div> ))
Correct approach:
// CORRECT - Unique key from data todos.map(todo => ( <div key={todo.id} className="todo-item"> {todo.text} </div> ))
Using the array index as a key is also problematic when the list can be reordered or items can be deleted from the middle. Always use stable, unique identifiers from your data (like database IDs or timestamps) as keys. In our Todo app, we use todo.id which is generated using Date.now() when a task is created.
Practice Exercises
Exercise 1: Add Task Priority Feature
Problem: Enhance the Todo application by adding a priority level to each task. Users should be able to set tasks as High, Medium, or Low priority, and tasks should be visually distinguished based on their priority. High priority tasks should appear at the top of the list and display with a red border, Medium priority tasks in the middle with orange, and Low priority at the bottom with green.
Solution: First, modify the newTodo object in addTodo to include a priority property. Add a dropdown select element in your form for choosing priority. Then, sort the todos array before mapping to display high priority items first. Finally, add CSS classes for each priority level. Here is a partial implementation to get you started:
// Add priority state const [priority, setPriority] = useState('medium'); // Modified newTodo object const newTodo = { id: Date.now(), text: inputValue, completed: false, priority: priority, // 'high', 'medium', or 'low' createdAt: new Date().toLocaleDateString('en-PK') }; // Sorting function before rendering const sortedTodos = [...todos].sort((a, b) => { const priorityOrder = { high: 1, medium: 2, low: 3 }; return priorityOrder[a.priority] - priorityOrder[b.priority]; });
Exercise 2: Implement Local Storage Persistence
Problem: Currently, all tasks are lost when the user refreshes the page. Implement local storage persistence so that tasks survive page refreshes and browser restarts. The application should load existing tasks from local storage when it initializes and save tasks to local storage whenever they change.
Solution: Use the useEffect hook to synchronize state with local storage. When the component mounts, read from local storage to initialize state. Whenever todos change, write to local storage. This pattern is common in Pakistani freelance projects where clients want data persistence without requiring a backend server.
import React, { useState, useEffect } from 'react'; function App() { // Initialize from localStorage or empty array const [todos, setTodos] = useState(() => { const saved = localStorage.getItem('todos'); return saved ? JSON.parse(saved) : []; }); // Save to localStorage whenever todos change useEffect(() => { localStorage.setItem('todos', JSON.stringify(todos)); }, [todos]); // Rest of your component... }
Frequently Asked Questions
What is the difference between props and state in React?
Props (properties) are read-only data passed from parent to child components, while state is mutable data managed within a component. Props cannot be changed by the child component receiving them—they flow down from parents. State, on the other hand, is internal to a component and can be updated using setState or useState hooks. When Fatima passes data from her App component to a TodoItem component, that data travels as props. When the TodoItem needs to track whether it's being edited, that internal tracking happens in state.
How do I handle forms in React applications?
React forms can be controlled or uncontrolled. Controlled forms (recommended) link input values to state, making React the single source of truth. You set the input's value attribute to a state variable and update that state in an onChange handler. This gives you complete control over validation, formatting, and submission. Uncontrolled forms use refs to access DOM elements directly, which can be simpler for basic forms but provides less control. For our Todo app, we use controlled inputs where inputValue state controls the text input.
Why should I use React keys when rendering lists?
Keys help React identify which items in a list have changed, been added, or been removed, enabling efficient DOM updates. Without keys, React would need to re-render the entire list on every change, which is slow for large lists. Keys must be unique among siblings and should be stable (not changing between renders). Using array indexes as keys is acceptable only for static lists that never reorder. For dynamic lists like our Todo app, use unique IDs from your data as keys for optimal performance and correct behavior.
What React hooks should beginners learn first?
Beginners should master useState first for managing component state, followed by useEffect for side effects like data fetching and local storage. These two hooks cover most use cases in simple applications. After mastering these, learn useContext for avoiding prop drilling in deeply nested components, and useRef for accessing DOM elements or storing mutable values that don't trigger re-renders. useMemo and useCallback are optimization hooks that become important in larger applications but aren't essential for beginners.
How can Pakistani developers practice React development?
Pakistani developers can practice React by building projects locally and contributing to open-source repositories. Start with simple projects like calculators, weather apps, or expense trackers, then progress to more complex applications. Platforms like GitHub offer countless open-source React projects that welcome contributions. Consider building projects relevant to Pakistani contexts—a currency converter for PKR, an app tracking local prayer times, or a bus schedule app for Lahore Transport Company routes. These portfolio pieces demonstrate both technical skills and cultural awareness to potential employers.
Summary & Key Takeaways
Congratulations on completing this comprehensive React tutorial! You have learned the fundamental concepts needed to build complete React applications. Here are the key takeaways to remember as you continue your React journey:
• React applications are built from reusable components that manage their own state and accept data through props. Always think in terms of small, focused components that do one thing well.
• State management using useState is fundamental to React development. Never mutate state directly—always create new copies using the spread operator or array methods that return new arrays.
• Always provide unique key props when rendering lists to ensure React can efficiently update the DOM. Use stable IDs from your data rather than array indexes.
• Unidirectional data flow makes React applications predictable: data flows down through props, and actions flow up through event handlers passed as props.
• The useEffect hook enables you to handle side effects like data fetching, subscriptions, and local storage synchronization. Always include the dependency array to control when effects run.
• Building real projects is the best way to learn React. Start with simple applications and gradually increase complexity as your confidence grows.
Next Steps & Related Tutorials
Now that you have built your first complete React application, continue your learning journey with these related tutorials available on theiqra.edu.pk. Each tutorial builds upon the concepts you have learned here while introducing new skills that will make you a more versatile React developer:
React Hooks Deep Dive — Master advanced hooks like useReducer, useCallback, and useMemo to optimize your applications and handle complex state logic. This tutorial is essential for developers building production applications that need to perform well at scale.
Building REST API Integrations with React — Learn to connect your React applications to backend APIs using fetch and axios. This skill is crucial for Pakistani freelancers working on full-stack projects for international clients.
State Management with Redux Toolkit — When your React applications grow beyond simple state needs, Redux Toolkit provides a predictable state container. This tutorial prepares you for enterprise-level development roles.
React Router for Multi-Page Applications — Expand beyond single-page applications by learning client-side routing with React Router. Build professional applications with multiple views and navigation that users expect from modern web apps.
Remember, every expert React developer started exactly where you are now. The key to success is consistent practice and building projects that challenge you to apply new concepts. Happy coding from all of us at theiqra.edu.pk!
Test Your Python Knowledge!
Finished reading? Take a quick quiz to see how much you've learned from this tutorial.