React Query (TanStack Query) Server State Management
Introduction
React applications often need to fetch and manage data from APIs—whether it's user profiles, product listings, or dashboards. Traditionally, developers used tools like useEffect and useState to handle this, but this approach becomes messy and hard to maintain as apps grow.
This is where React Query (now known as TanStack Query) comes in. It is a powerful library for managing server state in React applications. Server state refers to data that lives on a server (like a database or API) and is fetched, cached, and updated in your app.
With React Query v5, developers can:
- Automatically cache API data
- Keep UI in sync with server data
- Perform background updates
- Handle loading and error states easily
For Pakistani students building real-world apps (like e-commerce platforms in Karachi or student portals in Lahore), mastering TanStack Query can significantly improve performance and developer experience.
Prerequisites
Before starting this tutorial, you should be comfortable with:
- Basic JavaScript (ES6+)
- React fundamentals (components, props, state)
- React Hooks (
useState,useEffect) - API calls using
fetchoraxios - Basic understanding of async/await
Core Concepts & Explanation
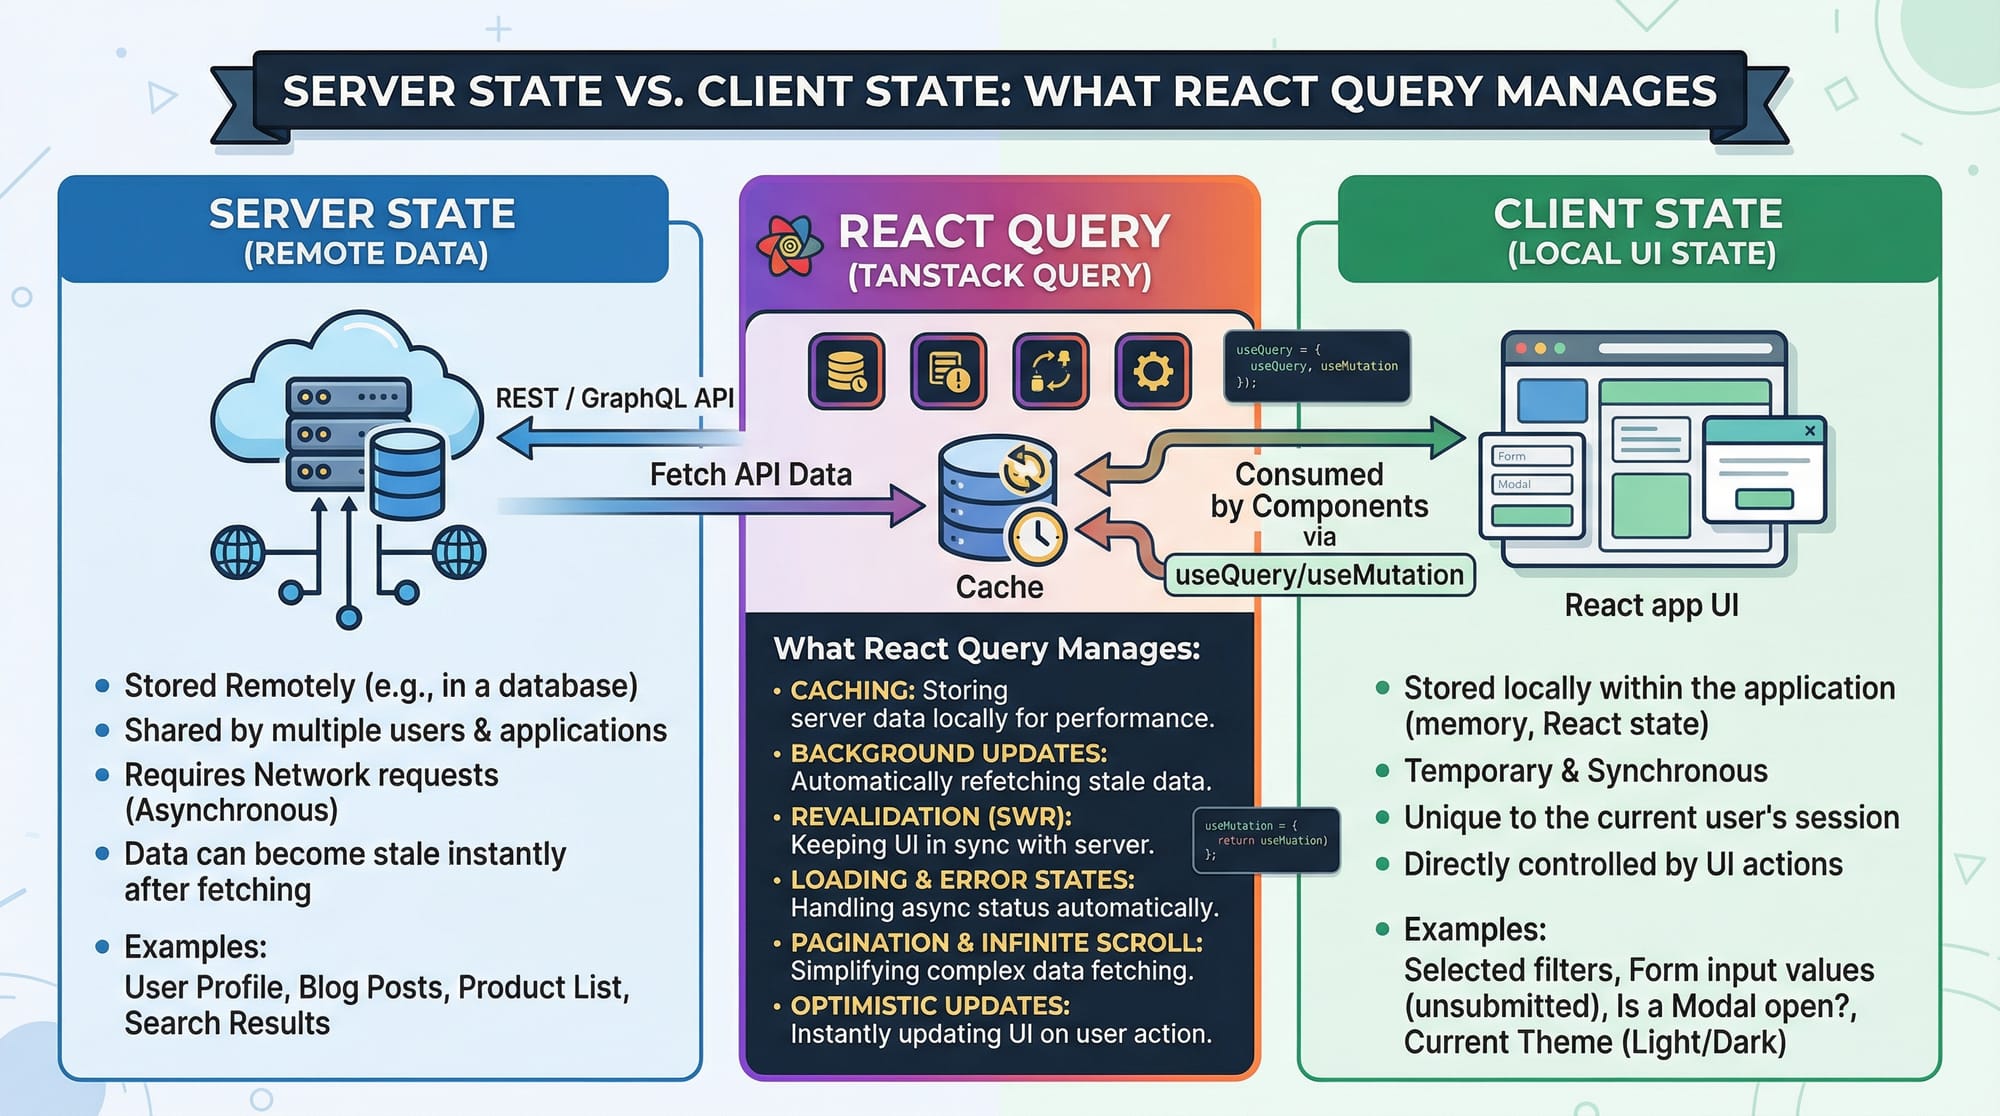
Server State vs Client State
In React, there are two types of state:
- Client State → Managed locally (e.g., form inputs, UI toggles)
- Server State → Comes from an API (e.g., user data, products)
React Query focuses on server state.
Example:
- Ahmad builds an app in Islamabad to show weather data.
- The weather data comes from an API → this is server state.
React Query helps manage:
- Fetching data
- Caching it
- Keeping it fresh
Query Client and Provider
Before using React Query, you need to set up a QueryClient.
import { QueryClient, QueryClientProvider } from '@tanstack/react-query';

const queryClient = new QueryClient();

function App() {
  return (
    <QueryClientProvider client={queryClient}>
      <MyComponent />
    </QueryClientProvider>
  );
}
Explanation:
QueryClient→ Creates a central store for all queriesQueryClientProvider→ Makes it available across the appclient={queryClient}→ Passes the instance
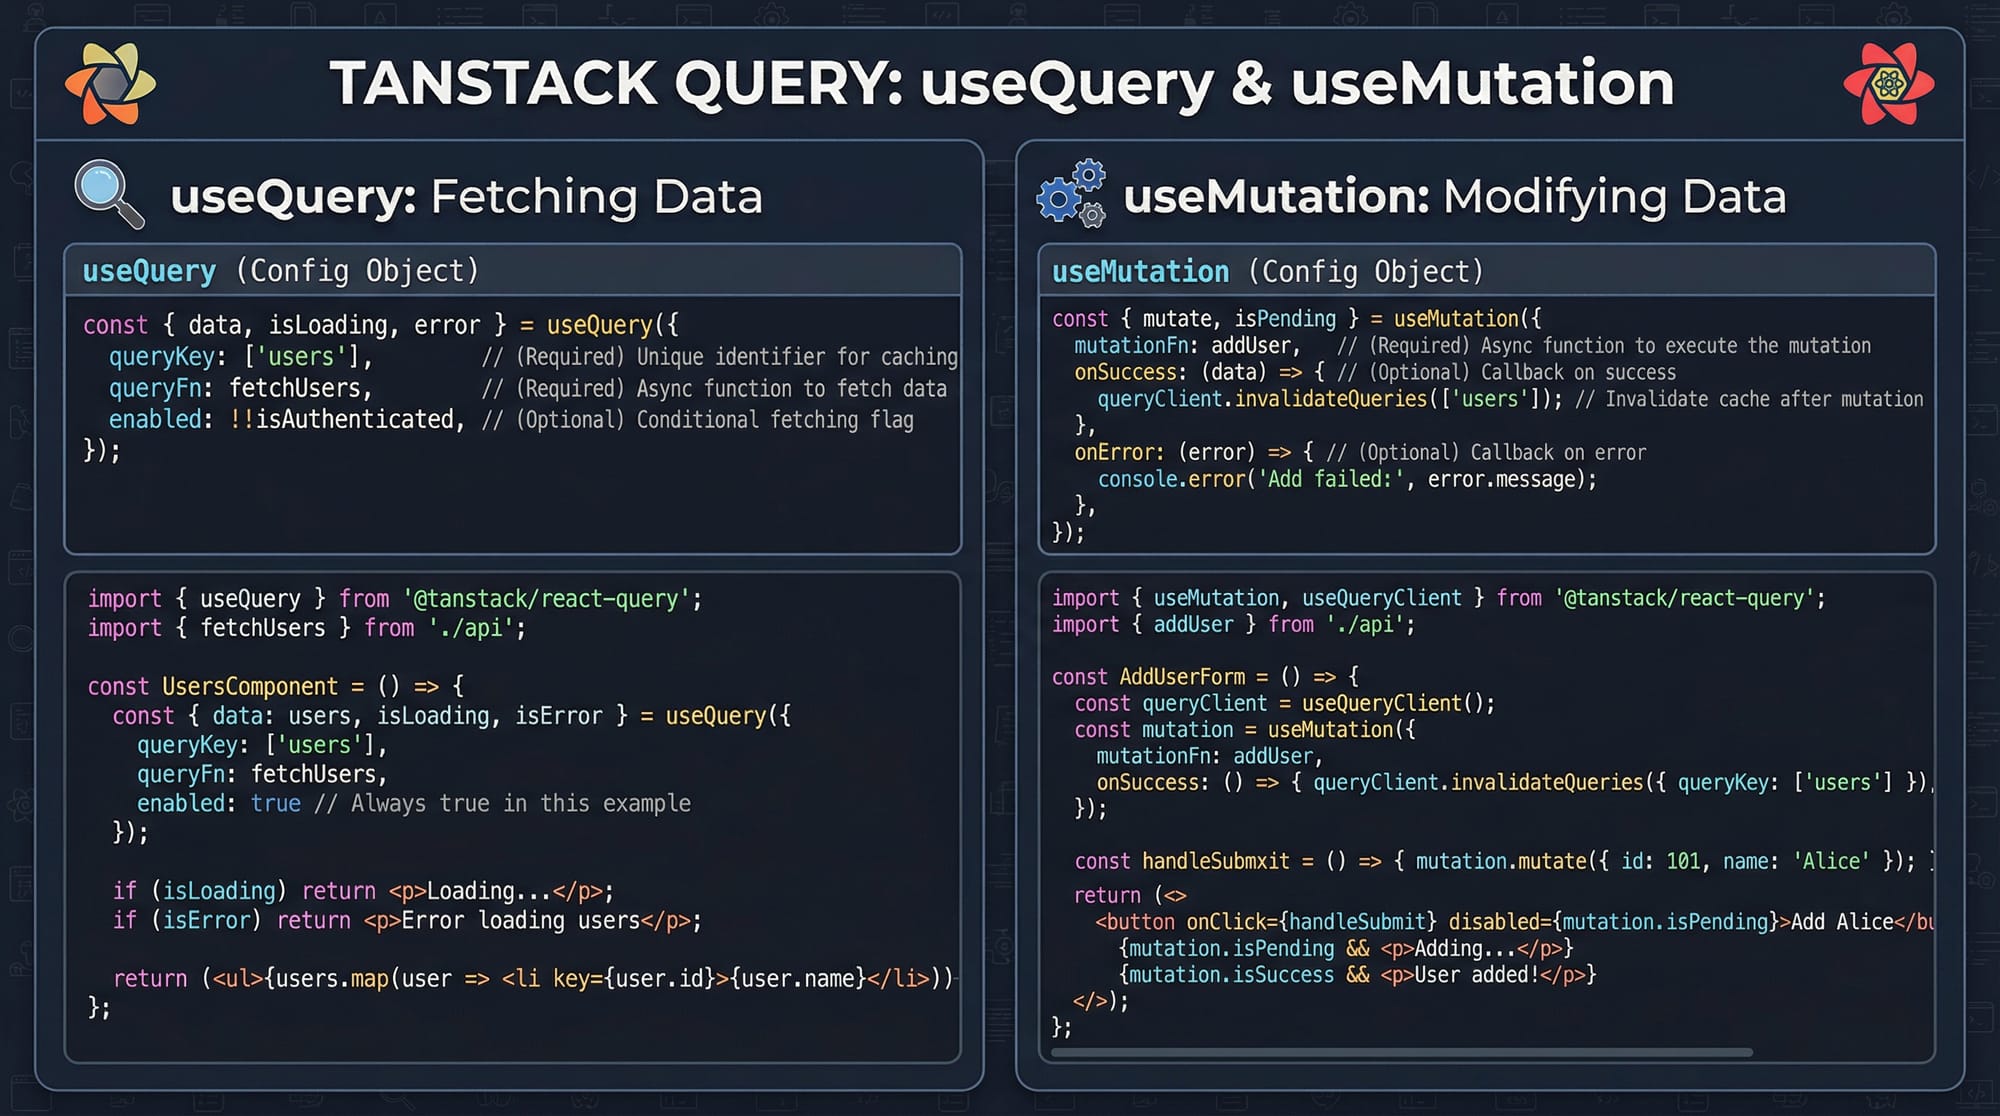
Fetching Data with useQuery
The useQuery hook is used to fetch data.
import { useQuery } from '@tanstack/react-query';

function Users() {
  const { data, isLoading, error } = useQuery({
    queryKey: ['users'],
    queryFn: fetchUsers
  });

  if (isLoading) return <p>Loading...</p>;
  if (error) return <p>Error occurred</p>;

  return <div>{data.length} users found</div>;
}
Explanation:
queryKey→ Unique identifier for cachingqueryFn→ Function that fetches datadata→ API responseisLoading→ Loading stateerror→ Error state
Mutations with useMutation
Mutations are used for creating, updating, or deleting data.
import { useMutation } from '@tanstack/react-query';

function AddUser() {
  const mutation = useMutation({
    mutationFn: addUser
  });

  return (
    <button onClick={() => mutation.mutate({ name: 'Ali' })}>
      Add User
    </button>
  );
}
Explanation:
useMutation→ Handles POST/PUT/DELETEmutationFn→ API call functionmutate()→ Triggers the mutation
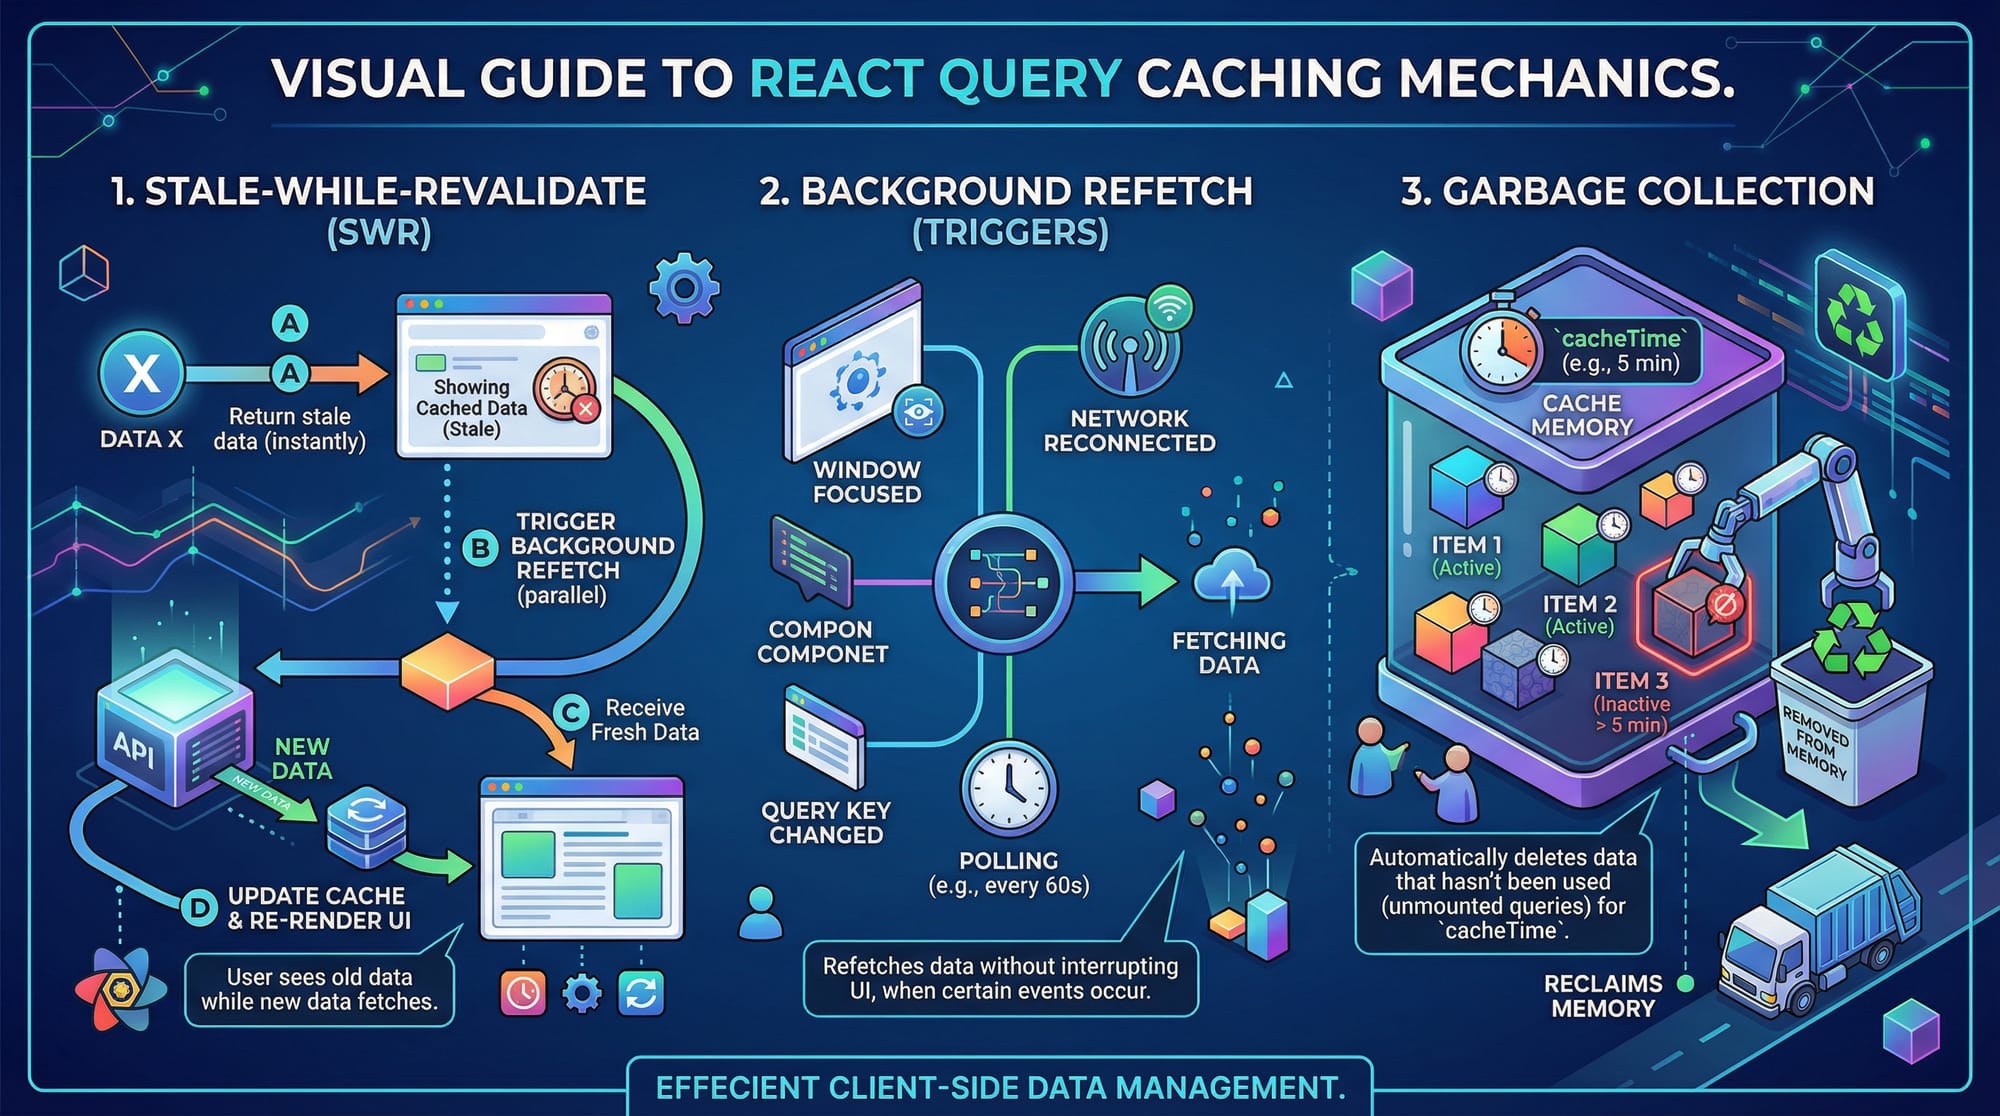
Caching and Background Refetching
React Query automatically:
- Caches data
- Refetches in the background
- Keeps UI updated
Example:
- Fatima opens a product list in Lahore
- Data is cached
- When she revisits → instant load + background update
Practical Code Examples
Example 1: Fetching Students Data
import { useQuery } from '@tanstack/react-query';

async function fetchStudents() {
  const response = await fetch('https://api.example.com/students');
  return response.json();
}

function StudentsList() {
  const { data, isLoading, error } = useQuery({
    queryKey: ['students'],
    queryFn: fetchStudents
  });

  if (isLoading) return <p>Loading students...</p>;
  if (error) return <p>Error loading students</p>;

  return (
    <ul>
      {data.map((student) => (
        <li key={student.id}>{student.name}</li>
      ))}
    </ul>
  );
}
Line-by-line Explanation:
fetchStudents()→ Fetches data from APIawait fetch()→ Makes async requestuseQuery()→ Calls API and caches resultqueryKey: ['students']→ Unique identifierdata.map()→ Loops through studentskey={student.id}→ Required for React list
Example 2: Real-World Application (E-commerce Orders)
import { useQuery, useMutation, useQueryClient } from '@tanstack/react-query';

const fetchOrders = async () => {
  const res = await fetch('/api/orders');
  return res.json();
};

const updateOrderStatus = async (orderId) => {
  await fetch(`/api/orders/${orderId}`, {
    method: 'PUT'
  });
};

function Orders() {
  const queryClient = useQueryClient();

  const { data } = useQuery({
    queryKey: ['orders'],
    queryFn: fetchOrders
  });

  const mutation = useMutation({
    mutationFn: updateOrderStatus,
    onSuccess: () => {
      queryClient.invalidateQueries(['orders']);
    }
  });

  return (
    <div>
      {data?.map((order) => (
        <div key={order.id}>
          <p>{order.name} - PKR {order.price}</p>
          <button onClick={() => mutation.mutate(order.id)}>
            Mark as Delivered
          </button>
        </div>
      ))}
    </div>
  );
}
Line-by-line Explanation:
useQueryClient()→ Access cachefetchOrders()→ Get ordersuseQuery()→ Load and cache ordersuseMutation()→ Update orderonSuccess()→ Runs after mutationinvalidateQueries()→ Refetch updated datamutation.mutate(order.id)→ Trigger update
Common Mistakes & How to Avoid Them
Mistake 1: Not Using queryKey Properly
❌ Wrong:
useQuery({ queryKey: 'users', queryFn: fetchUsers });
✅ Correct:
useQuery({ queryKey: ['users'], queryFn: fetchUsers });
Fix Explanation:
- Always use an array for queryKey
- Helps React Query manage caching better
Mistake 2: Forgetting to Invalidate Queries
❌ Wrong:
mutation.mutate(data);
(No refetch after update)
✅ Correct:
onSuccess: () => {
  queryClient.invalidateQueries(['users']);
}
Fix Explanation:
- Without invalidation, UI shows stale data
- Always refetch after mutation
Practice Exercises
Exercise 1: Fetch Products
Problem:
Fetch product data from an API and display product names.
Solution:
const fetchProducts = async () => {
  const res = await fetch('/api/products');
  return res.json();
};

function Products() {
  const { data } = useQuery({
    queryKey: ['products'],
    queryFn: fetchProducts
  });

  return (
    <ul>
      {data?.map(p => <li key={p.id}>{p.name}</li>)}
    </ul>
  );
}
Explanation:
- API fetch
- useQuery handles caching
- map renders products
Exercise 2: Add New User
Problem:
Create a form to add a new user.
Solution:
const addUser = async (user) => {
  await fetch('/api/users', {
    method: 'POST',
    body: JSON.stringify(user)
  });
};

function AddUser() {
  const mutation = useMutation({ mutationFn: addUser });

  return (
    <button onClick={() => mutation.mutate({ name: 'Fatima' })}>
      Add User
    </button>
  );
}
Explanation:
addUser()→ API POST requestuseMutation()→ Handles submissionmutate()→ Sends data
Frequently Asked Questions
What is React Query (TanStack Query)?
React Query is a library for managing server state in React applications. It handles data fetching, caching, and synchronization automatically.
How do I install React Query v5?
You can install it using npm:npm install @tanstack/react-query. Then wrap your app with QueryClientProvider.
What is queryKey in React Query?
queryKey is a unique identifier for each query. It helps React Query cache and manage data efficiently.
How do I refetch data manually?
You can use refetch() returned by useQuery or use queryClient.invalidateQueries().
Is React Query better than useEffect?
Yes, for server state management. It reduces boilerplate and provides caching, background updates, and better performance.
Summary & Key Takeaways
- React Query (TanStack Query) simplifies server state management
useQueryis used for fetching datauseMutationis used for updating data- Automatic caching improves performance
- Query invalidation ensures fresh data
- React Query reduces need for manual state management
Next Steps & Related Tutorials
To continue your learning journey, explore these tutorials on theiqra.edu.pk:
- Learn how to connect APIs in React & API Integration
- Master state handling with React Hooks
- Understand performance with React Performance Optimization
- Build full apps with Full-Stack Web Development Guide
These will help you become a confident React developer ready to build real-world applications in Pakistan and beyond 🚀
Test Your Python Knowledge!
Finished reading? Take a quick quiz to see how much you've learned from this tutorial.