React Router v6 Navigation Nested Routes & Guards
Introduction
React applications today are no longer just single-page views—they are full-fledged web apps with multiple screens, user flows, and protected areas. This is where React Router v6 becomes essential. It is the latest version of the popular routing library for React, allowing developers to handle navigation, nested routes, and route protection (guards) efficiently.
In this tutorial, you’ll learn how to use React Router v6 for:
- Seamless navigation between pages
- Creating nested layouts (like dashboards)
- Protecting routes based on authentication
For Pakistani students building real-world apps—such as university portals, e-commerce stores in PKR, or job platforms—understanding routing is a must. Imagine building a student dashboard for Lahore University or an online shop in Karachi—without routing, users cannot navigate between pages properly.
By the end of this guide, you’ll be able to confidently implement routing in your React apps.
Prerequisites
Before starting this tutorial, you should have:
- Basic understanding of React.js (components, props, state)
- Familiarity with JavaScript ES6
- Knowledge of JSX
- Experience using npm or yarn
- Basic idea of Single Page Applications (SPA)
If you're new to React, check out the React.js Introduction tutorial on theiqra.edu.pk before continuing.
Core Concepts & Explanation
Understanding React Router v6 Basics
React Router v6 is installed using:
npm install react-router-dom
In v6, routing is more declarative and simplified compared to previous versions.
Basic Example
import { BrowserRouter, Routes, Route } from "react-router-dom";
import Home from "./Home";
import About from "./About";

function App() {
  return (
    <BrowserRouter>
      <Routes>
        <Route path="/" element={<Home />} />
        <Route path="/about" element={<About />} />
      </Routes>
    </BrowserRouter>
  );
}

export default App;
Explanation (line by line):
BrowserRouter: Wraps the entire app and enables routingRoutes: A container for all route definitionsRoute: Defines a path and which component to renderelement: The component shown when the path matches
Navigation Using useNavigate Hook
React Router v6 replaces useHistory with useNavigate.
import { useNavigate } from "react-router-dom";

function Login() {
  const navigate = useNavigate();

  const handleLogin = () => {
    // after login success
    navigate("/dashboard");
  };

  return <button onClick={handleLogin}>Login</button>;
}
Explanation:
useNavigate()returns a functionnavigate("/dashboard")redirects user to dashboard- Useful for login, logout, form submissions
Dynamic Routes with useParams
Dynamic routes are used when you need IDs (e.g., product pages).
import { useParams } from "react-router-dom";

function Product() {
  const { id } = useParams();

  return <h1>Product ID: {id}</h1>;
}
Explanation:
useParams()extracts URL parameters/product/5→id = 5- Useful for e-commerce apps in Pakistan (e.g., product listings in PKR)
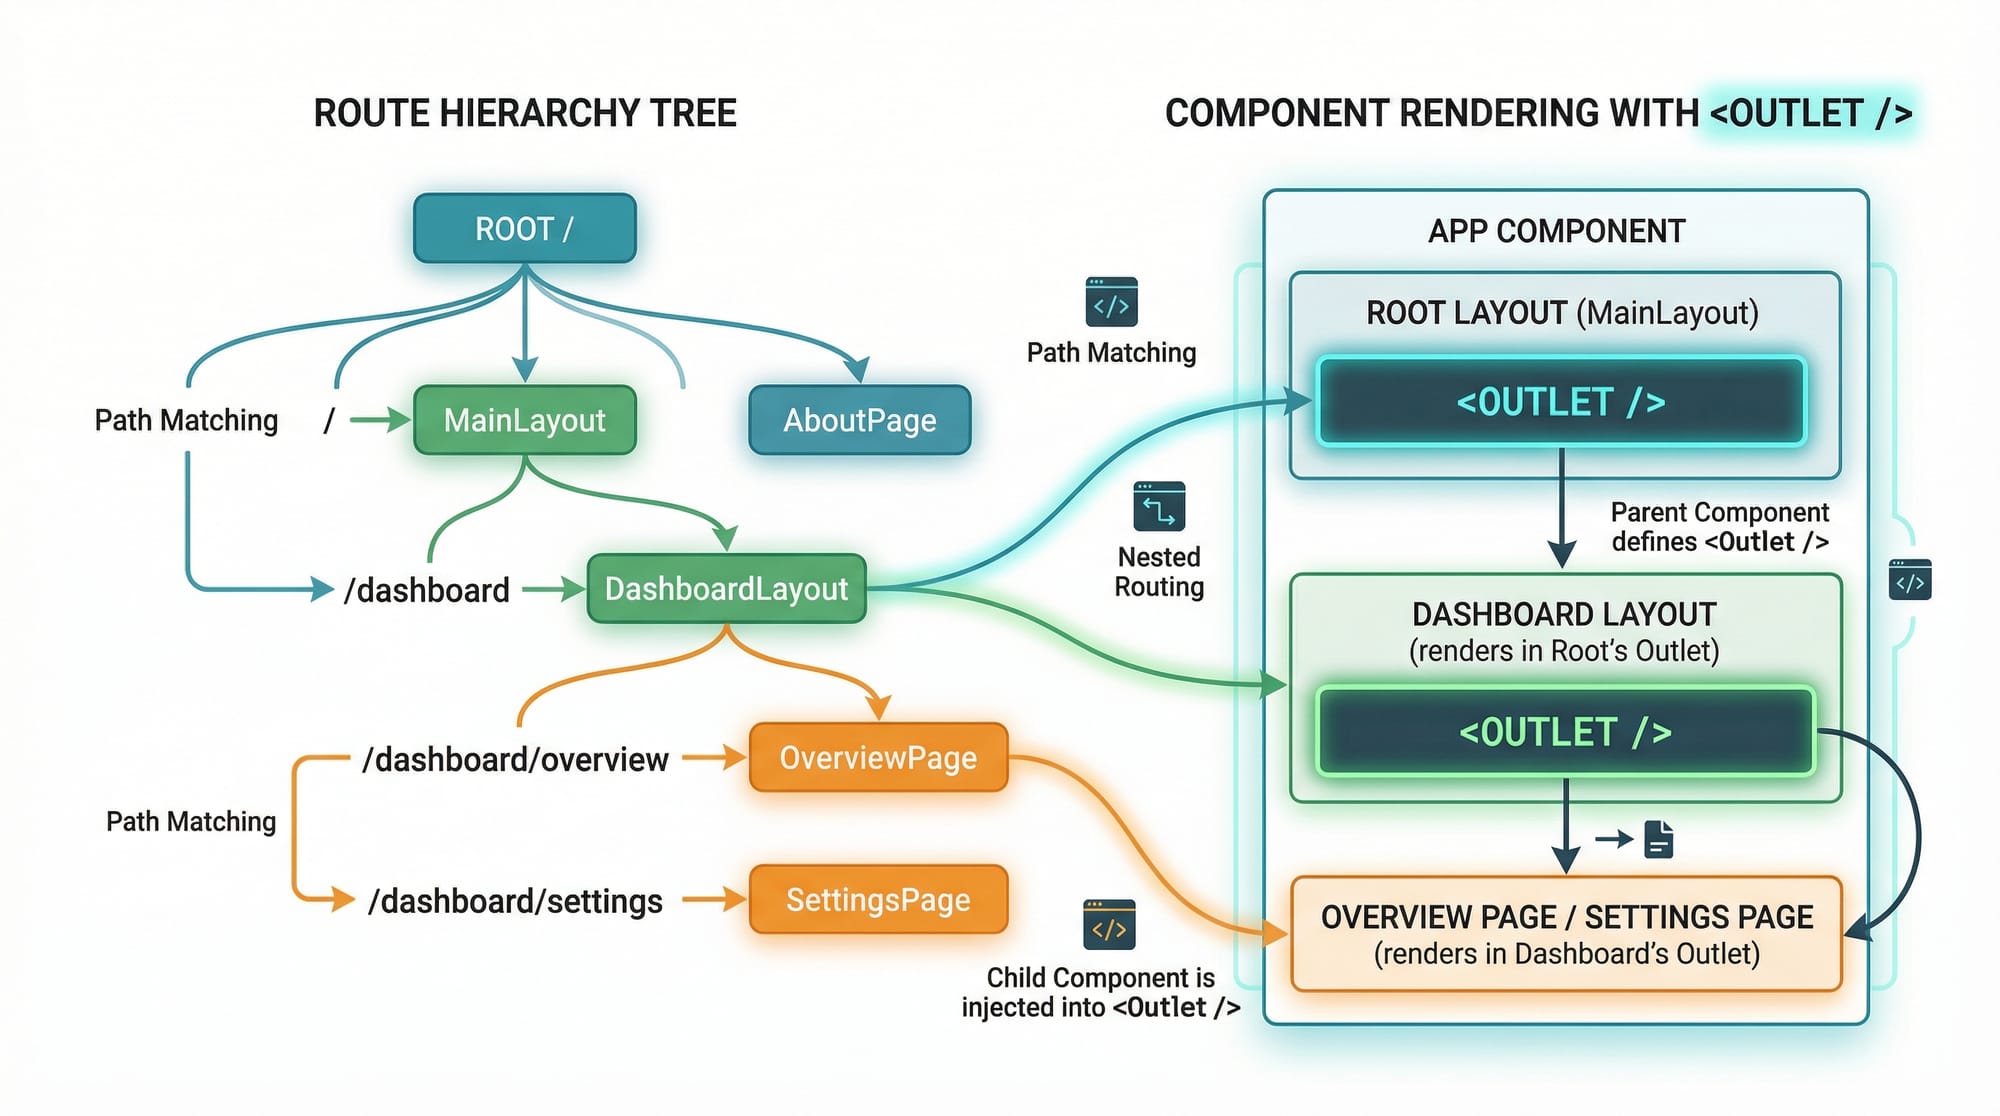
Nested Routes & Layouts
Nested routes allow you to create layouts like dashboards.
import { Outlet } from "react-router-dom";

function Dashboard() {
  return (
    <div>
      <h1>Dashboard</h1>
      <Outlet />
    </div>
  );
}
Explanation:
Outletrenders child routes inside parent layout- Useful for admin panels or student portals

Practical Code Examples
Example 1: Basic Navigation System
import { BrowserRouter, Routes, Route, Link } from "react-router-dom";

function Home() {
  return <h2>Welcome Ahmad</h2>;
}

function About() {
  return <h2>About Page</h2>;
}

function App() {
  return (
    <BrowserRouter>
      <nav>
        <Link to="/">Home</Link>
        <Link to="/about">About</Link>
      </nav>

      <Routes>
        <Route path="/" element={<Home />} />
        <Route path="/about" element={<About />} />
      </Routes>
    </BrowserRouter>
  );
}
Explanation:
Linkreplaces<a>tag (prevents page reload)- Navigation becomes smooth and fast
toattribute defines route pathRouteshandles matching and rendering
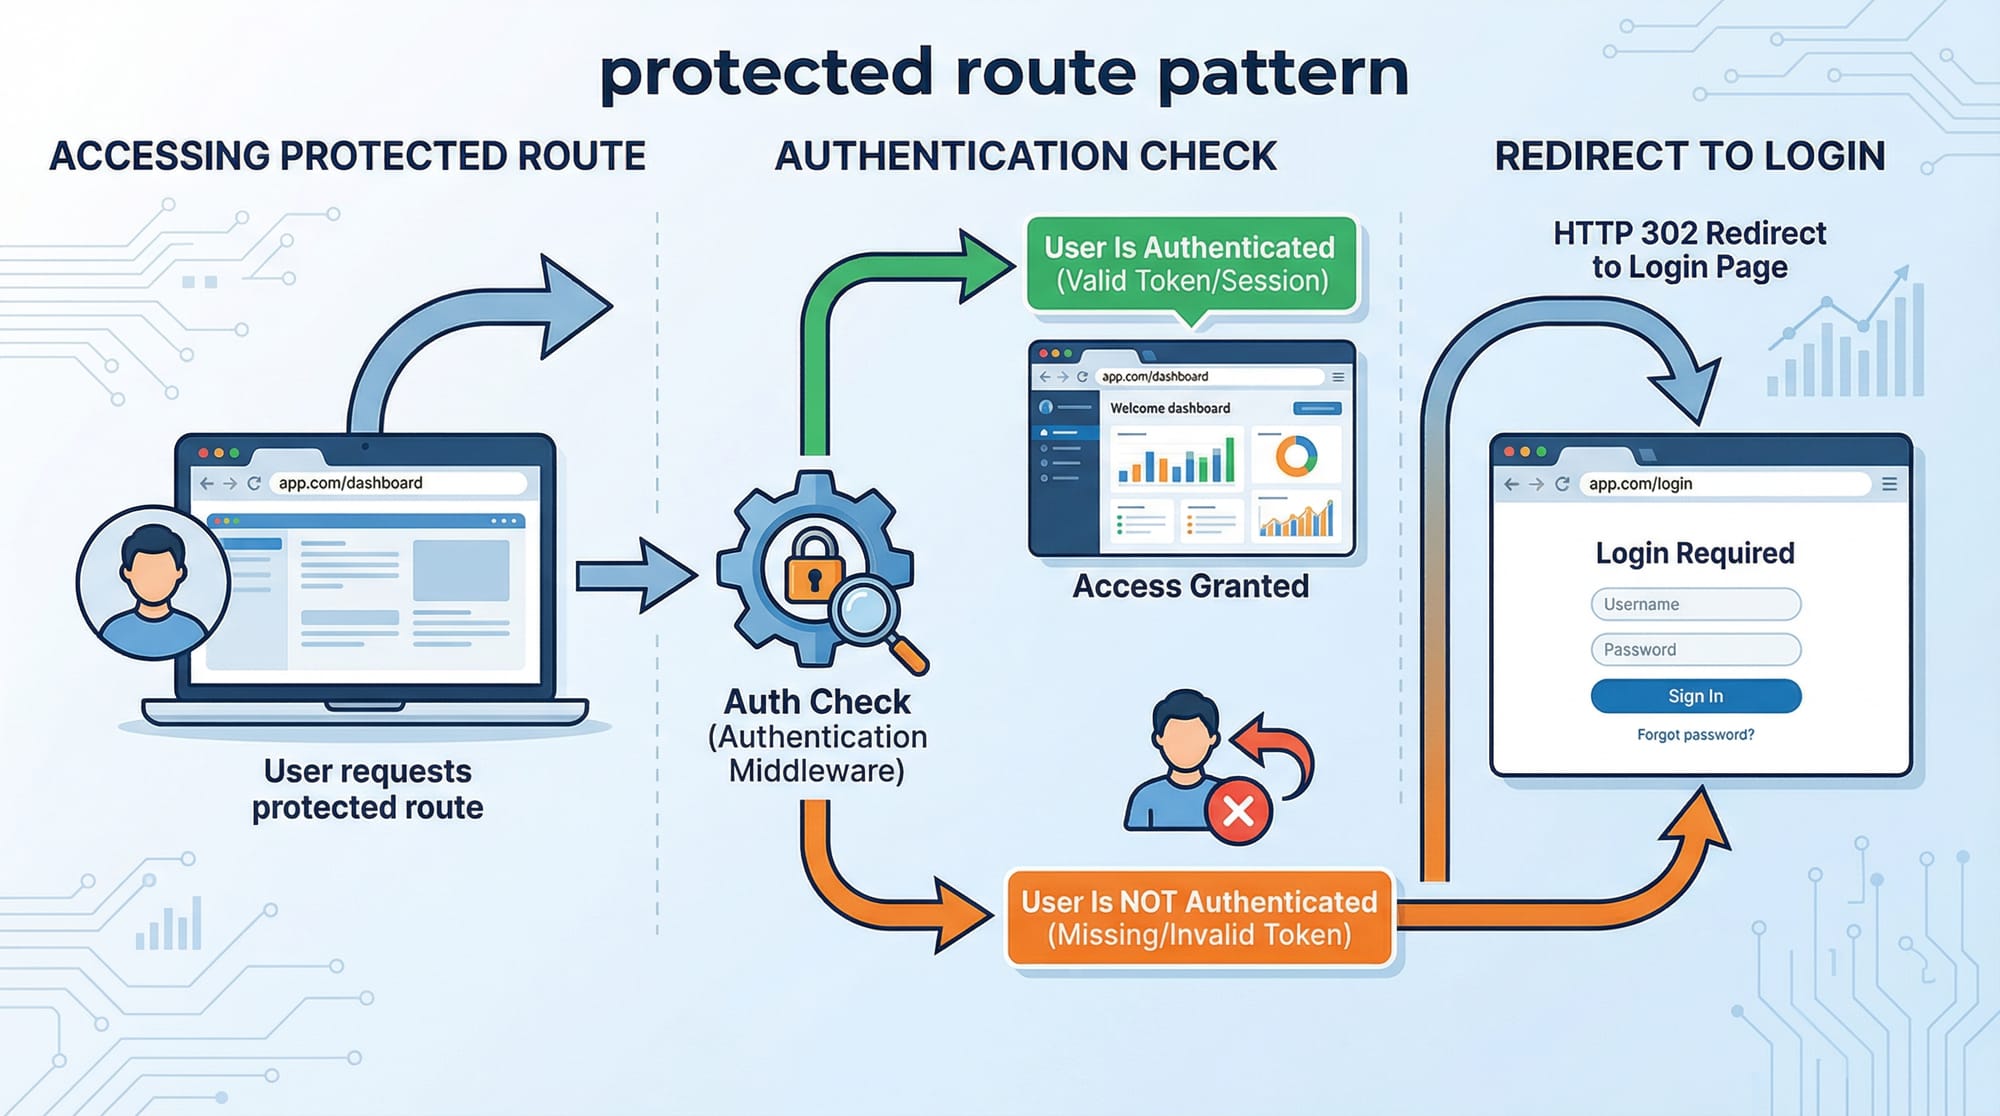
Example 2: Real-World Application (Protected Dashboard)
Let’s create a protected dashboard for a Pakistani student portal.
import { BrowserRouter, Routes, Route, Navigate } from "react-router-dom";

function Login() {
  return <h2>Please Login</h2>;
}

function Dashboard() {
  return <h2>Welcome to Student Dashboard</h2>;
}

function ProtectedRoute({ children }) {
  const isAuthenticated = false; // simulate login

  if (!isAuthenticated) {
    return <Navigate to="/login" />;
  }

  return children;
}

function App() {
  return (
    <BrowserRouter>
      <Routes>
        <Route path="/login" element={<Login />} />

        <Route
          path="/dashboard"
          element={
            <ProtectedRoute>
              <Dashboard />
            </ProtectedRoute>
          }
        />
      </Routes>
    </BrowserRouter>
  );
}
Explanation:
ProtectedRoutechecks authentication- If user is not logged in → redirects to
/login - If authenticated → shows dashboard
NavigatereplacesRedirect(from v5)
Common Mistakes & How to Avoid Them
Mistake 1: Using Switch Instead of Routes
Older tutorials use Switch, which no longer exists.
❌ Wrong:
<Switch>
  <Route path="/" component={Home} />
</Switch>
✅ Correct:
<Routes>
  <Route path="/" element={<Home />} />
</Routes>
Fix:
- Replace
SwitchwithRoutes - Use
elementinstead ofcomponent
Mistake 2: Forgetting Outlet in Nested Routes
❌ Wrong:
function Dashboard() {
  return <h1>Dashboard</h1>;
}
✅ Correct:
import { Outlet } from "react-router-dom";

function Dashboard() {
  return (
    <div>
      <h1>Dashboard</h1>
      <Outlet />
    </div>
  );
}
Fix:
- Always include
<Outlet />for child routes
Practice Exercises
Exercise 1: Create a Blog Navigation
Problem:
Create routes for Home, Blog, and Contact pages.
Solution:
<Routes>
  <Route path="/" element={<Home />} />
  <Route path="/blog" element={<Blog />} />
  <Route path="/contact" element={<Contact />} />
</Routes>
Explanation:
- Each route maps to a component
- Navigation can be added using
Link
Exercise 2: Dynamic Product Page
Problem:
Create a route /product/:id and display product ID.
Solution:
<Route path="/product/:id" element={<Product />} />
function Product() {
  const { id } = useParams();
  return <h2>Product {id}</h2>;
}
Explanation:
:idis dynamic parameteruseParamsextracts it
Frequently Asked Questions
What is React Router v6?
React Router v6 is a library that enables navigation in React applications. It allows you to create multiple pages without reloading the browser.
How do I navigate programmatically in React?
You can use the useNavigate hook to redirect users after actions like login or form submission.
What is a protected route?
A protected route restricts access to certain pages unless the user is authenticated. It is commonly used in dashboards and admin panels.
What is Outlet in React Router?
Outlet is used in nested routes to render child components inside a parent layout.
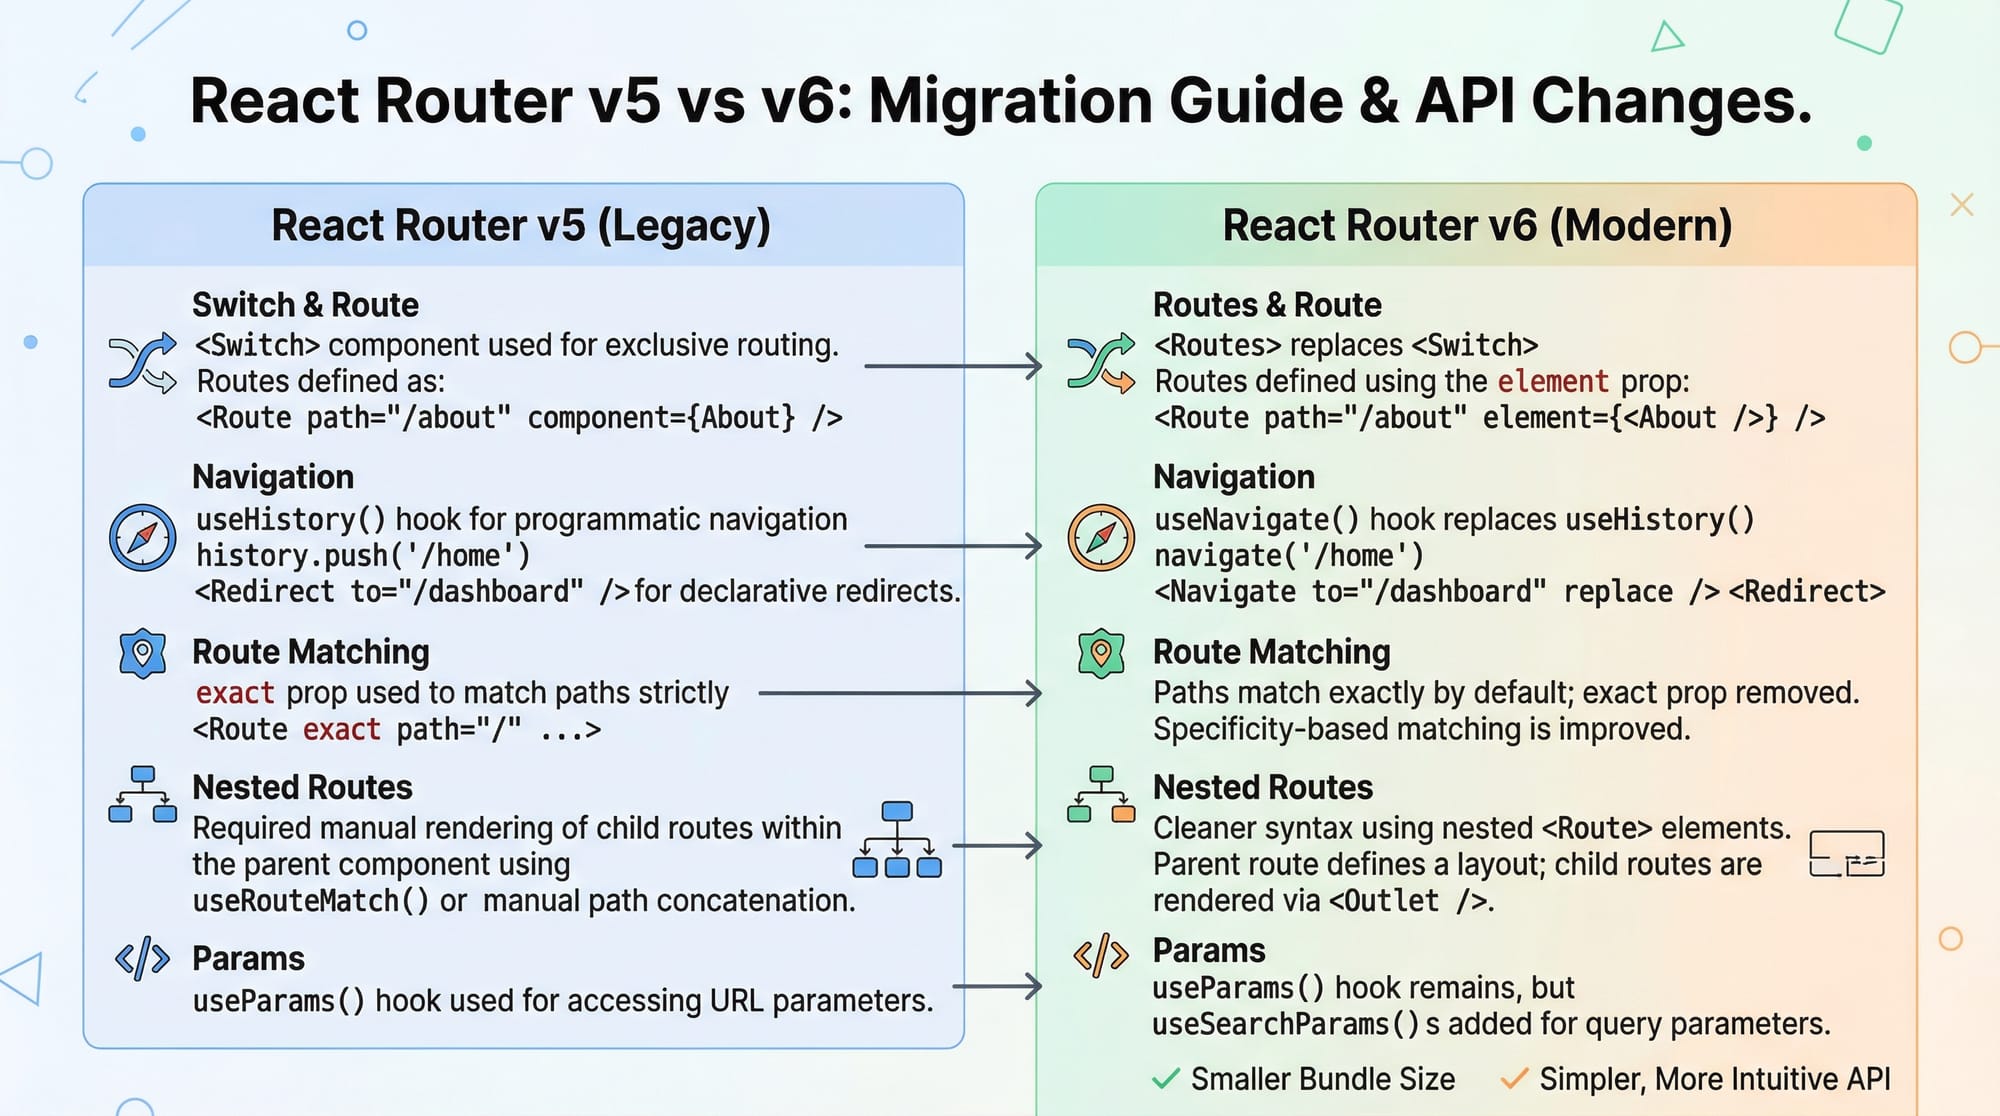
How is React Router v6 different from v5?
Version 6 simplifies routing by replacing Switch with Routes, using element instead of component, and improving nested routing.
Summary & Key Takeaways
- React Router v6 is essential for building modern React apps
- Use
BrowserRouter,Routes, andRoutefor basic routing useNavigatehelps with programmatic navigationuseParamsenables dynamic routingOutletis required for nested routes- Protected routes improve app security
Next Steps & Related Tutorials
Now that you understand routing, continue your journey with:
- Learn the basics in React.js Introduction
- Build server-side apps with Next.js Tutorial
- Improve performance with React Performance Optimization
- Manage global state using Zustand State Management Guide
Mastering routing is a huge step toward becoming a professional React developer. Keep practicing and try building real-world Pakistani apps like university portals or e-commerce stores in PKR 🚀
Test Your Python Knowledge!
Finished reading? Take a quick quiz to see how much you've learned from this tutorial.