React State & Props Managing Data Flow
Introduction
React applications are built around the concept of data flowing through components. Two of the most important tools that enable this flow are React State and React Props. Understanding how these work together is essential for building dynamic, interactive user interfaces.
In simple terms:
- React Props allow components to receive data from their parent components.
- React State allows components to manage and update their own data internally.
Together, they form the foundation of state management in React.
For Pakistani students learning modern web development, mastering react state, react props, and useState is extremely valuable. Many companies in Lahore, Karachi, and Islamabad use React for frontend development. Understanding how to manage data with props, state, setState, and useState will help you build real-world applications such as dashboards, e-commerce platforms, and student management systems.
For example, imagine building a fee calculator for a college in Lahore where the fee updates dynamically when a student selects different courses. That dynamic behavior is handled using state management in React.
By the end of this tutorial, you will clearly understand:
- How React Props pass data between components
- How React State stores dynamic data
- How useState manages state in functional components
- How to avoid problems like props drilling
Prerequisites
Before starting this tutorial, you should already be familiar with the following topics:
- Basic JavaScript concepts
- Variables
- Functions
- ES6 arrow functions
- HTML and CSS fundamentals
- Basic React knowledge
- Creating components
- JSX syntax
- Rendering components
- Development tools
- Node.js installed
- npm or yarn
- A code editor like VS Code
If you are new to these topics, we recommend first reading tutorials like "Getting Started with React Components" and "Understanding JSX in React" on theiqra.edu.pk.
Core Concepts & Explanation
Understanding React Props (Passing Data Between Components)
Props (short for properties) allow you to pass data from a parent component to a child component.
Props are read-only, meaning the child component cannot modify them.
Think of props like function arguments in JavaScript.
Example scenario:
Ali is building a student profile card that displays the student's name and city.
function StudentCard(props) {
  return (
    <div>
      <h2>{props.name}</h2>
      <p>City: {props.city}</p>
    </div>
  );
}

function App() {
  return (
    <StudentCard name="Ahmad Khan" city="Karachi" />
  );
}
Line-by-line explanation:
function StudentCard(props)
This creates a component called StudentCard that receives props as input.
<h2>{props.name}</h2>
Displays the name passed through props.
<p>City: {props.city}</p>
Displays the city passed through props.
<StudentCard name="Ahmad Khan" city="Karachi" />
The parent component App passes the props to the child component.
Output:
Ahmad Khan
City: Karachi
This simple mechanism allows data to flow from parent to child components.
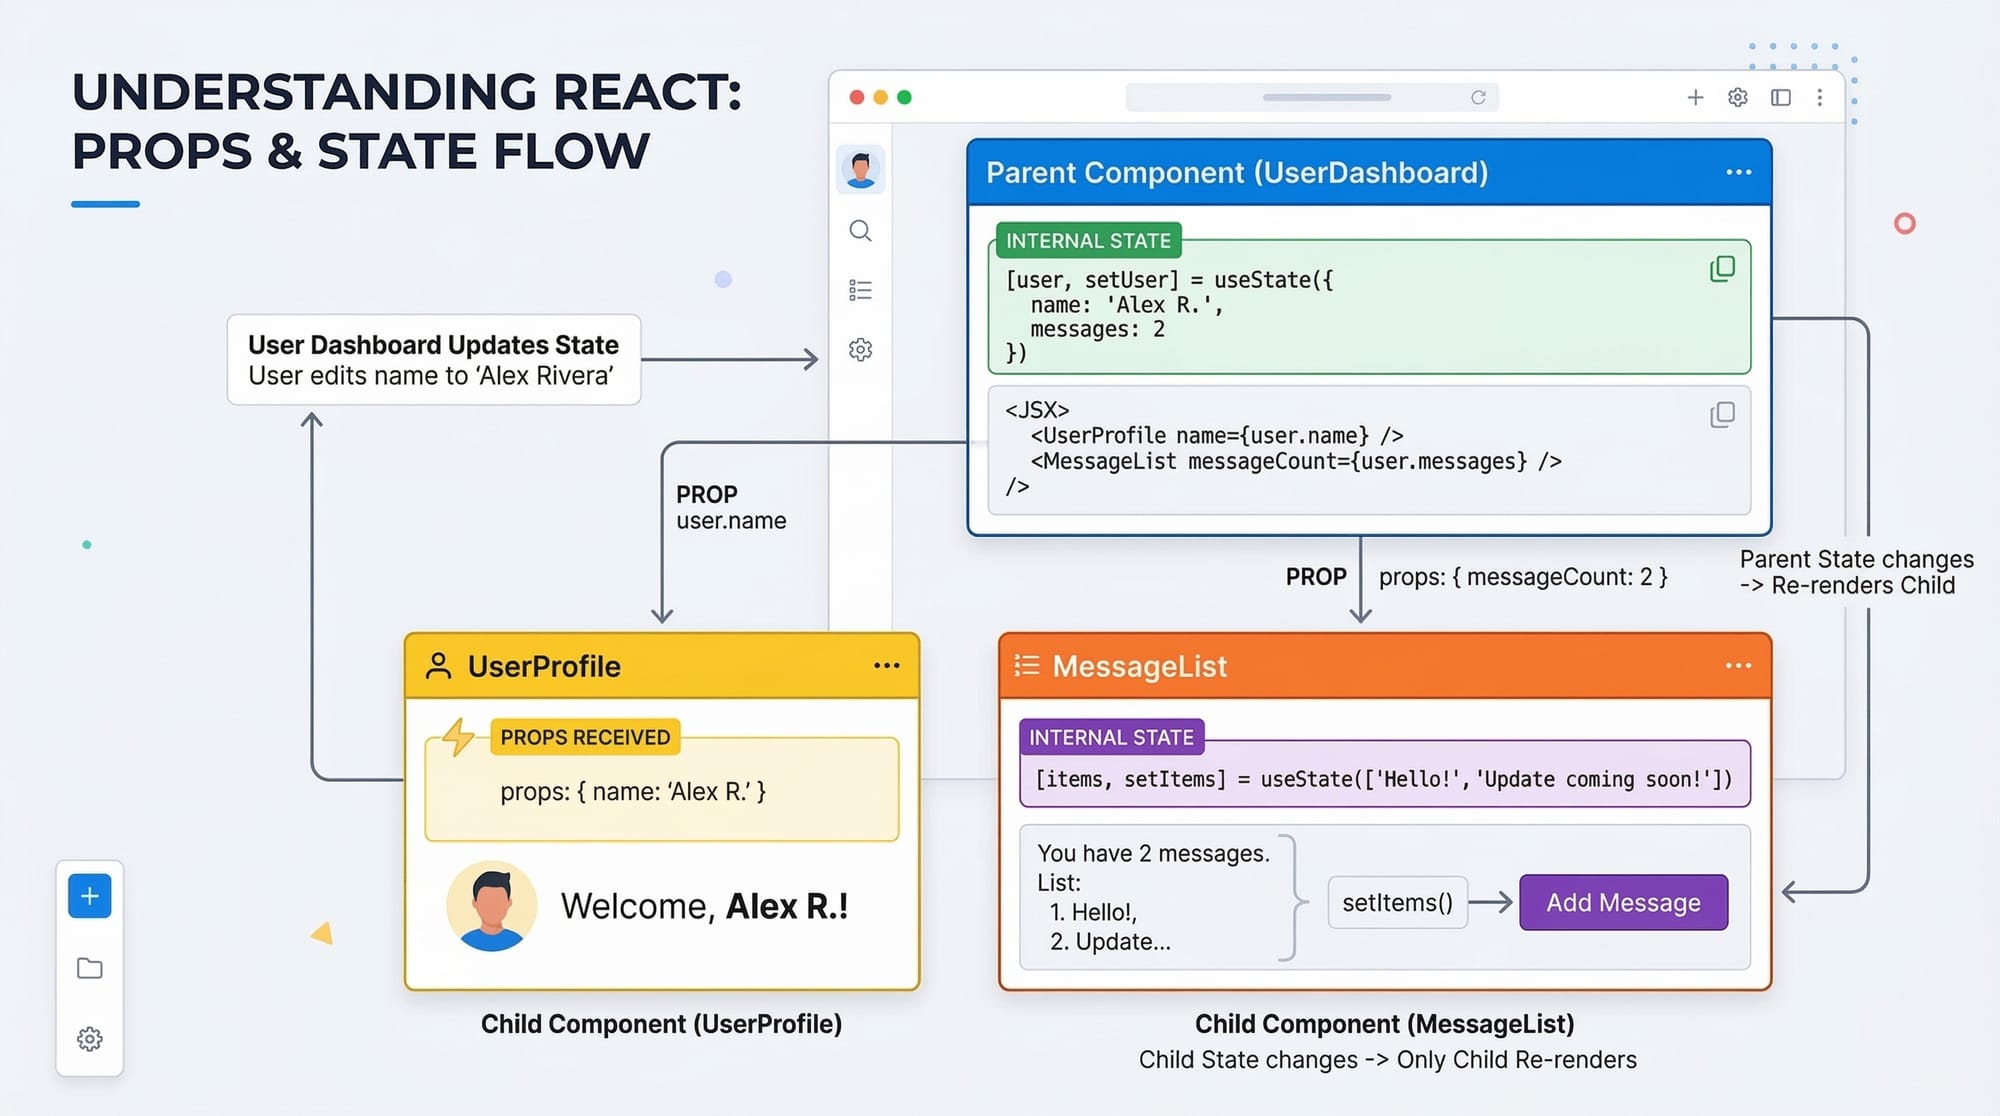
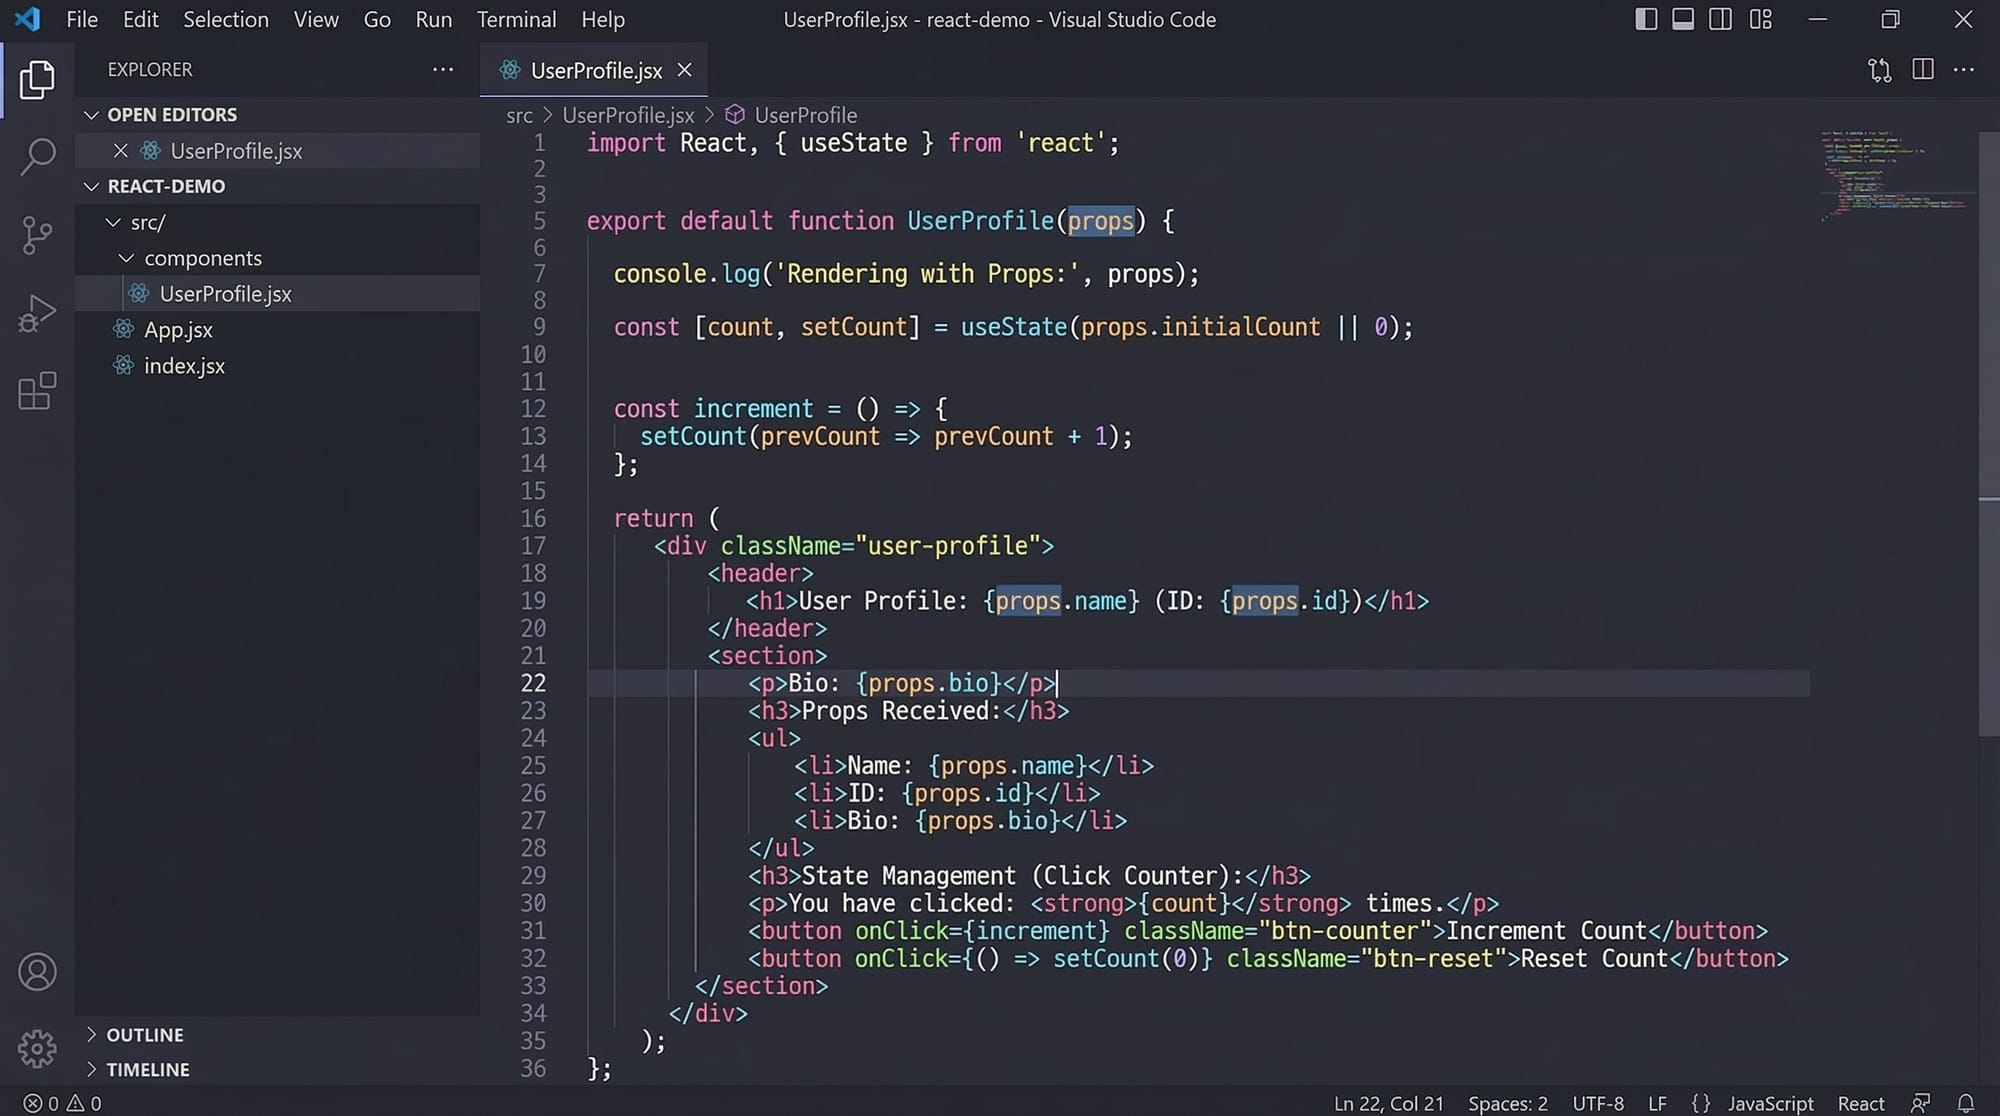
Understanding React State (Managing Dynamic Data)
While props pass data from parents, state stores data that changes inside a component.
For example:
- A counter
- A form input
- A shopping cart total
- A course selection system
In modern React, state is usually managed using the useState hook.
Example:
import { useState } from "react";

function Counter() {
  const [count, setCount] = useState(0);

  return (
    <div>
      <h2>Count: {count}</h2>
      <button onClick={() => setCount(count + 1)}>Increase</button>
    </div>
  );
}
Line-by-line explanation:
import { useState } from "react";
Imports the useState hook from React.
const [count, setCount] = useState(0);
count→ current state valuesetCount→ function used to update state0→ initial value
<h2>Count: {count}</h2>
Displays the current state value.
<button onClick={() => setCount(count + 1)}>
When the button is clicked, the state increases by 1.
React automatically re-renders the component when the state changes.
Props vs State (Key Differences)
| Feature | Props | State |
|---|---|---|
| Who owns it | Parent component | Current component |
| Can it change | No (read-only) | Yes |
| Purpose | Pass data | Store dynamic data |
| Updated by | Parent | setState / useState |
Example:
A CourseList component receives course names through props, but it stores the selected course in state.
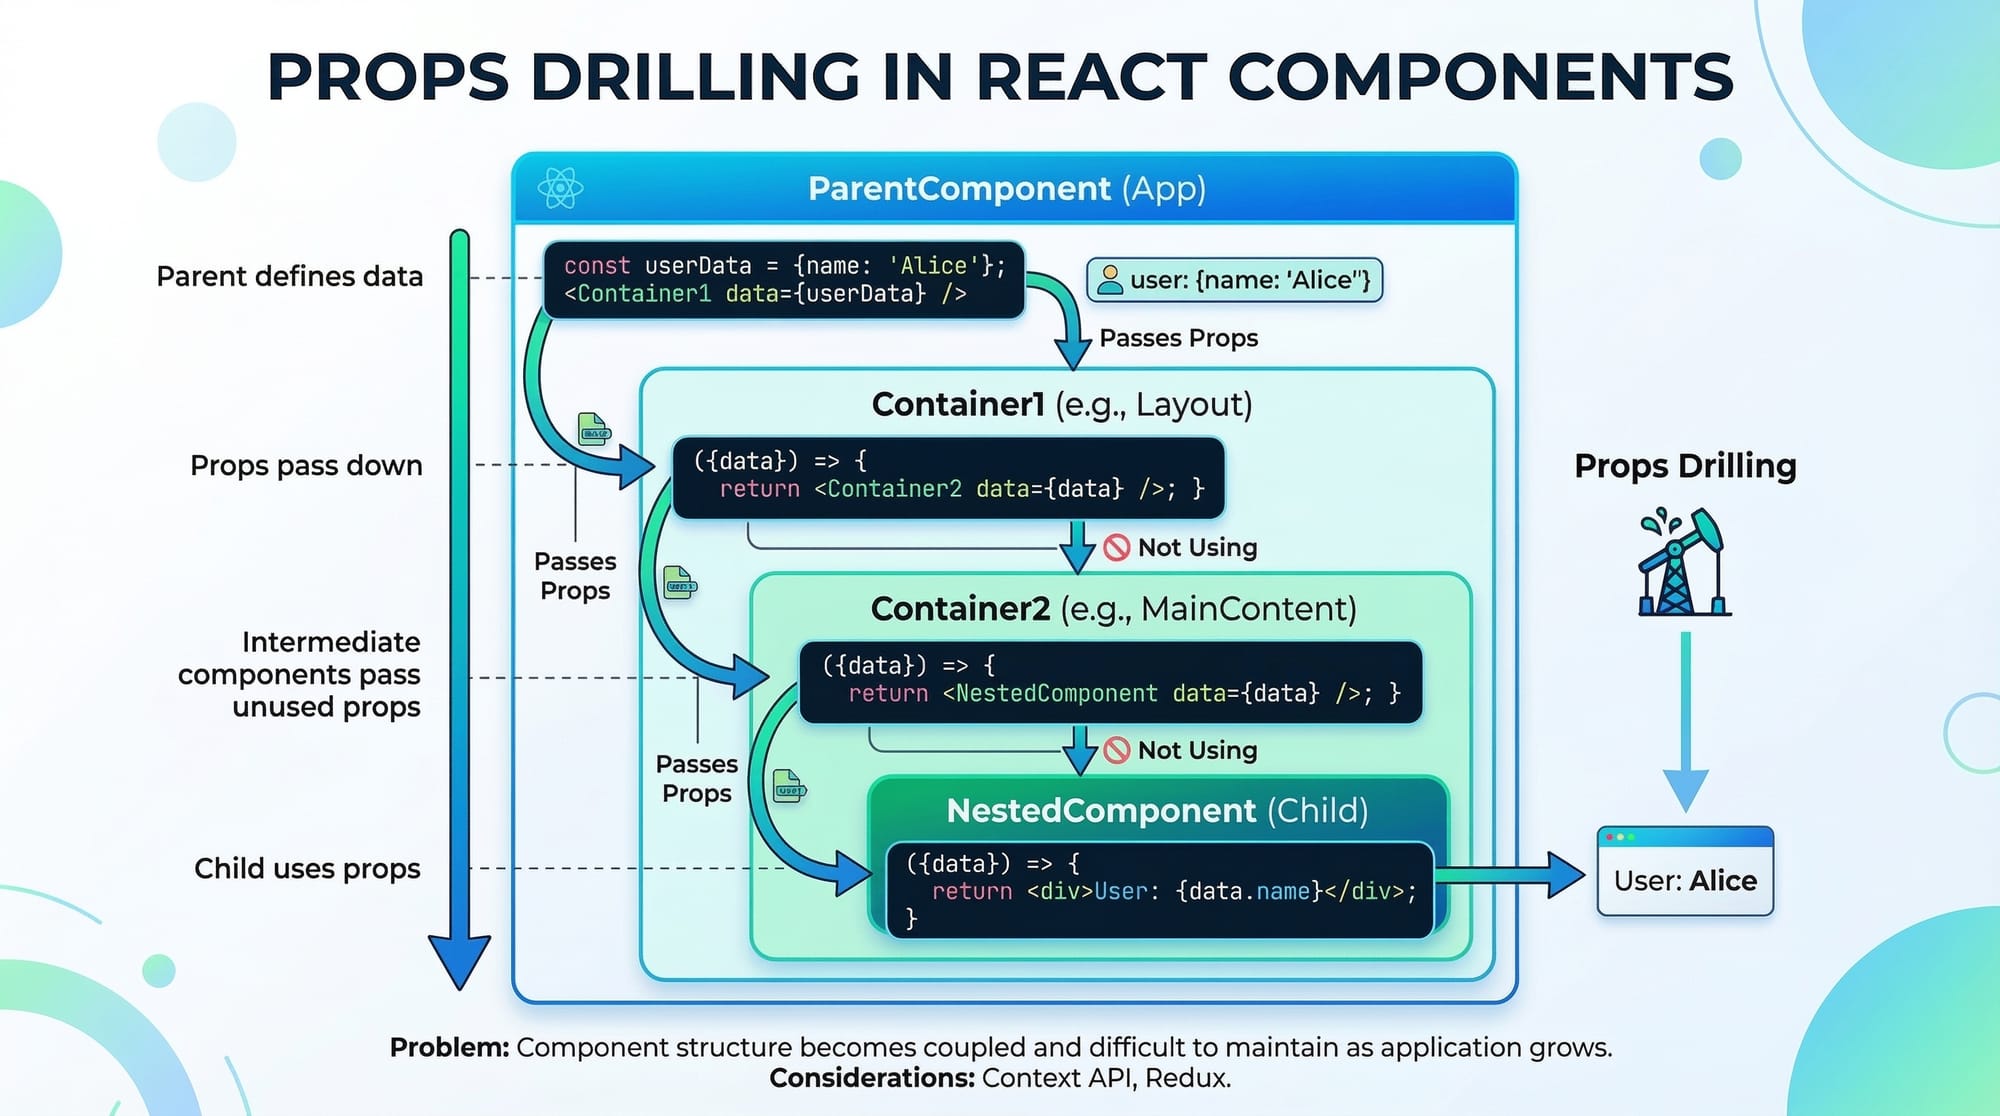
Understanding Props Drilling
Props drilling happens when data is passed through multiple components just to reach a deeply nested component.
Example:
App → Dashboard → StudentPanel → StudentCard
If App needs to send student data to StudentCard, the data must pass through every intermediate component.
Example:
function App() {
  const student = "Fatima";
  return <Dashboard student={student} />;
}
This can become messy in large applications.
Solutions include:
- React Context API
- State management libraries
Practical Code Examples
Example 1: Student Fee Counter
This example demonstrates state management using useState.
Scenario: A student in Islamabad selects courses and the fee updates dynamically.
import { useState } from "react";

function FeeCalculator() {
  const [courses, setCourses] = useState(1);
  const feePerCourse = 5000;

  const totalFee = courses * feePerCourse;

  return (
    <div>
      <h2>Total Courses: {courses}</h2>
      <h3>Total Fee: PKR {totalFee}</h3>

      <button onClick={() => setCourses(courses + 1)}>
        Add Course
      </button>
    </div>
  );
}
Line-by-line explanation:
const [courses, setCourses] = useState(1);
Stores the number of selected courses.
const feePerCourse = 5000;
Each course costs PKR 5000.
const totalFee = courses * feePerCourse;
Calculates the total fee.
<h2>Total Courses: {courses}</h2>
Displays the current number of courses.
<h3>Total Fee: PKR {totalFee}</h3>
Shows the calculated fee.
<button onClick={() => setCourses(courses + 1)}>
Adds one course when clicked.
Example 2: Real-World Application (Product Card)
Scenario: A student from Karachi builds a small online store UI.
function ProductCard(props) {
  return (
    <div>
      <h2>{props.name}</h2>
      <p>Price: PKR {props.price}</p>
    </div>
  );
}

function App() {
  return (
    <div>
      <ProductCard name="Laptop Bag" price={2500} />
      <ProductCard name="Wireless Mouse" price={1800} />
    </div>
  );
}
Line-by-line explanation:
function ProductCard(props)
Creates a reusable component.
<h2>{props.name}</h2>
Displays product name.
<p>Price: PKR {props.price}</p>
Displays product price.
<ProductCard name="Laptop Bag" price={2500} />
Passes product data through props.
Benefits:
- Reusable components
- Clean UI structure
- Easy state management
Common Mistakes & How to Avoid Them
Mistake 1: Modifying Props Directly
Props are immutable.
Wrong example:
props.name = "Ali";
This causes errors.
Correct approach:
Use state instead.
const [name, setName] = useState(props.name);
Now the value can be updated safely.
Mistake 2: Forgetting to Use setState / useState
Many beginners try to change state directly.
Wrong:
count = count + 1;
Correct:
setCount(count + 1);
Why?
React only re-renders components when setState or setCount is used.
Practice Exercises
Exercise 1: Build a Student Greeting Component
Problem:
Create a component that displays a student's name and city using props.
Example output:
Welcome Ahmad from Lahore
Solution:
function Greeting(props) {
  return (
    <h2>
      Welcome {props.name} from {props.city}
    </h2>
  );
}
Explanation:
function Greeting(props)
Receives props.
{props.name}
Displays the student's name.
{props.city}
Displays the student's city.
Exercise 2: Create a Like Button
Problem:
Create a button that increases the number of likes when clicked.
Solution:
import { useState } from "react";

function LikeButton() {
  const [likes, setLikes] = useState(0);

  return (
    <div>
      <h3>Likes: {likes}</h3>
      <button onClick={() => setLikes(likes + 1)}>
        Like
      </button>
    </div>
  );
}
Explanation:
useState(0)
Initial likes = 0.
setLikes(likes + 1)
Increases likes when clicked.
Frequently Asked Questions
What is React State?
React state is an object that stores dynamic data inside a component. When the state changes using setState or useState, React automatically re-renders the component to update the UI.
What are React Props?
React props are inputs passed from a parent component to a child component. They allow components to share data and build reusable UI elements.
What is useState in React?
useState is a React hook used to add state to functional components. It returns a state variable and a function that updates that variable.
What is props drilling?
Props drilling occurs when props are passed through many nested components just to reach a deeply nested child component. This can make code harder to maintain.
When should I use state vs props?
Use props when passing data between components and state when managing data that changes within a component.
Summary & Key Takeaways
- React Props allow data to be passed from parent to child components.
- React State stores dynamic data inside components.
- The useState hook is the modern way to manage state in functional components.
- setState / setCount functions must be used to update state properly.
- Props drilling can occur when data passes through many nested components.
- Understanding state management is essential for building real-world React apps.
Next Steps & Related Tutorials
Now that you understand React State and Props, continue learning with these tutorials on theiqra.edu.pk:
- Learn how components work in "Building Reusable React Components"
- Understand UI rendering in "Understanding JSX in React"
- Improve performance with "React Hooks Explained for Beginners"
- Build real apps with "Creating a React Student Management System"
By mastering React state management, props, and hooks, you will be ready to build modern applications used by companies across Pakistan and around the world.
Test Your Python Knowledge!
Finished reading? Take a quick quiz to see how much you've learned from this tutorial.