Tauri Tutorial Build Desktop Apps with Rust & Web Tech
Introduction
Tauri Tutorial: Build Desktop Apps with Rust & Web Tech is a modern guide for students who want to create lightweight, fast, and secure desktop applications using a combination of web technologies (HTML, CSS, JavaScript) and the Rust programming language.
Unlike traditional desktop frameworks, Tauri allows you to build apps where the frontend is powered by web technologies (like React, Vue, or Svelte), while the backend logic is handled by Rust. This gives you the best of both worlds: a beautiful user interface and a high-performance, memory-safe backend.
For Pakistani students in cities like Lahore, Karachi, and Islamabad, learning Tauri is especially valuable. The global job market is rapidly shifting toward lightweight desktop tools, cross-platform apps, and secure systems. Freelancers in Pakistan can use Tauri to build:
- POS systems for local shops in PKR billing
- Lightweight note-taking apps for students
- Inventory systems for small businesses
- Cross-platform utility apps for Fiverr/Upwork clients
Tauri is also a strong alternative in the ongoing debate of tauri vs electron, especially when performance and app size matter.
Prerequisites
Before starting this Tauri tutorial, you should have a basic understanding of:
- HTML, CSS, and JavaScript fundamentals
- Basic Rust programming (variables, functions, ownership basics)
- Command line usage (Terminal / PowerShell)
- Node.js installed on your system
- Familiarity with frontend frameworks (optional but helpful)
For Pakistani students:
If you’ve already built small web projects in React or even simple JavaScript apps like a calculator or to-do list, you are ready to start learning Tauri.
You should also install:
- Rust toolchain (via rustup)
- Node.js LTS version
- A code editor like VS Code
Core Concepts & Explanation
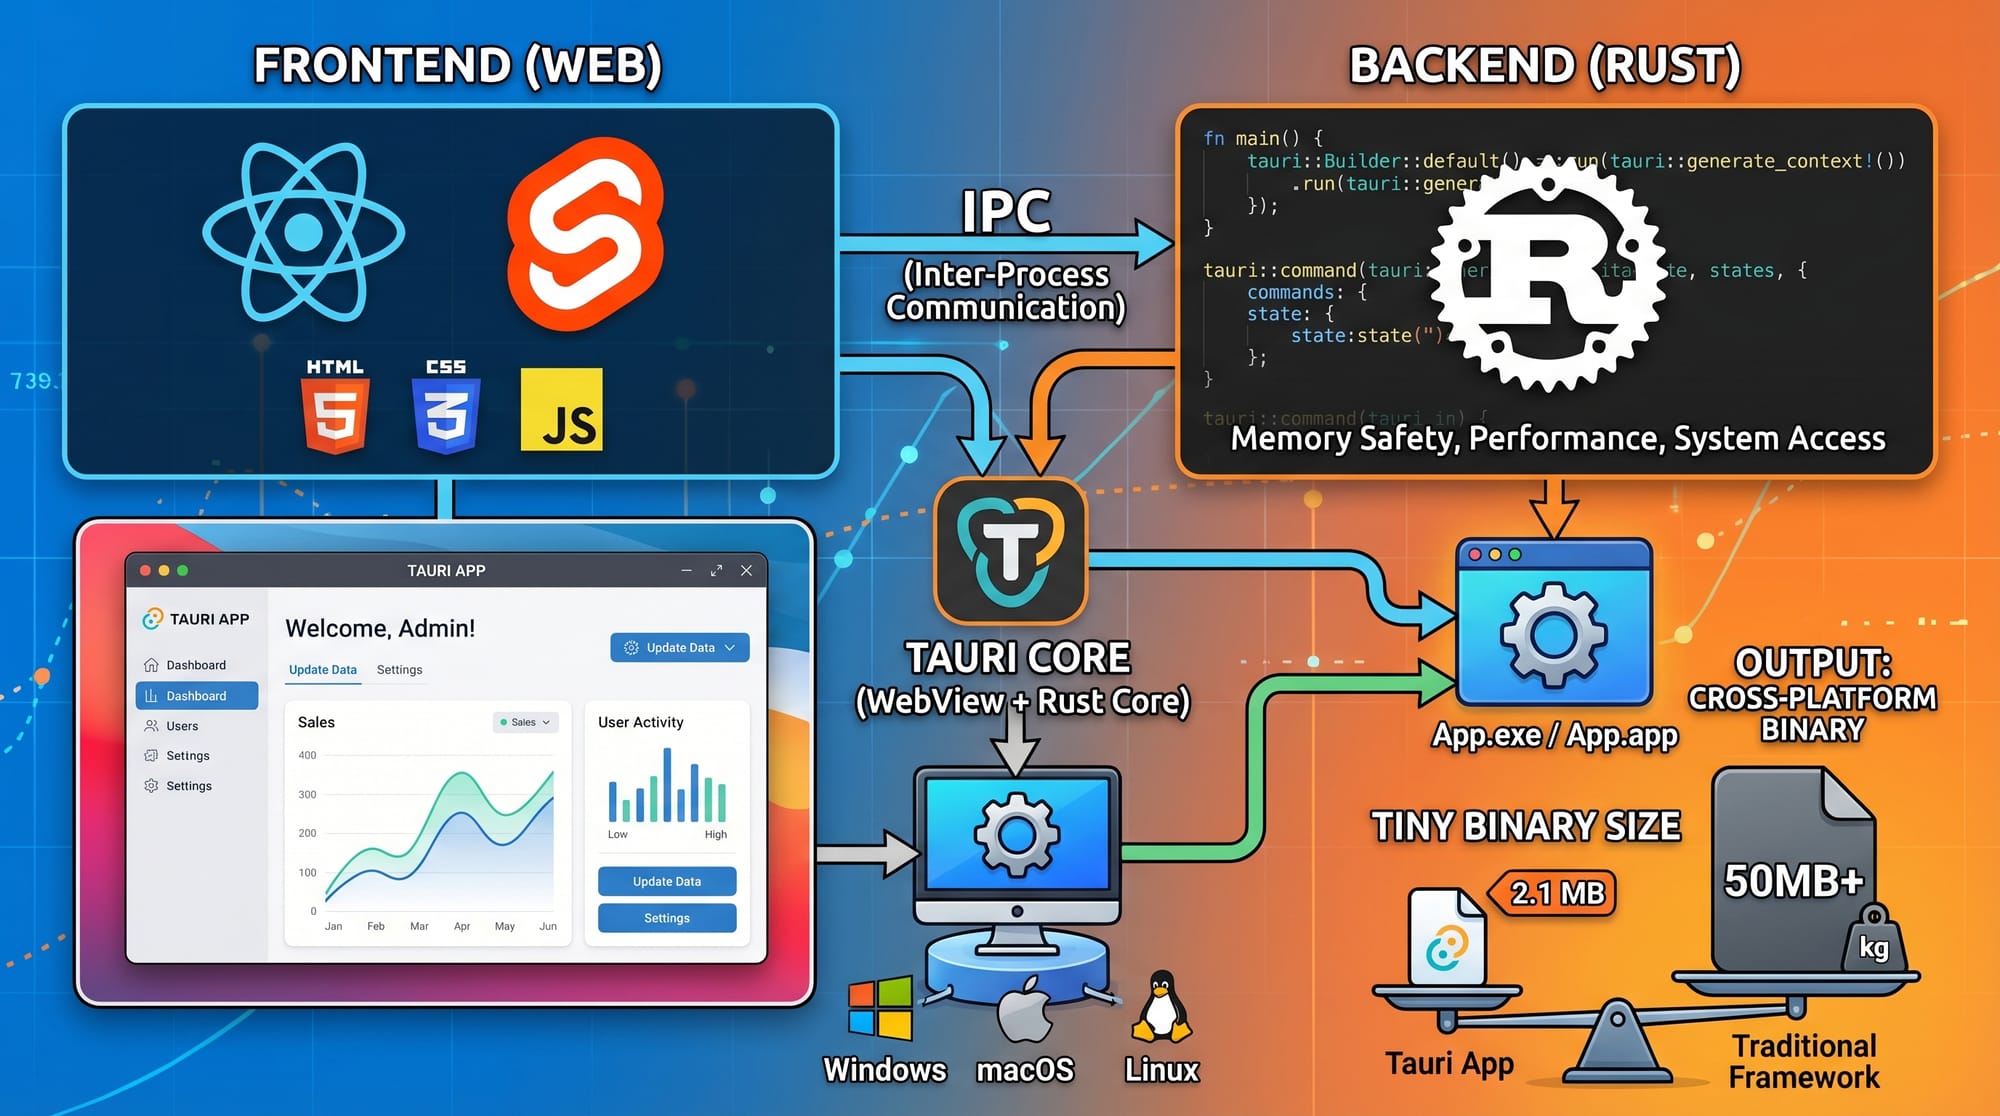
How Tauri Works (Frontend + Rust Backend Architecture)
Tauri applications are built using two main layers:
- Frontend Layer (Web UI)
- Built with HTML, CSS, JavaScript
- Frameworks like React, Vue, Svelte are supported
- Runs in a webview (not a full browser like Electron)
- Backend Layer (Rust Core)
- Handles system-level operations
- File system access, APIs, performance logic
- Ensures memory safety and security
This separation makes Tauri apps extremely lightweight compared to Electron apps.
Example:
- React handles UI for a "Expense Tracker App"
- Rust handles saving data to local files securely
Tauri Commands and Communication System
One of the most important concepts in Tauri is how JavaScript communicates with Rust.
Tauri uses a command system:
- Rust functions are marked as commands
- JavaScript calls them using
invoke()
Example concept:
- User clicks “Save Expense”
- JS sends data to Rust
- Rust writes data into a file
- JS updates UI

Why Tauri is Lightweight
Tauri does NOT bundle a full browser engine like Chromium.
Instead:
- Uses system webview (Edge WebView2 on Windows)
- Uses native OS rendering
- Keeps binary size extremely small
This is why apps built with Tauri are often 5–10MB compared to Electron apps which can be 100–200MB.
Practical Code Examples
Example 1: Basic Tauri Command (Hello from Rust)
Rust Backend (src-tauri/src/main.rs)
// Import Tauri library
use tauri::command;

// Define a command function
#[command]
fn greet(name: String) -> String {
    format!("Hello, {} from Pakistan!", name)
}

fn main() {
    tauri::Builder::default()
        .invoke_handler(tauri::generate_handler![greet])
        .run(tauri::generate_context!())
        .expect("error while running tauri application");
}
Explanation (Line by Line)
use tauri::command;→ Imports Tauri command macro#[command]→ Marks function accessible from frontendfn greet(name: String)→ Takes user input from JSformat!()→ Creates formatted string responsetauri::Builder::default()→ Initializes app builderinvoke_handler()→ Registers Rust functions for JSrun()→ Starts the desktop application
Frontend (JavaScript)
import { invoke } from "@tauri-apps/api/tauri";

async function sayHello() {
  const result = await invoke("greet", { name: "Ahmad" });
  console.log(result);
}
Explanation
invoke→ Bridge between JS and Rust"greet"→ Name of Rust function{ name: "Ahmad" }→ Data sent to backendresult→ Response from Rust printed in console
Example 2: Real-World Expense Tracker App
Rust Backend
use tauri::command;
use std::fs::OpenOptions;
use std::io::Write;

#[command]
fn save_expense(item: String, amount: f64) -> String {
    let data = format!("{},{}\n", item, amount);

    let mut file = OpenOptions::new()
        .append(true)
        .create(true)
        .open("expenses.txt")
        .unwrap();

    file.write_all(data.as_bytes()).unwrap();

    "Expense saved successfully!".to_string()
}
Explanation
OpenOptions::new()→ Opens file safely.append(true)→ Adds new data without deleting old.create(true)→ Creates file if it doesn’t existwrite_all()→ Writes data into file- Returns success message to frontend
Frontend
import { invoke } from "@tauri-apps/api/tauri";

async function addExpense() {
  await invoke("save_expense", {
    item: "Internet Bill",
    amount: 2500
  });
}
Explanation
- Sends expense data like "Internet Bill - 2500 PKR"
- Rust saves it locally in a file
- Useful for Pakistani small business systems

Common Mistakes & How to Avoid Them
Mistake 1: Forgetting to Register Rust Commands
Problem:
Students write Rust functions but cannot call them from JavaScript.
Fix:
Always register functions inside:
invoke_handler(tauri::generate_handler![your_function])
Without this, frontend cannot access backend functions.
Mistake 2: Incorrect Data Types Between JS and Rust
Problem:
Sending string instead of number or vice versa causes errors.
Fix:
Ensure correct types:
- JS number → Rust
f64 - JS string → Rust
String
Example fix:
amount: Number(2500)

Practice Exercises
Exercise 1: Simple Greeting App
Problem:
Create a Tauri app that asks the user for their name and returns:
“Welcome, [Name] from Pakistan!”
Solution:
- Create Rust command
welcome_user - Pass name from JS using
invoke - Return formatted greeting
Exercise 2: Simple Calculator Backend
Problem:
Create a Rust backend that adds two numbers.
Solution:
#[command]
fn add(a: f64, b: f64) -> f64 {
    a + b
}
JavaScript:
const result = await invoke("add", { a: 10, b: 20 });
console.log(result);
Frequently Asked Questions
What is Tauri and why is it used?
Tauri is a framework for building desktop applications using web technologies and Rust. It is used because it produces smaller, faster, and more secure apps compared to traditional frameworks.
How is Tauri different from Electron?
Tauri vs Electron is mainly about performance and size. Electron apps include Chromium, making them heavy, while Tauri uses the system webview, making apps much smaller and faster.
Is Rust necessary for Tauri development?
Yes, Rust is required for backend logic in Tauri. However, beginners can start with simple commands and gradually learn Rust concepts.
Can I build real-world apps with Tauri in Pakistan?
Yes. Students in Pakistan can build inventory systems, billing software, and freelance desktop tools for clients in PKR or international markets.
Is Tauri good for beginners?
Tauri is beginner-friendly if you already know basic JavaScript. However, learning Rust basics is important for advanced functionality.
Summary & Key Takeaways
- Tauri combines web frontend + Rust backend for desktop apps
- It is a lightweight alternative to Electron
- Communication happens through
invoke()and Rust commands - Apps built with Tauri are smaller and faster
- Rust ensures security and performance
- Great choice for Pakistani students entering global freelancing
Next Steps & Related Tutorials
To continue your learning journey on theiqra.edu.pk, explore these tutorials:
- Learn frontend integration in Electron Tutorial
- Strengthen your backend skills with Rust Tutorial for Beginners
- Understand modern app architecture in Cross-Platform App Development Guide
- Explore APIs with JavaScript API Integration Tutorial
If you want, I can also convert this into a full website blog page (HTML + Tailwind) or generate a downloadable PDF for students.
Test Your Python Knowledge!
Finished reading? Take a quick quiz to see how much you've learned from this tutorial.