Three js Tutorial 3D Graphics & WebGL in the Browser
Introduction
Three.js is a powerful JavaScript library that allows developers to create stunning 3D graphics directly in the browser using WebGL. In this three.js tutorial: 3d graphics & webgl in the browser, you will learn how to build interactive 3D scenes using JavaScript—without needing complex low-level graphics programming.
For Pakistani students in cities like Lahore, Karachi, and Islamabad, learning Three.js opens doors to careers in game development, data visualization, web design, and even freelancing platforms like Fiverr and Upwork. Imagine Ahmad building a 3D product showcase for a local clothing brand, or Fatima designing interactive educational content—this is the power of 3D JavaScript.
Three.js simplifies WebGL, which is otherwise complex and difficult to use directly. With it, you can create animations, games, simulations, and immersive web experiences.
Prerequisites
Before starting this threejs beginner tutorial, you should have:
- Basic understanding of HTML and CSS
- Intermediate knowledge of JavaScript
- Familiarity with ES6 concepts (let, const, arrow functions)
- Basic understanding of coordinate systems (helpful but not required)
- A code editor like VS Code
- A modern browser (Chrome recommended)
Core Concepts & Explanation
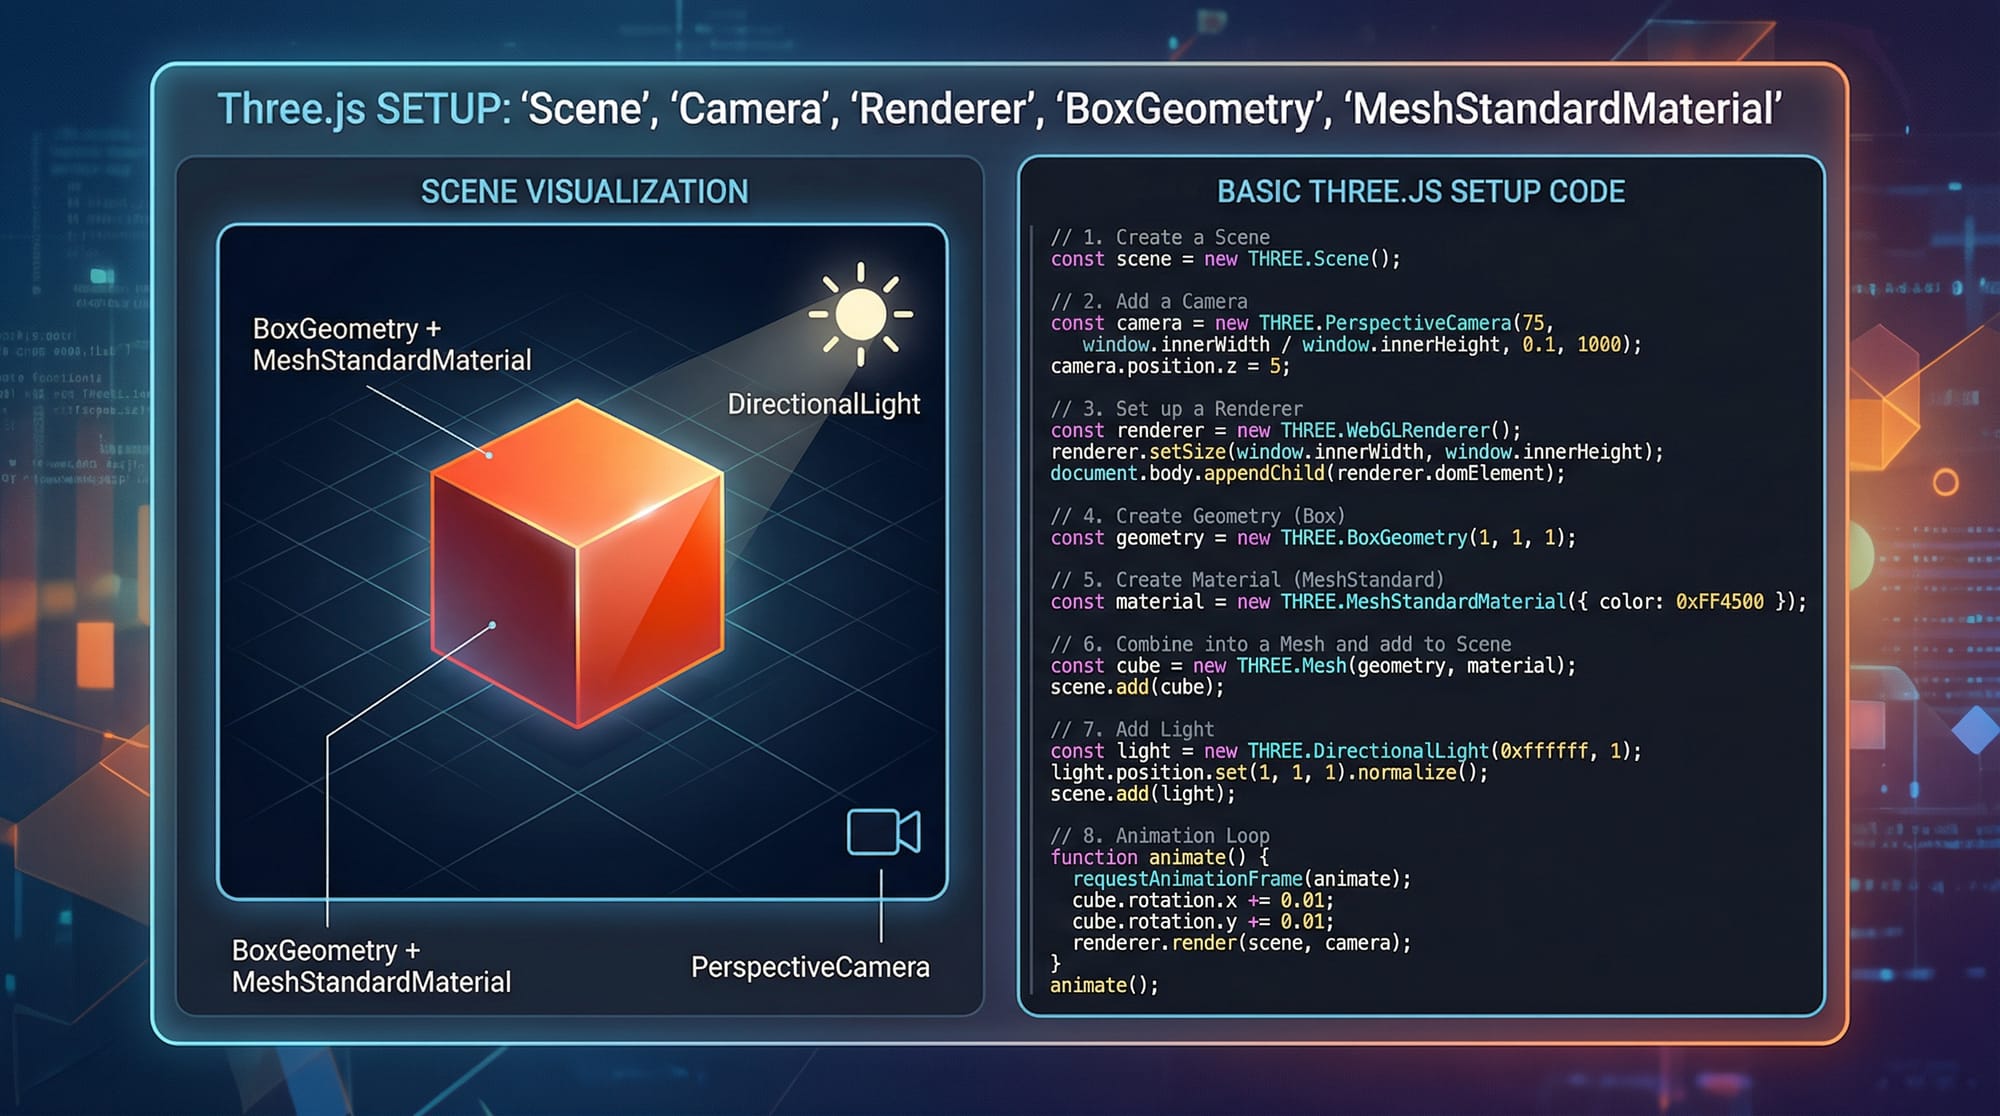
Scene, Camera, and Renderer (The Foundation)
Every Three.js application is built using three main components:
- Scene → The container that holds all objects
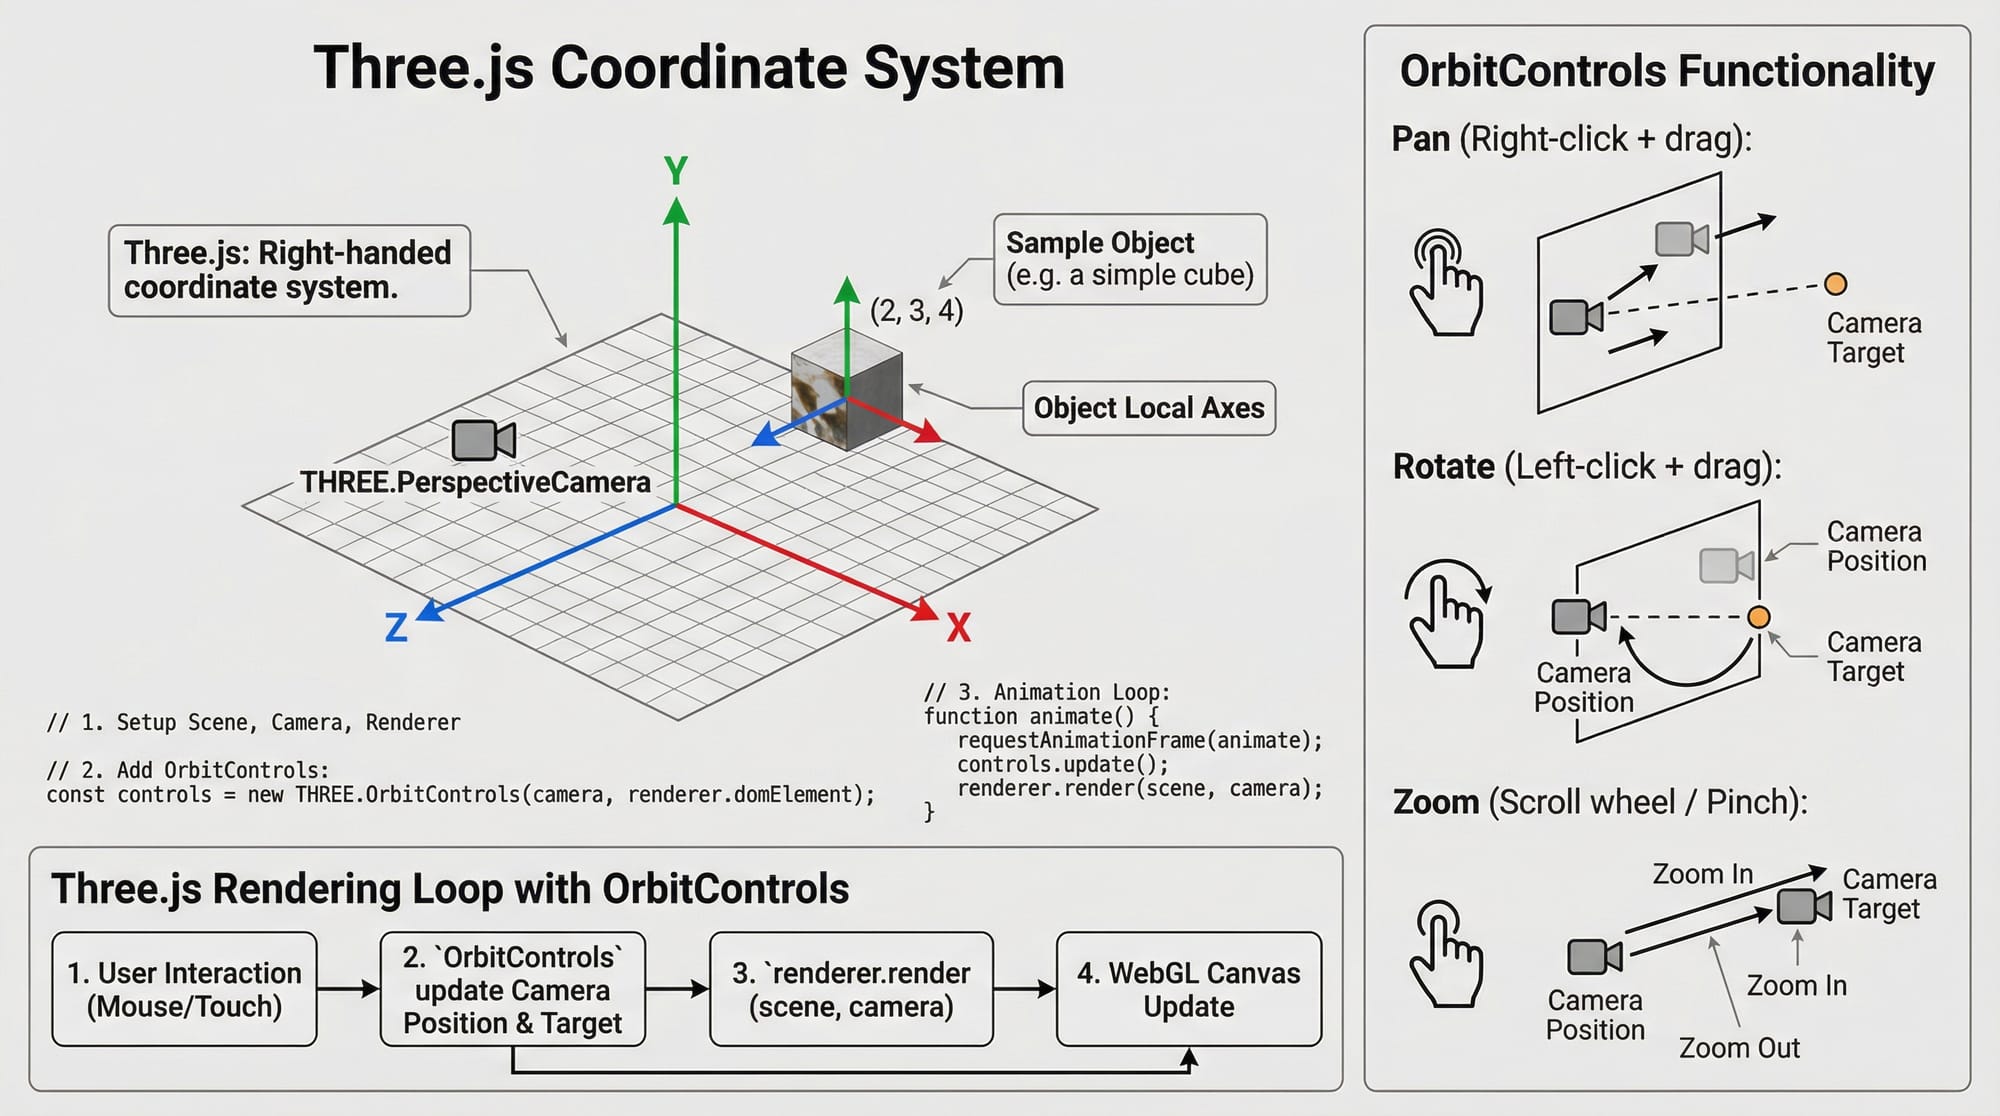
- Camera → Defines what the user sees
- Renderer → Displays the scene on the browser
Example Concept:
const scene = new THREE.Scene();
const camera = new THREE.PerspectiveCamera(75, window.innerWidth / window.innerHeight, 0.1, 1000);
const renderer = new THREE.WebGLRenderer();
Explanation:
scenecreates a 3D worldcameradefines perspective view (like human eyes)rendererdraws everything on the screen
Geometry, Material, and Mesh (Creating Objects)
To display anything in Three.js, you need:
- Geometry → Shape (cube, sphere, etc.)
- Material → Appearance (color, texture)
- Mesh → Combination of geometry + material
Example:
const geometry = new THREE.BoxGeometry();
const material = new THREE.MeshStandardMaterial({ color: 0x00ff00 });
const cube = new THREE.Mesh(geometry, material);
scene.add(cube);
Explanation:
BoxGeometry()creates a cubeMeshStandardMaterialadds realistic lightingMeshcombines shape + appearancescene.add()puts object into the scene
Practical Code Examples
Example 1: Rotating 3D Cube (Beginner Project)
<!DOCTYPE html>
<html>
<head>
  <title>Three.js Cube</title>
  <style>
    body { margin: 0; }
  </style>
</head>
<body>
<script src="https://cdnjs.cloudflare.com/ajax/libs/three.js/r128/three.min.js"></script>
<script>
// Create scene
const scene = new THREE.Scene();

// Create camera
const camera = new THREE.PerspectiveCamera(
  75,
  window.innerWidth / window.innerHeight,
  0.1,
  1000
);

// Create renderer
const renderer = new THREE.WebGLRenderer();
renderer.setSize(window.innerWidth, window.innerHeight);
document.body.appendChild(renderer.domElement);

// Create cube
const geometry = new THREE.BoxGeometry();
const material = new THREE.MeshStandardMaterial({ color: 0x0077ff });
const cube = new THREE.Mesh(geometry, material);
scene.add(cube);

// Add light
const light = new THREE.PointLight(0xffffff, 1);
light.position.set(5, 5, 5);
scene.add(light);

// Position camera
camera.position.z = 5;

// Animation loop
function animate() {
  requestAnimationFrame(animate);

  cube.rotation.x += 0.01;
  cube.rotation.y += 0.01;

  renderer.render(scene, camera);
}

animate();
</script>
</body>
</html>
Line-by-line Explanation:
THREE.Scene()→ Creates 3D environmentPerspectiveCamera()→ Defines viewing angleWebGLRenderer()→ Renders graphicsBoxGeometry()→ Creates cube shapeMeshStandardMaterial()→ Adds color & lightingPointLight()→ Adds light sourcecamera.position.z = 5→ Moves camera backanimate()→ Continuously updates scenecube.rotation.x/y→ Rotates cube
Example 2: Real-World Application — 3D Product Viewer
Imagine Ali in Karachi building a product viewer for an online store selling shoes.
// Scene setup
const scene = new THREE.Scene();

// Camera
const camera = new THREE.PerspectiveCamera(70, window.innerWidth / window.innerHeight, 0.1, 1000);

// Renderer
const renderer = new THREE.WebGLRenderer({ antialias: true });
renderer.setSize(window.innerWidth, window.innerHeight);
document.body.appendChild(renderer.domElement);

// Load texture
const textureLoader = new THREE.TextureLoader();
const texture = textureLoader.load('shoe.jpg');

// Geometry + material
const geometry = new THREE.BoxGeometry(2, 1, 4);
const material = new THREE.MeshStandardMaterial({ map: texture });

// Mesh
const product = new THREE.Mesh(geometry, material);
scene.add(product);

// Light
const light = new THREE.DirectionalLight(0xffffff, 1);
light.position.set(10, 10, 10);
scene.add(light);

// Camera position
camera.position.z = 6;

// Animation
function animate() {
  requestAnimationFrame(animate);
  product.rotation.y += 0.01;
  renderer.render(scene, camera);
}
animate();
Explanation:
TextureLoader()→ Loads image for realismmap: texture→ Applies image to objectDirectionalLight→ Simulates sunlight- Rotating object improves user interaction
This is useful for Pakistani e-commerce platforms showing products in 3D.
Common Mistakes & How to Avoid Them
Mistake 1: Forgetting Lighting
Problem: Objects appear black.
// Wrong: No light
const cube = new THREE.Mesh(geometry, material);
Fix:
const light = new THREE.PointLight(0xffffff, 1);
scene.add(light);
Explanation:
Without light, materials like MeshStandardMaterial cannot be seen.
Mistake 2: Incorrect Camera Position
Problem: Object not visible.
// Camera too close
camera.position.z = 0;
Fix:
camera.position.z = 5;
Explanation:
Camera must be positioned away from objects.

Practice Exercises
Exercise 1: Change Cube Color
Problem: Modify cube color to red.
Solution:
const material = new THREE.MeshStandardMaterial({ color: 0xff0000 });
Explanation:
0xff0000represents red color in hex
Exercise 2: Add Rotation Control
Problem: Rotate cube only on Y-axis.
Solution:
cube.rotation.y += 0.02;
Explanation:
- Rotates cube horizontally
- Removes X-axis rotation
Frequently Asked Questions
What is Three.js used for?
Three.js is used to create 3D graphics, animations, and interactive experiences in web browsers using JavaScript and WebGL.
How do I start learning Three.js as a beginner?
Start with basic JavaScript, then build simple scenes like cubes and gradually move to lighting, textures, and animations.
Is Three.js better than WebGL?
Three.js is not better but easier—it is a library built on top of WebGL that simplifies complex tasks.
Can I build games using Three.js?
Yes, you can build browser-based 3D games, especially simple or medium-level games.
Do I need a powerful computer to run Three.js?
No, most modern laptops in Pakistan can run Three.js projects smoothly, as long as the browser supports WebGL.
Summary & Key Takeaways
- Three.js simplifies WebGL for creating 3D graphics
- Core components: Scene, Camera, Renderer
- Objects require Geometry + Material + Mesh
- Lighting is essential for visibility
- Real-world applications include games and e-commerce
- Great skill for freelancing and modern web development
Next Steps & Related Tutorials
To continue your journey, explore these tutorials on theiqra.edu.pk:
- Learn JavaScript fundamentals in our JavaScript Tutorial
- Build data visualizations with our D3.js Tutorial
- Explore animation concepts in a Web Animations Guide
- Dive into advanced frontend development with a React.js Tutorial
By mastering this threejs beginner guide, you’re stepping into the future of web development—where 3D experiences are becoming the norm.
Test Your Python Knowledge!
Finished reading? Take a quick quiz to see how much you've learned from this tutorial.