Zustand Tutorial Lightweight React State Management
Introduction
State management is one of the most important concepts in modern React development. As applications grow, managing data between components becomes complex and difficult to maintain. This is where Zustand comes in.
In this zustand tutorial, you will learn how Zustand React state management works and why it is becoming popular among developers worldwide. Zustand is a lightweight, fast, and simple state management library that avoids the boilerplate of tools like Redux while still providing powerful features.
For Pakistani students building projects like e-commerce apps in Karachi, university portals in Islamabad, or freelance dashboards for clients in Lahore, Zustand can significantly simplify your workflow.
Unlike traditional libraries, Zustand offers:
- Minimal setup
- No providers required
- Simple and readable code
By the end of this tutorial, you will confidently use react zustand state in real-world applications.
Prerequisites
Before starting this tutorial, you should have:
- Basic knowledge of React.js
- Understanding of:
- Components
- Props and State
- Hooks (especially
useState)
- Familiarity with JavaScript ES6:
- Arrow functions
- Destructuring
- Node.js and npm installed
- A React project setup (e.g., using Vite or Create React App)
Core Concepts & Explanation
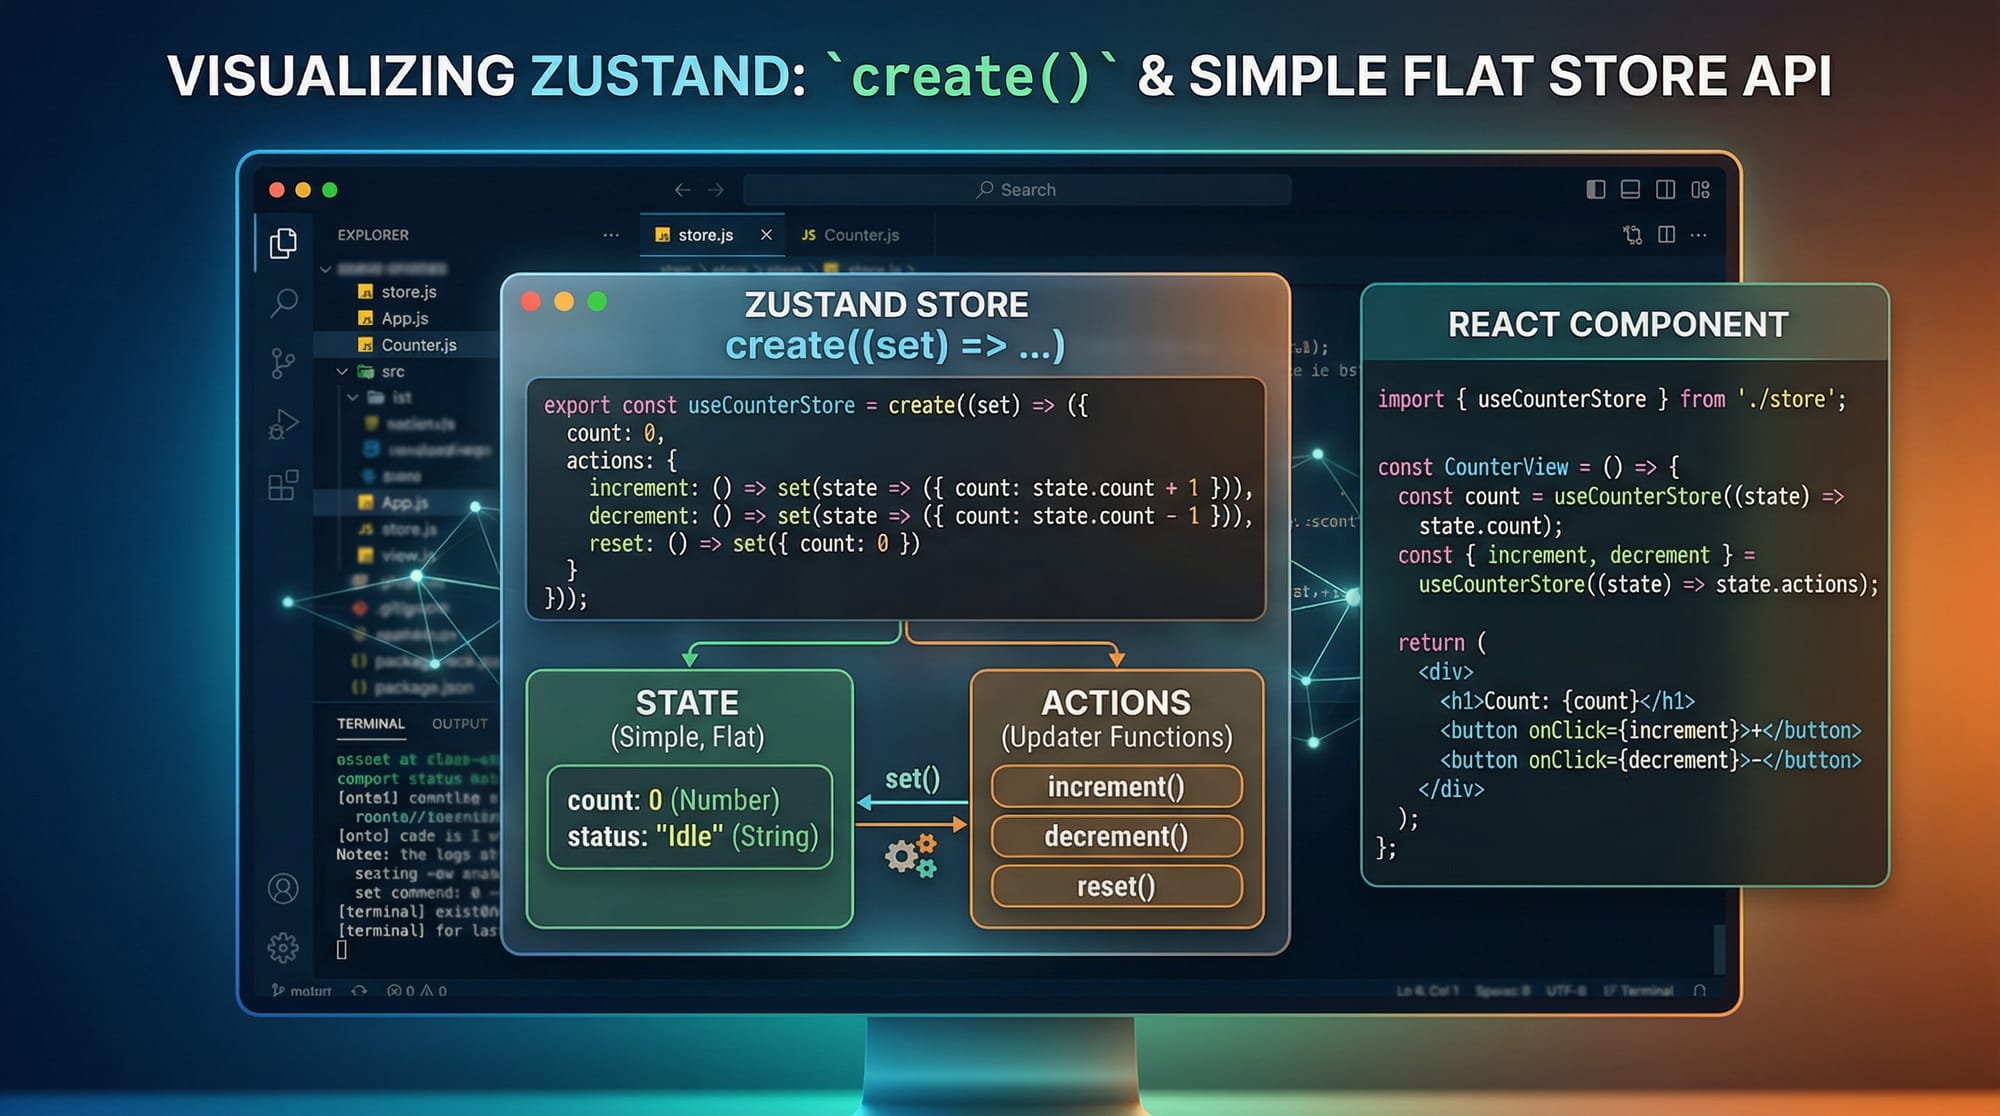
Zustand Store Creation with create()
The core of Zustand is the store, created using the create() function.
import { create } from 'zustand';

const useStore = create((set) => ({
  count: 0,
  increment: () => set((state) => ({ count: state.count + 1 })),
}));
Line-by-line Explanation:
import { create } from 'zustand';
Imports the main function used to create a store.const useStore = create((set) => ({ ... }))
Defines a custom hook (useStore) that holds state and actions.count: 0
Initial state value.increment: () => set(...)
Function to update state.set((state) => ({ count: state.count + 1 }))
Updates state based on previous state.
This simple structure replaces reducers, actions, and dispatch logic.
Accessing and Updating State in Components
Zustand allows direct usage inside components without wrapping providers.
import React from 'react';
import useStore from './store';

function Counter() {
  const count = useStore((state) => state.count);
  const increment = useStore((state) => state.increment);

  return (
    <div>
      <h1>{count}</h1>
      <button onClick={increment}>Increase</button>
    </div>
  );
}
Explanation:
useStore((state) => state.count)
Selects only the required state.useStore((state) => state.increment)
Selects the action.- No provider needed → simpler than Context API.
This is ideal for Pakistani beginners who want less complexity.
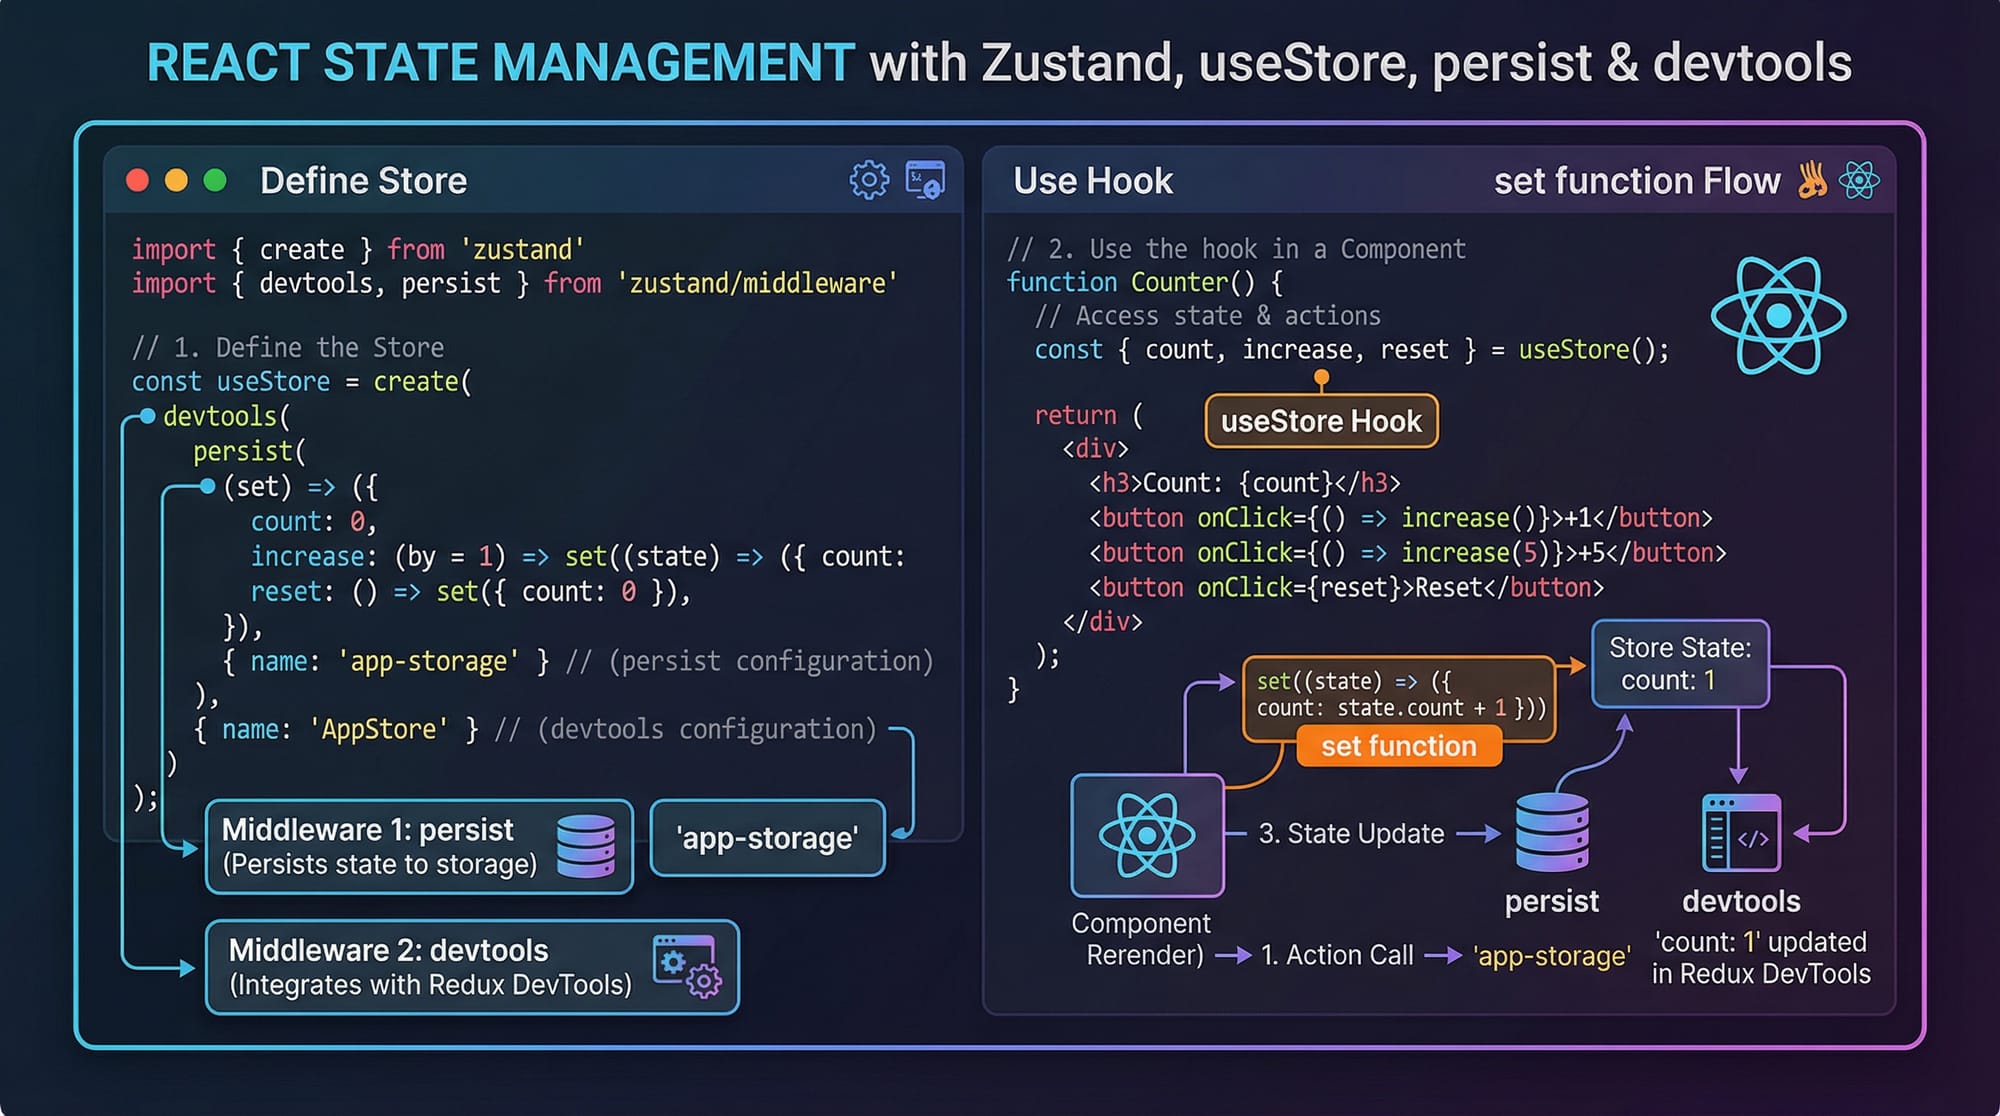
Middleware in Zustand (Persist & Devtools)
Zustand supports middleware like persist and devtools.
import { create } from 'zustand';
import { persist } from 'zustand/middleware';

const useStore = create(
  persist(
    (set) => ({
      user: null,
      login: (user) => set({ user }),
    }),
    {
      name: 'user-storage',
    }
  )
);
Explanation:
persist(...)
Saves state in localStorage.user: null
Initial user state.login: (user) => set({ user })
Updates user data.name: 'user-storage'
Key used in browser storage.
This is useful for apps like:
- Student dashboards
- Login systems
- Freelance client panels
Practical Code Examples
Example 1: Counter App (Beginner-Friendly)
import { create } from 'zustand';

// Create store
const useStore = create((set) => ({
  count: 0,
  increment: () => set((state) => ({ count: state.count + 1 })),
  decrement: () => set((state) => ({ count: state.count - 1 })),
}));

// Component
function Counter() {
  const count = useStore((state) => state.count);
  const increment = useStore((state) => state.increment);
  const decrement = useStore((state) => state.decrement);

  return (
    <div>
      <h2>Counter: {count}</h2>
      <button onClick={increment}>+</button>
      <button onClick={decrement}>-</button>
    </div>
  );
}
Line-by-line Explanation:
count: 0→ initial valueincrement→ increases countdecrement→ decreases countuseStore(...)→ reads state- Buttons trigger actions
This is much simpler than Redux setup.
Example 2: Real-World Application (Student Fee System in PKR)
import { create } from 'zustand';

const useFeeStore = create((set) => ({
  student: 'Ali',
  balance: 5000,

  payFee: (amount) =>
    set((state) => ({
      balance: state.balance - amount,
    })),

  addFee: (amount) =>
    set((state) => ({
      balance: state.balance + amount,
    })),
}));

function FeeDashboard() {
  const student = useFeeStore((state) => state.student);
  const balance = useFeeStore((state) => state.balance);
  const payFee = useFeeStore((state) => state.payFee);
  const addFee = useFeeStore((state) => state.addFee);

  return (
    <div>
      <h2>{student}'s Fee Dashboard</h2>
      <p>Balance: PKR {balance}</p>
      <button onClick={() => payFee(1000)}>Pay 1000</button>
      <button onClick={() => addFee(2000)}>Add 2000</button>
    </div>
  );
}
Explanation:
student: 'Ali'→ student namebalance: 5000→ initial PKR balancepayFee()→ deducts feeaddFee()→ adds amount- Buttons simulate real transactions
Perfect for university systems in Pakistan.

Common Mistakes & How to Avoid Them
Mistake 1: Updating State Incorrectly
❌ Wrong:
set({ count: count + 1 });
✔️ Correct:
set((state) => ({ count: state.count + 1 }));
Why?
- Direct updates can cause stale values
- Always use previous state safely
Mistake 2: Over-fetching State
❌ Wrong:
const state = useStore();
✔️ Correct:
const count = useStore((state) => state.count);
Why?
- Selecting entire state causes unnecessary re-renders
- Always pick only what you need

Practice Exercises
Exercise 1: Simple Todo List
Problem: Create a todo store with add and remove functions.
Solution:
const useTodoStore = create((set) => ({
  todos: [],
  addTodo: (todo) =>
    set((state) => ({ todos: [...state.todos, todo] })),
}));
Explanation:
todos: []→ empty listaddTodo→ pushes new item
Exercise 2: Shopping Cart (PKR)
Problem: Build a cart system where Ahmad adds products.
Solution:
const useCartStore = create((set) => ({
  cart: [],
  addItem: (item) =>
    set((state) => ({ cart: [...state.cart, item] })),
}));
Explanation:
cart→ holds productsaddItem→ adds product to cart
Frequently Asked Questions
What is Zustand in React?
Zustand is a lightweight state management library for React that allows you to manage global state without complex setup like Redux. It uses hooks and is very beginner-friendly.
How do I install Zustand?
You can install it using npm:
npm install zustand
It works directly in any React project without extra configuration.
Is Zustand better than Redux?
For small to medium apps, Zustand is simpler and faster to implement. Redux is still powerful for large-scale enterprise apps with strict structure.
Can I use Zustand with TypeScript?
Yes, Zustand fully supports TypeScript and provides strong typing for better developer experience.
Does Zustand replace Context API?
Yes, in many cases Zustand can replace Context API because it avoids provider nesting and improves performance.
Summary & Key Takeaways
- Zustand is a lightweight and simple state management library
- No providers or boilerplate required
- Uses hooks for direct state access
- Supports middleware like
persist - Ideal for Pakistani students building real-world apps
- Better performance with selective state usage
Next Steps & Related Tutorials
To deepen your understanding, explore these tutorials on theiqra.edu.pk:
- Learn the basics in React.js Introduction
- Understand broader concepts in React State Management
- Explore performance in React Performance Optimization
- Build full apps with Full-Stack Web Development Guide
These will help you become a professional React developer ready for freelancing or jobs in Pakistan’s growing tech industry 🚀
Test Your Python Knowledge!
Finished reading? Take a quick quiz to see how much you've learned from this tutorial.