Framer Motion Tutorial React Animations & Transitions

Introduction
Framer Motion is a powerful animation library for React that makes it easy to create smooth, interactive, and production-ready animations. In this framer motion tutorial: react animations & transitions, you will learn how to bring your React applications to life with minimal code and maximum control.
For Pakistani students learning modern web development in cities like Lahore, Karachi, and Islamabad, mastering animations can give you a strong edge in freelancing, internships, and UI/UX-focused roles. Whether you're building a startup dashboard, an e-commerce site with prices in PKR, or a portfolio, animations help improve user experience and engagement.
Framer Motion simplifies complex animation logic with intuitive APIs like motion, variants, and AnimatePresence. Instead of struggling with CSS keyframes or JavaScript-heavy animation libraries, you can write clean, declarative animations directly in React.
Prerequisites
Before starting this framer motion guide, you should have:
- Basic understanding of React.js (components, props, state)
- Familiarity with JavaScript ES6 (arrow functions, destructuring)
- Knowledge of CSS fundamentals (flexbox, positioning)
- Node.js and npm installed on your system
- A React project setup (e.g., using Vite or Create React App)
Core Concepts & Explanation
Motion Components (motion.div, motion.button)
Framer Motion replaces standard HTML elements with animated versions like motion.div.
import { motion } from "framer-motion";

function Example() {
  return (
    <motion.div animate={{ x: 100 }}>
      Hello Ahmad
    </motion.div>
  );
}
Explanation:
import { motion }→ imports animation functionality<motion.div>→ replaces<div>with animated versionanimate={{ x: 100 }}→ moves element 100px on X-axis"Hello Ahmad"→ displayed content
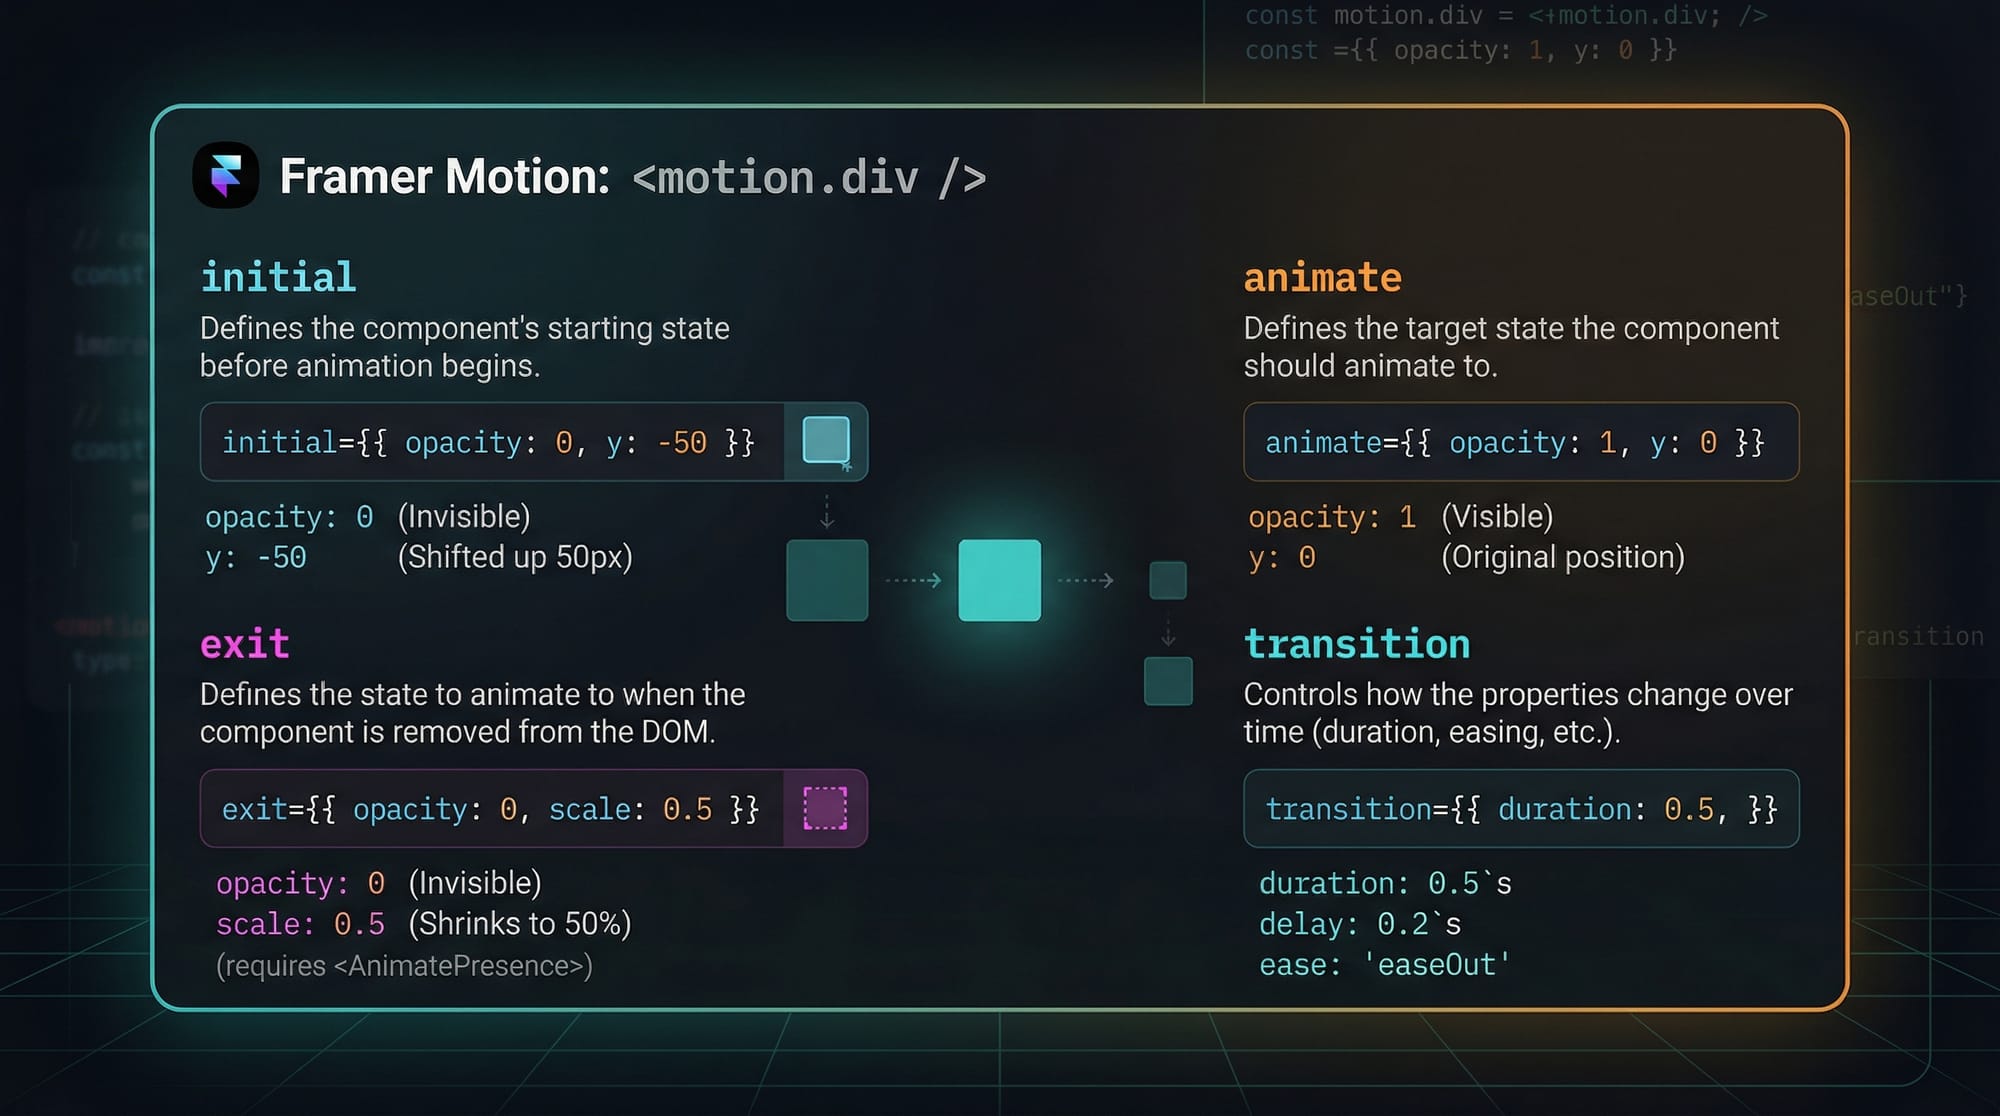
Animation Props (initial, animate, exit, transition)
These are the building blocks of react animations in Framer Motion.
<motion.div
  initial={{ opacity: 0 }}
  animate={{ opacity: 1 }}
  transition={{ duration: 1 }}
>
  Welcome Fatima
</motion.div>
Explanation:
initial→ starting state (invisible)animate→ final state (visible)transition→ controls timing (1 second fade-in)
Variants System for Reusable Animations
Variants allow you to define multiple animation states and reuse them.
const boxVariants = {
  hidden: { opacity: 0 },
  visible: { opacity: 1 }
};

<motion.div variants={boxVariants} initial="hidden" animate="visible" />
Explanation:
boxVariants→ defines animation stateshidden→ invisible statevisible→ visible statevariants={boxVariants}→ connects variants to componentinitial="hidden"→ start stateanimate="visible"→ end state
Gestures & Interactions
Framer Motion supports hover, tap, and drag interactions.
<motion.button whileHover={{ scale: 1.1 }} whileTap={{ scale: 0.9 }}>
  Click Me
</motion.button>
Explanation:
whileHover→ animation on hoverscale: 1.1→ increases sizewhileTap→ animation on clickscale: 0.9→ shrinks button
Practical Code Examples
Example 1: Fade-In Card Animation
import { motion } from "framer-motion";

function Card() {
  return (
    <motion.div
      initial={{ opacity: 0, y: 50 }}
      animate={{ opacity: 1, y: 0 }}
      transition={{ duration: 0.8 }}
      style={{ background: "#eee", padding: "20px", borderRadius: "10px" }}
    >
      Price: 5000 PKR
    </motion.div>
  );
}
Line-by-line Explanation:
import { motion }→ enables animation<motion.div>→ animated containerinitial={{ opacity: 0, y: 50 }}→ starts invisible and belowanimate={{ opacity: 1, y: 0 }}→ fades in and moves uptransition={{ duration: 0.8 }}→ animation speedstyle={...}→ basic card styling"Price: 5000 PKR"→ content
Example 2: Real-World Application (Product List Animation)
import { motion } from "framer-motion";

const container = {
  hidden: {},
  visible: {
    transition: {
      staggerChildren: 0.3
    }
  }
};

const item = {
  hidden: { opacity: 0, x: -50 },
  visible: { opacity: 1, x: 0 }
};

function ProductList() {
  return (
    <motion.ul variants={container} initial="hidden" animate="visible">
      {["Shoes - 3000 PKR", "Watch - 5000 PKR", "Bag - 2500 PKR"].map((product, index) => (
        <motion.li key={index} variants={item}>
          {product}
        </motion.li>
      ))}
    </motion.ul>
  );
}
Line-by-line Explanation:
container→ controls parent animationstaggerChildren→ delays each itemitem→ defines animation per product<motion.ul>→ animated list containervariants={container}→ applies parent animation.map()→ loops products<motion.li>→ animated list itemsvariants={item}→ applies item animation

Common Mistakes & How to Avoid Them
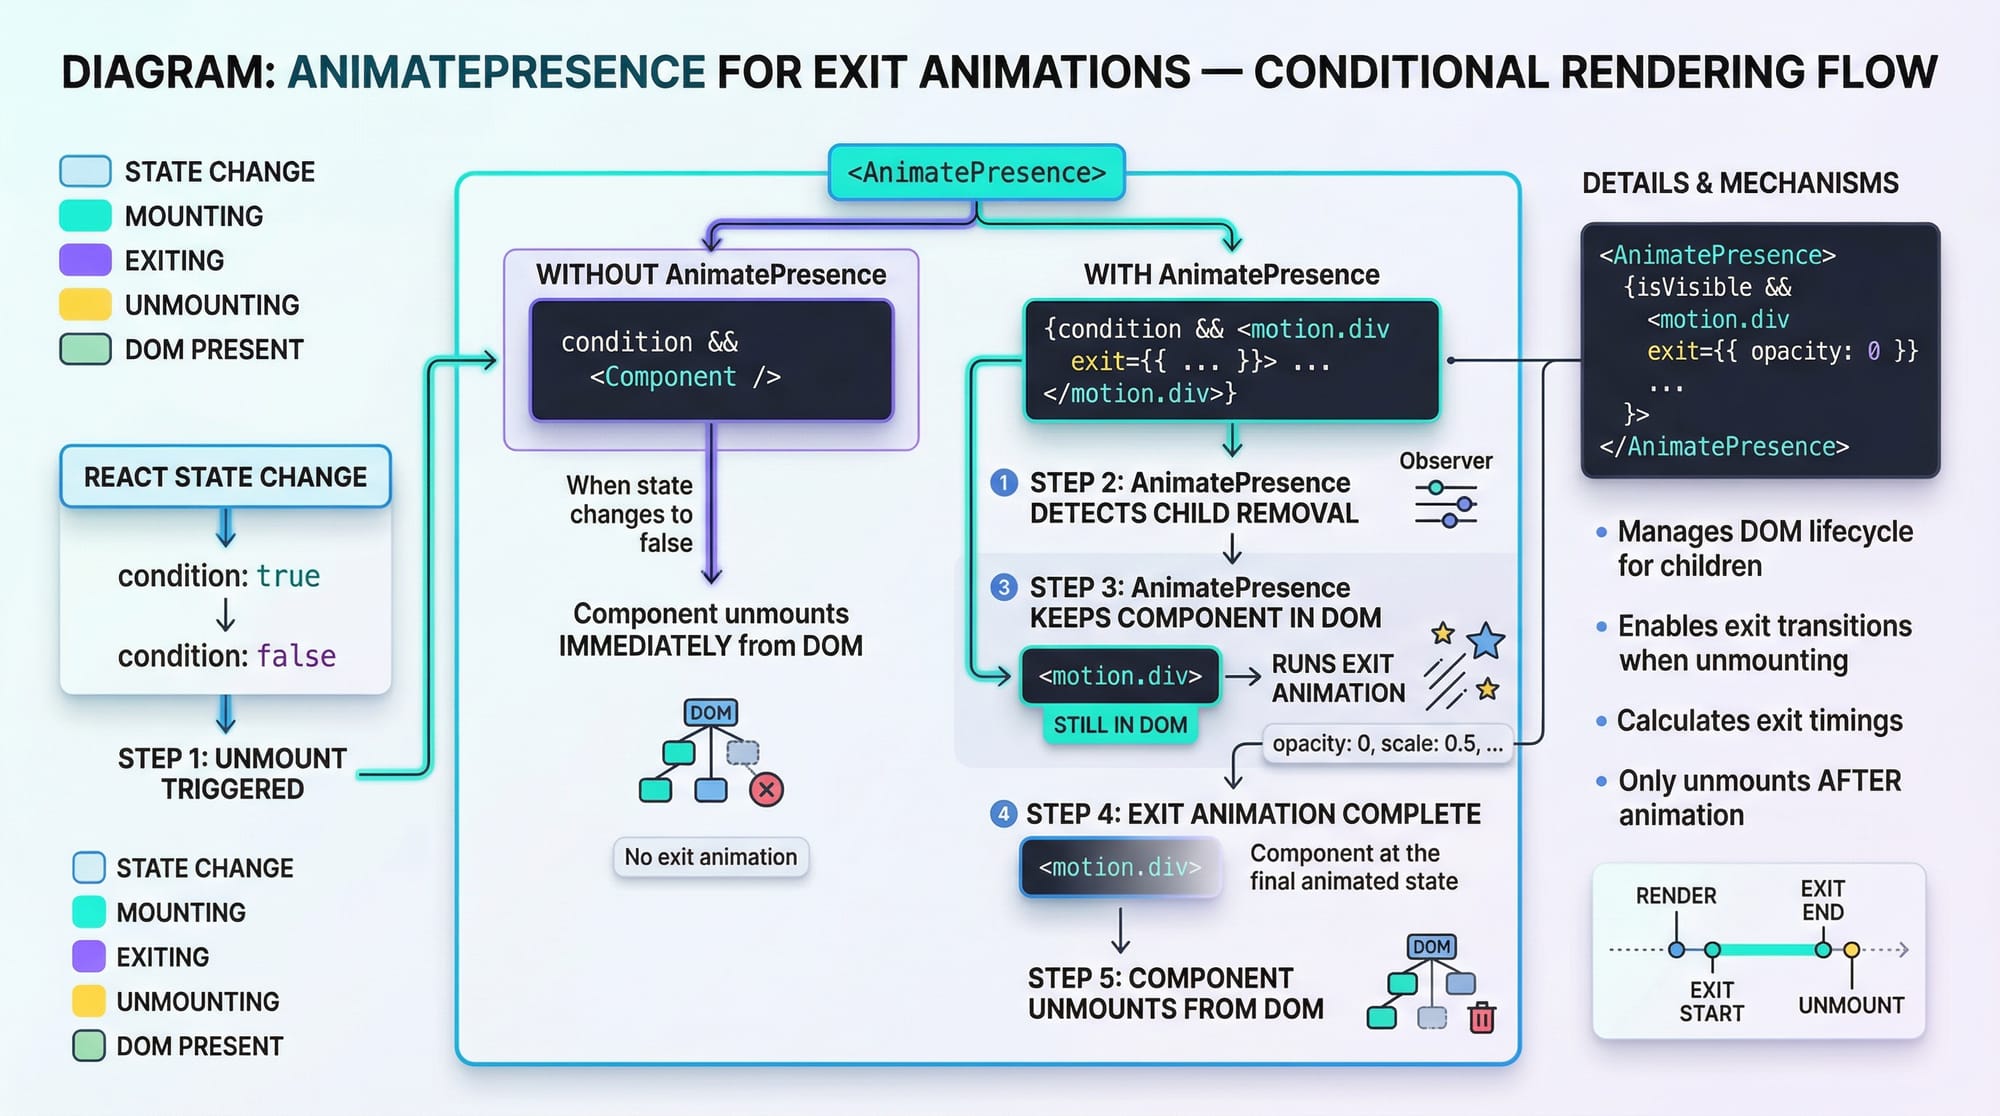
Mistake 1: Not Using AnimatePresence for Exit Animations
Without AnimatePresence, exit animations won’t work.
import { AnimatePresence, motion } from "framer-motion";

{show && (
  <motion.div exit={{ opacity: 0 }}>
    Goodbye Ali
  </motion.div>
)}
Fix:
Wrap with AnimatePresence:
<AnimatePresence>
  {show && (
    <motion.div exit={{ opacity: 0 }}>
      Goodbye Ali
    </motion.div>
  )}
</AnimatePresence>
Mistake 2: Overusing Inline Animations Instead of Variants
Avoid repeating animation logic.
Wrong:
<motion.div animate={{ opacity: 1 }} />
<motion.div animate={{ opacity: 1 }} />
Correct:
const variant = { visible: { opacity: 1 } };

<motion.div variants={variant} />
<motion.div variants={variant} />
Practice Exercises
Exercise 1: Bounce Button
Problem: Create a button that slightly bounces on hover.
Solution:
<motion.button whileHover={{ y: -10 }}>
  Hover Me
</motion.button>
Explanation:
whileHover→ triggers on hovery: -10→ moves button up
Exercise 2: Slide-In Sidebar
Problem: Create a sidebar that slides in from the left.
Solution:
<motion.div
  initial={{ x: "-100%" }}
  animate={{ x: 0 }}
  transition={{ duration: 0.5 }}
>
  Sidebar Content
</motion.div>
Explanation:
initial→ starts off-screenanimate→ moves into viewtransition→ controls speed
Frequently Asked Questions
What is Framer Motion in React?
Framer Motion is a React library used to create smooth animations and transitions. It simplifies animation logic using declarative syntax.
How do I install Framer Motion?
You can install it using npm with npm install framer-motion. Then import motion in your components.
How do I create smooth animations?
Use the transition property with values like duration, ease, or type: "spring" for natural motion effects.
Can I use Framer Motion with Tailwind CSS?
Yes, Framer Motion works perfectly with Tailwind CSS. You can combine utility classes with animation props.
How do I animate page transitions?
Use AnimatePresence and route-based animations to smoothly transition between pages.
Summary & Key Takeaways
- Framer Motion simplifies react animations with minimal code
- Use
motioncomponents instead of regular HTML elements initial,animate, andtransitioncontrol animations- Variants help create reusable and scalable animation logic
AnimatePresenceis essential for exit animations- Interactive animations like hover and drag improve UX
Next Steps & Related Tutorials
To continue your learning journey on theiqra.edu.pk, explore:
- Learn the basics with React.js Introduction to strengthen your foundation
- Master styling with CSS Animations for deeper animation control
- Build responsive UIs using Tailwind CSS tutorials
- Explore advanced UI patterns with modern React guides
These tutorials will help you become a professional frontend developer ready for real-world projects in Pakistan and beyond.
Test Your Python Knowledge!
Finished reading? Take a quick quiz to see how much you've learned from this tutorial.