MQTT Protocol Tutorial IoT Messaging for Beginners
Introduction
MQTT (Message Queuing Telemetry Transport) is a lightweight messaging protocol designed for IoT (Internet of Things) devices. This mqtt protocol tutorial: iot messaging for beginners will help you understand how small devices like sensors, microcontrollers, and mobile apps communicate efficiently over the internet.
Unlike traditional web systems that rely on heavy HTTP requests, MQTT uses a publish/subscribe model, making it ideal for low-bandwidth, low-power environments. This is why MQTT is widely used in smart homes, agriculture monitoring, industrial automation, and even student IoT projects.
For Pakistani students in cities like Lahore, Karachi, and Islamabad, learning MQTT opens doors to modern IoT careers. Imagine building a smart irrigation system for farms in Punjab or a low-cost smart energy meter for homes—MQTT makes it possible.
Prerequisites
Before starting this MQTT tutorial, you should have a basic understanding of:
- Basic programming knowledge (Python or JavaScript preferred)
- Fundamental networking concepts (IP address, internet, client-server model)
- Basic understanding of IoT devices (sensors, microcontrollers like Arduino or ESP32)
- Familiarity with command line tools
You do NOT need advanced networking knowledge. This tutorial is beginner-friendly but gradually moves toward intermediate concepts.
Core Concepts & Explanation
Publish/Subscribe Model
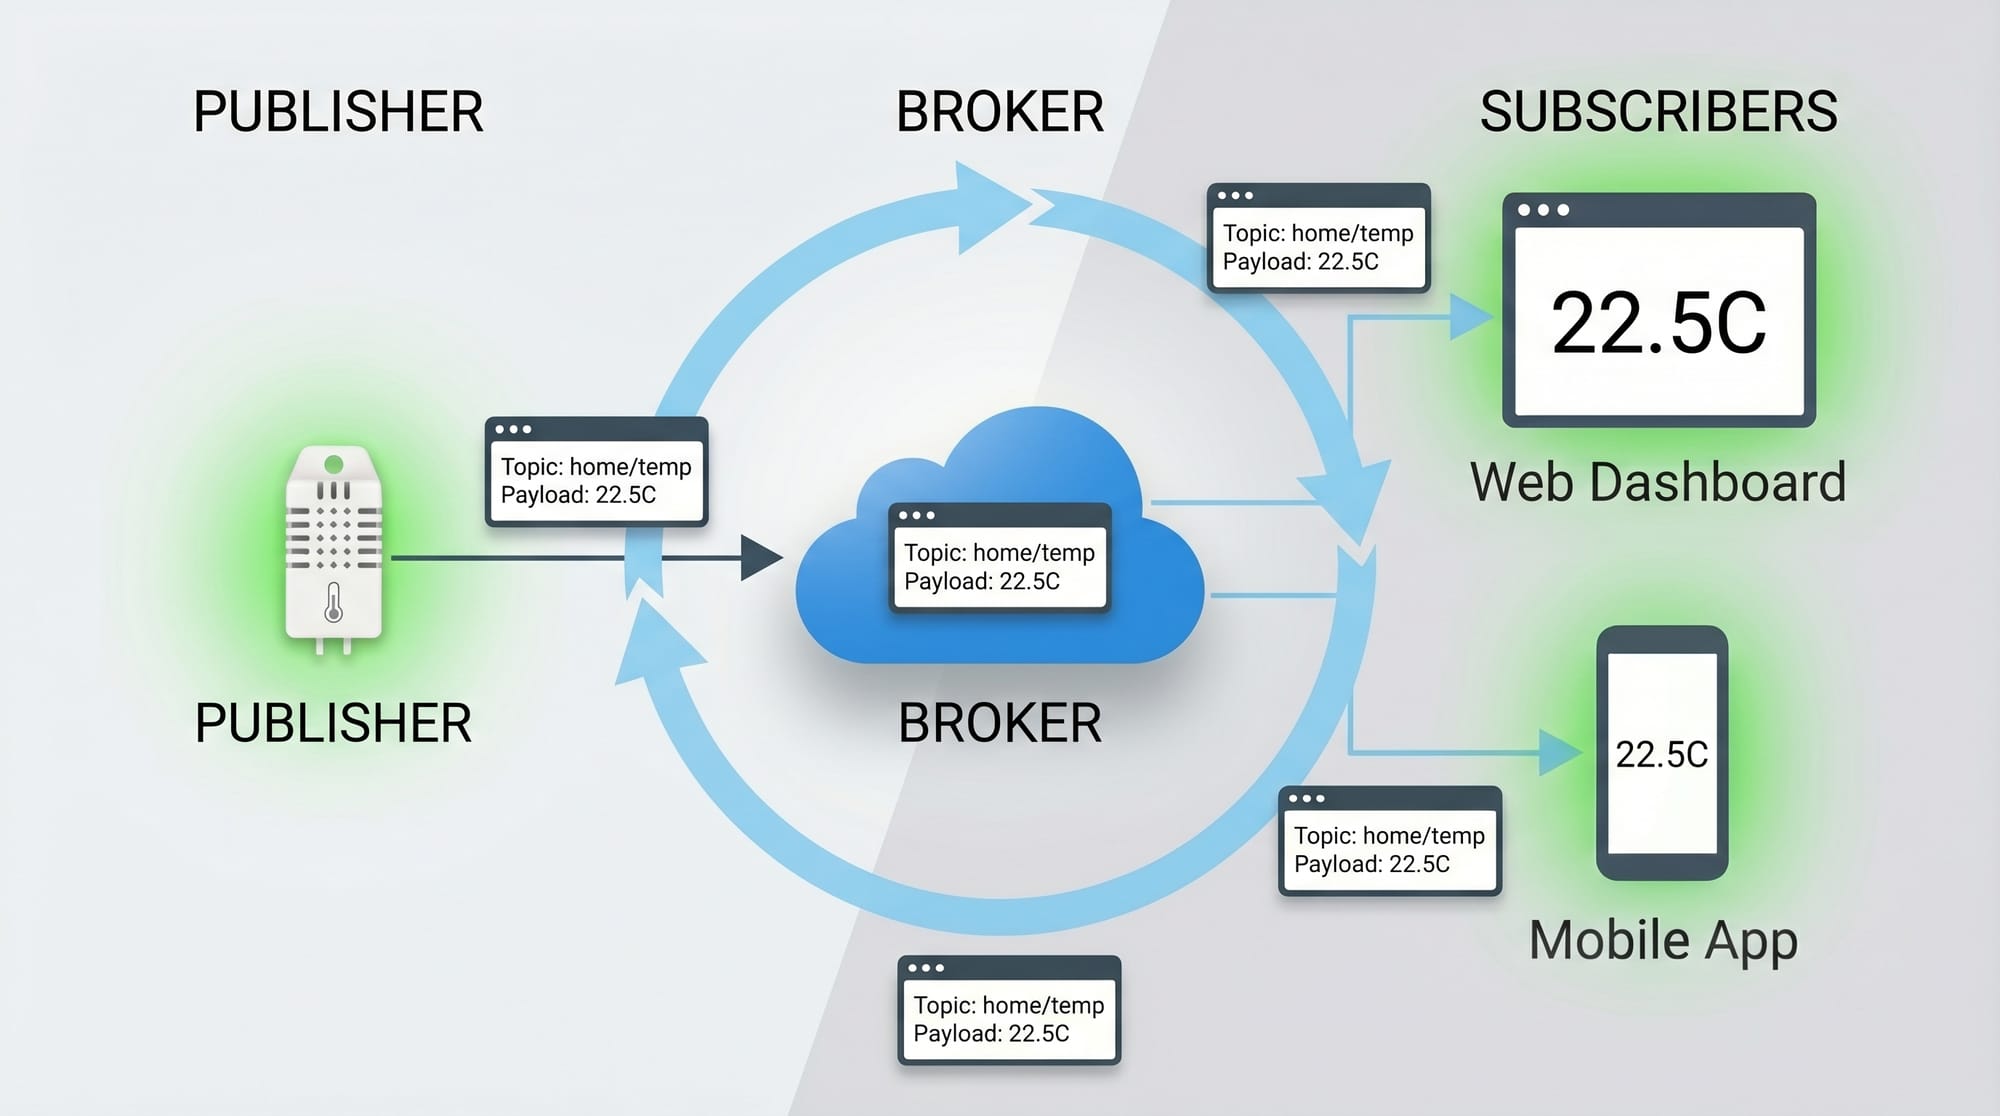
MQTT is built on a publish/subscribe architecture instead of direct client-to-client communication.
- Publisher: Sends data (e.g., temperature sensor in Ahmad’s home in Lahore)
- Subscriber: Receives data (e.g., mobile app dashboard used by Fatima)
- Broker: Central server that manages messages (e.g., Mosquitto broker)
Example:
- Ahmad’s ESP32 publishes temperature data to topic
home/livingroom/temp - Fatima’s mobile app subscribes to the same topic and receives updates instantly
This decouples devices, meaning they don’t need to know about each other.
MQTT Broker and Topics
The MQTT broker is the heart of the system. It receives messages from publishers and forwards them to subscribers.
One of the most popular brokers is Eclipse Mosquitto, which is widely used in the mosquitto broker tutorial setups.
Topics in MQTT
Topics are like “channels” used for organizing messages.
Examples:
home/kitchen/lightfactory/machine1/statuskarachi/airquality/co2
Topics are hierarchical, meaning you can structure them like folders.
Practical Code Examples
Example 1: Installing Mosquitto and Basic Publish/Subscribe
First, install Mosquitto broker on your system.
Installation (Ubuntu/Linux)
sudo apt update
sudo apt install mosquitto mosquitto-clients
Step 1: Start Mosquitto Broker
mosquitto
Explanation:
mosquittostarts the MQTT broker locally- It listens for incoming messages on default port 1883
Step 2: Subscribe to a Topic
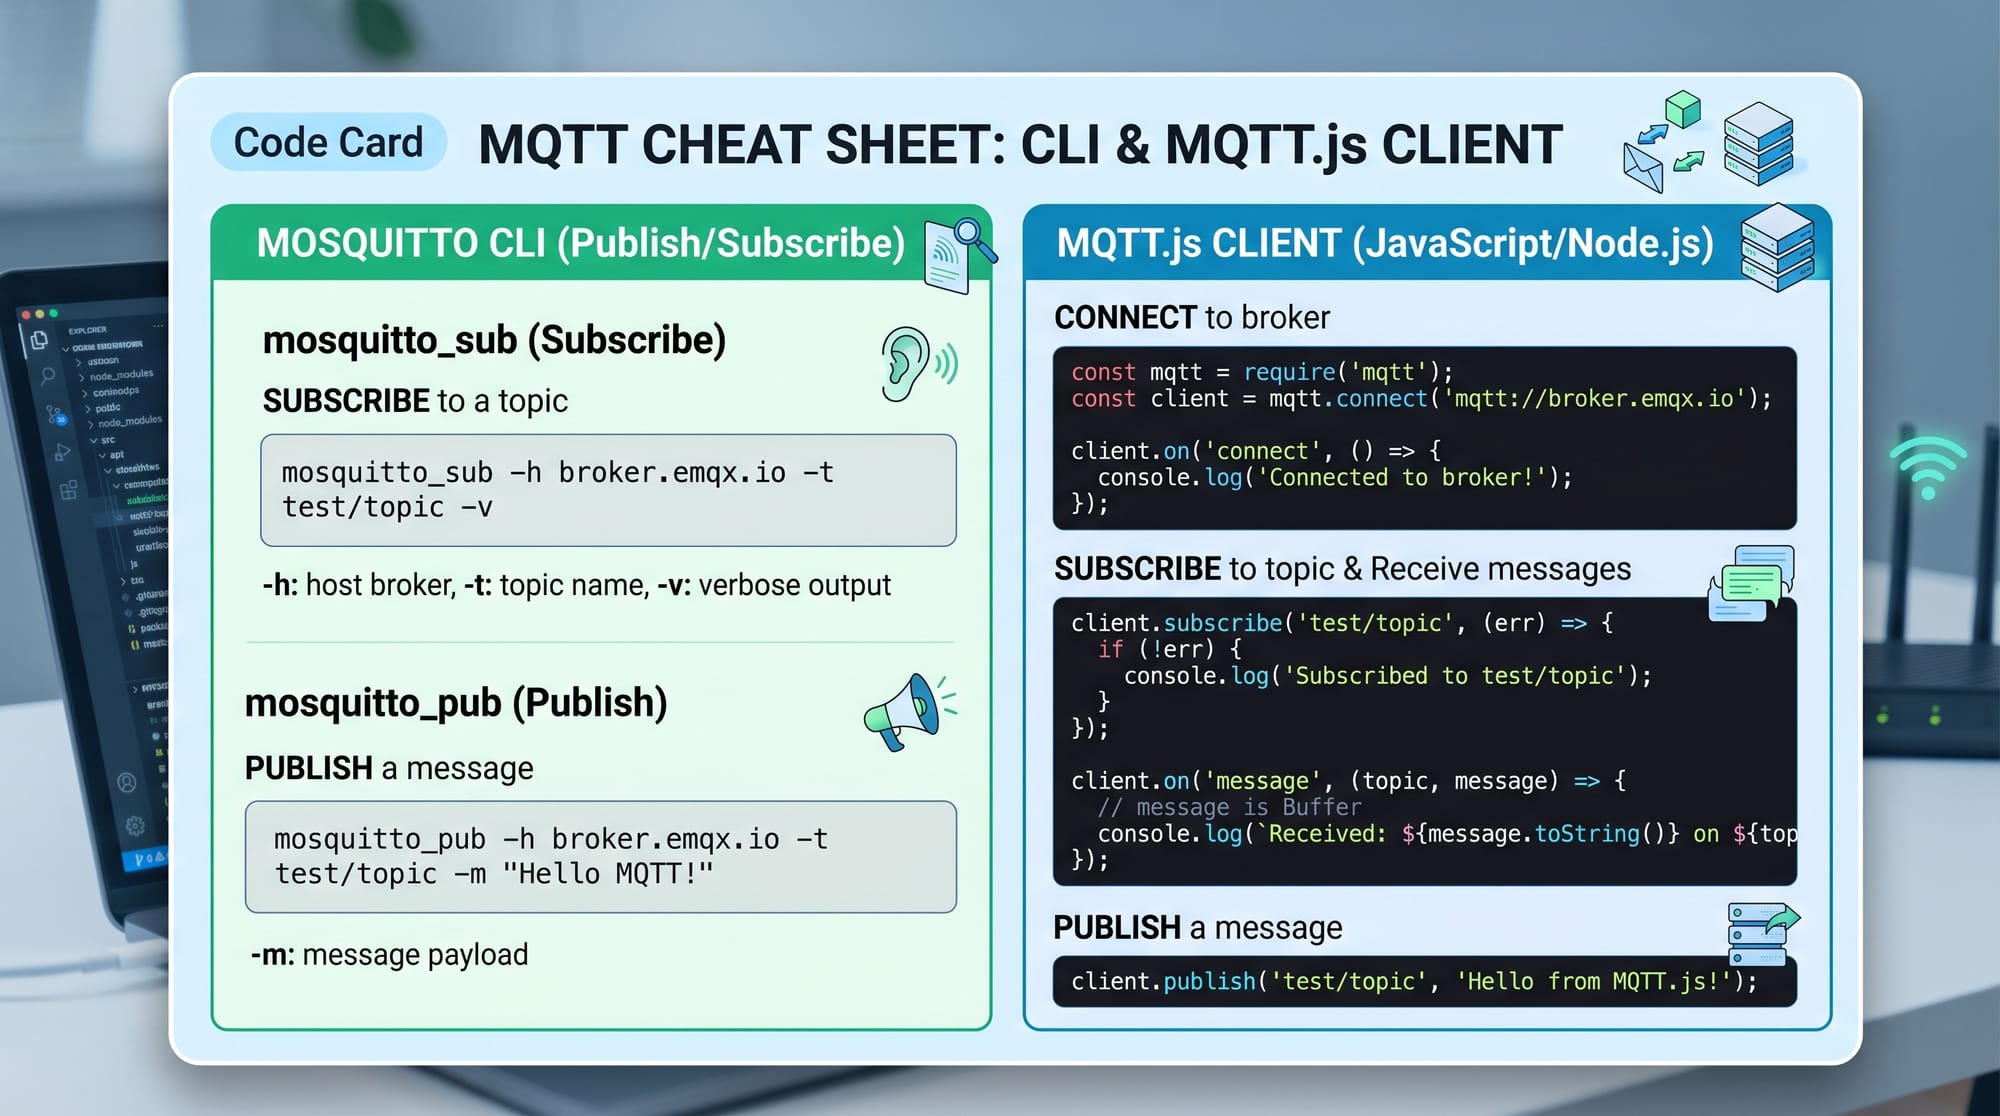
mosquitto_sub -t "test/topic"
Explanation:
mosquitto_subis the subscriber tool-t "test/topic"specifies the topic to listen to- It waits for messages from the broker
Step 3: Publish a Message
mosquitto_pub -t "test/topic" -m "Hello from Pakistan"
Explanation:
mosquitto_pubsends a message-tdefines topic name-mis the message payload
When you run this, the subscriber instantly receives:
Hello from Pakistan
Example 2: Real-World IoT Application (Python + MQTT)
Now let’s simulate a smart temperature sensor in a Pakistani home.
Install MQTT library:
pip install paho-mqtt
Python Publisher (Sensor Device)
import paho.mqtt.client as mqtt
import time
import random

client = mqtt.Client()
client.connect("broker.hivemq.com", 1883, 60)

while True:
    temp = random.randint(20, 40)
    client.publish("lahore/home/temp", temp)
    print("Temperature sent:", temp)
    time.sleep(5)
Line-by-line explanation:
import paho.mqtt.client: imports MQTT libraryclient = mqtt.Client(): creates MQTT clientconnect(...): connects to public brokerrandom.randint(20, 40): simulates temperature in Lahore weatherpublish(...): sends data to topicsleep(5): sends data every 5 seconds
Python Subscriber (Dashboard)
import paho.mqtt.client as mqtt

def on_message(client, userdata, message):
    print("Received:", str(message.payload.decode("utf-8")))

client = mqtt.Client()
client.connect("broker.hivemq.com", 1883, 60)

client.subscribe("lahore/home/temp")
client.on_message = on_message

client.loop_forever()
Line-by-line explanation:
on_message: function triggered when message arrivessubscribe: listens to Lahore temperature topicloop_forever: keeps connection active
MQTT QoS Levels Explained
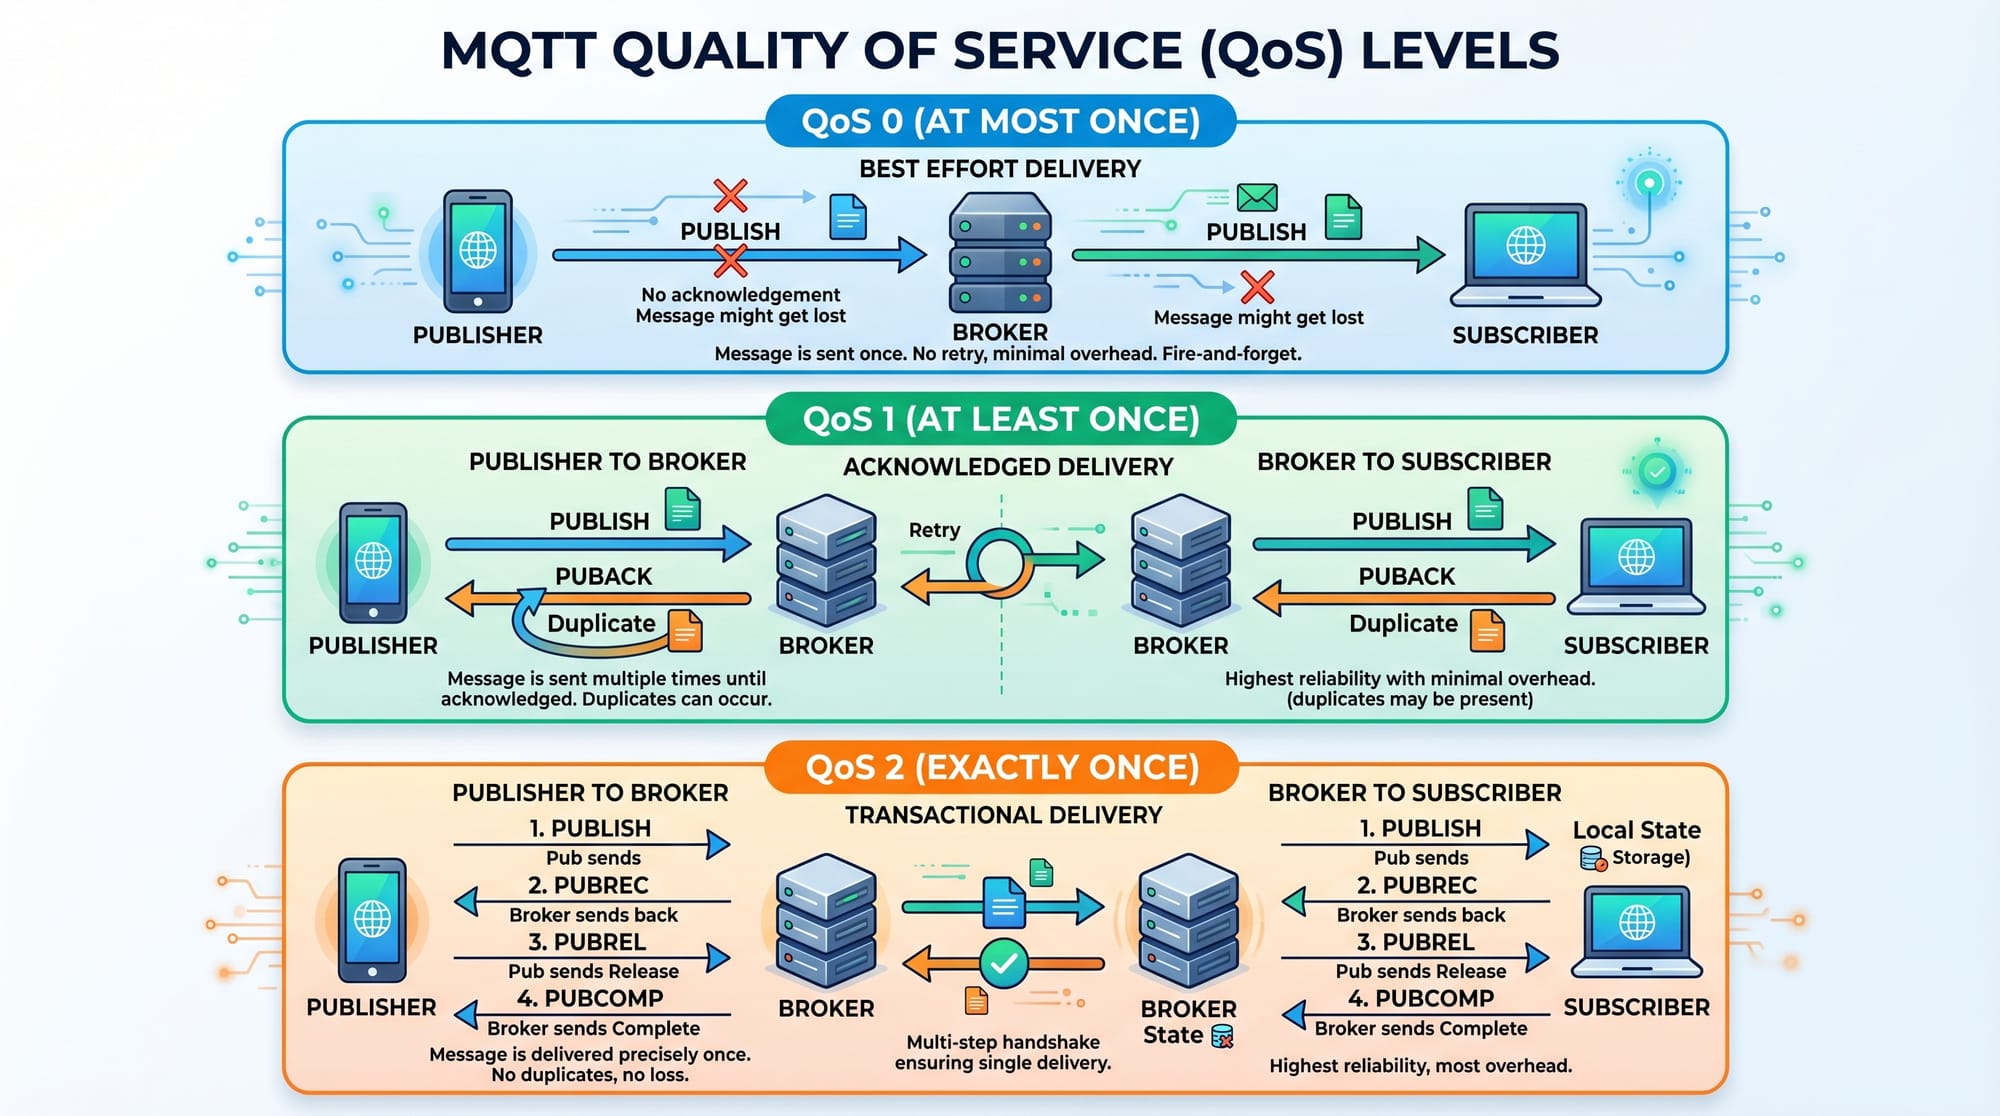
- QoS 0: Fast but no guarantee (sensor data)
- QoS 1: Guaranteed delivery (alerts)
- QoS 2: Exactly once (critical systems)
Common Mistakes & How to Avoid Them
Mistake 1: Using Poor Topic Structure
Many beginners use random topics like data1, test123, which makes scaling impossible.
Wrong:
sensor1
data123
Correct:
home/lahore/room1/temp
factory/karachi/machine2/status
Fix: Always design hierarchical topic structures.
Mistake 2: Not Handling Reconnection
IoT devices often disconnect due to weak internet (common in rural Pakistan areas).
Problem:
Device stops sending data after Wi-Fi drops.
Solution:
Implement reconnect logic:
- Auto reconnect on failure
- Buffer messages locally
- Retry publishing
Practice Exercises
Exercise 1: Basic MQTT Publisher
Task:
Create a program that sends “Hello IoT Pakistan” every 3 seconds.
Solution (Python):
import paho.mqtt.client as mqtt
import time

client = mqtt.Client()
client.connect("broker.hivemq.com", 1883, 60)

while True:
    client.publish("pakistan/iot/message", "Hello IoT Pakistan")
    time.sleep(3)
Explanation:
- Sends repeated messages to MQTT broker
- Useful for testing connectivity
Exercise 2: Smart Fan Control System
Task:
Simulate a fan system where:
- Temperature > 30 → Fan ON
- Temperature ≤ 30 → Fan OFF
Solution Concept:
- Publisher sends temperature
- Subscriber controls fan state
Subscriber Logic:
def on_message(client, userdata, message):
    temp = int(message.payload.decode())
    if temp > 30:
        print("Fan ON")
    else:
        print("Fan OFF")
Explanation:
- Converts MQTT data into real-world action
- Mimics smart home automation used in Karachi apartments
Frequently Asked Questions
What is MQTT used for in IoT?
MQTT is used for fast and lightweight communication between IoT devices. It is widely used in smart homes, agriculture systems, and industrial automation because it works well on low bandwidth networks.
How does MQTT differ from HTTP?
MQTT uses a publish/subscribe model, while HTTP uses request/response. MQTT is faster and consumes less power, making it ideal for IoT devices like ESP32 and Raspberry Pi.
What is Mosquitto in MQTT?
Mosquitto is a popular open-source MQTT broker used in many IoT projects. It handles message routing between publishers and subscribers efficiently.
Can MQTT work without internet?
Yes, MQTT can work on local networks (LAN). For example, devices inside a smart home in Islamabad can communicate without internet using a local broker.
Is MQTT good for beginners?
Yes, MQTT is beginner-friendly. With simple tools like Mosquitto and Python libraries, students can quickly build real IoT projects.
Summary & Key Takeaways
- MQTT is a lightweight IoT messaging protocol
- It uses publish/subscribe architecture
- Mosquitto is a popular MQTT broker
- Topics organize communication between devices
- QoS levels control message reliability
- MQTT is ideal for low-power IoT systems in Pakistan
Next Steps & Related Tutorials
Now that you understand MQTT, you can move forward with more advanced IoT topics:
- Learn how sensors connect using IoT Tutorial
- Build real-time communication apps using WebSocket Tutorial
- Explore hardware projects using Raspberry Pi and ESP32
- Learn cloud integration for IoT dashboards
Start experimenting with your own MQTT projects and build smart solutions for real-world problems in Pakistan’s growing tech ecosystem.
Test Your Python Knowledge!
Finished reading? Take a quick quiz to see how much you've learned from this tutorial.