Passkeys Tutorial Passwordless Authentication Guide 2026
Introduction
The internet is moving beyond passwords—and in 2026, passkeys are leading that shift. This passkeys tutorial: passwordless authentication guide 2026 will help you understand how modern authentication works using WebAuthn and how you can implement it in real applications.
Traditional passwords are weak. Users reuse them, forget them, and attackers steal them through phishing or data breaches. In Pakistan, where many students and developers are building apps for startups in cities like Lahore, Karachi, and Islamabad, secure authentication is critical.
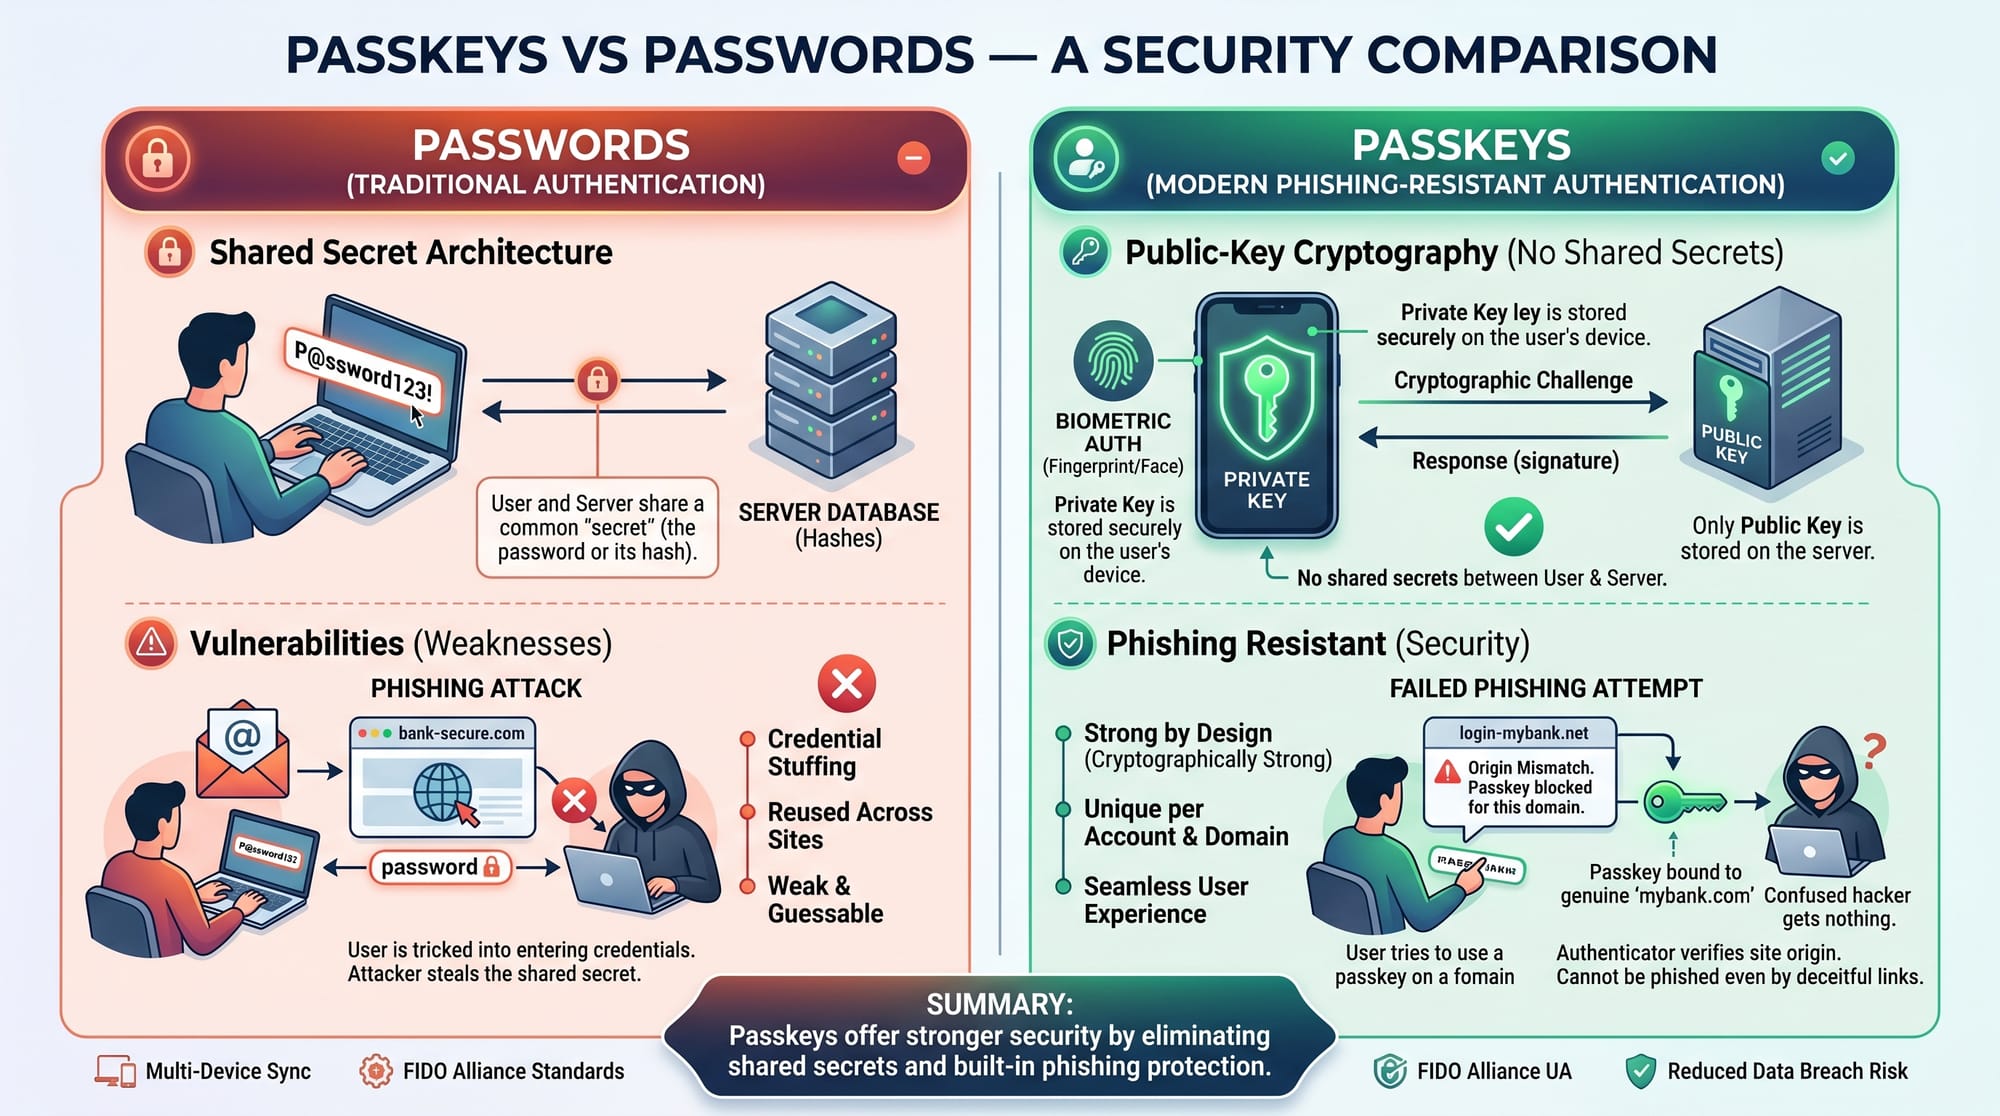
Passkeys solve this problem by replacing passwords with cryptographic key pairs stored securely on devices (like your phone or laptop). Instead of typing a password, users authenticate using biometrics (fingerprint, face ID) or device PINs.
By learning passkeys and WebAuthn (Web Authentication API), you’ll gain a strong edge in modern web security and build applications that are:
- Phishing-resistant
- More secure than passwords
- Easier for users
Prerequisites
Before starting this tutorial, you should have:
- Basic knowledge of JavaScript (ES6+)
- Understanding of HTTP requests and APIs
- Familiarity with Node.js or any backend language
- Basic understanding of authentication (sessions, tokens)
- A modern browser (Chrome, Edge, Safari)
Optional but helpful:
- Experience with Express.js
- Knowledge of JSON and REST APIs
Core Concepts & Explanation
Public-Key Cryptography in Passkeys
Passkeys are based on public-key cryptography.
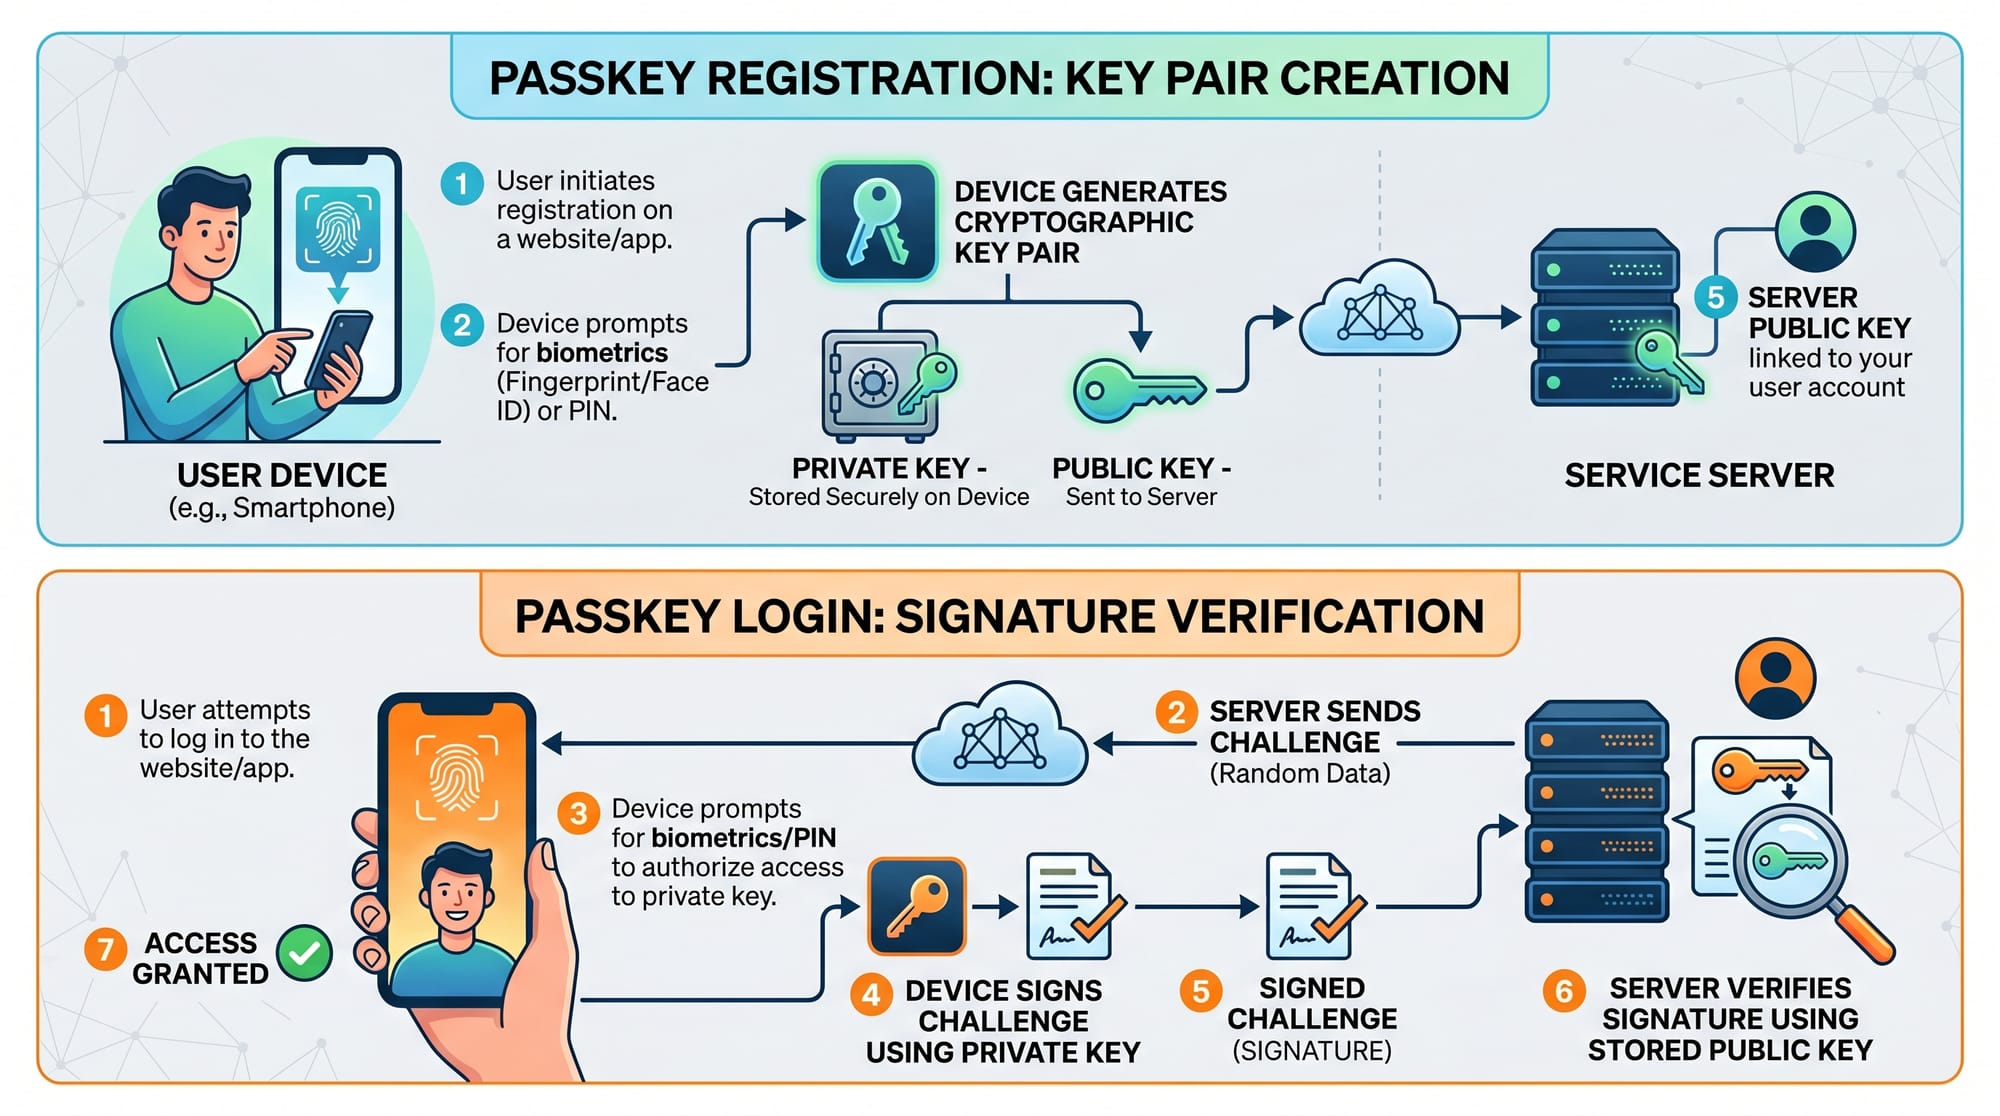
When Ahmad registers on a website:
- His device generates:
- Public key → sent to the server
- Private key → stays securely on his device
During login:
- Server sends a challenge
- Device signs it with the private key
- Server verifies using the public key
Example analogy:
- Public key = your email address
- Private key = your secret signature
Even if hackers steal the public key, they cannot log in.
WebAuthn and FIDO2 Explained
WebAuthn (Web Authentication API) is the browser standard that enables passkeys.
It works with:
- Browsers (Chrome, Safari, Edge)
- Devices (phones, laptops)
- Authenticators (biometric sensors, security keys)
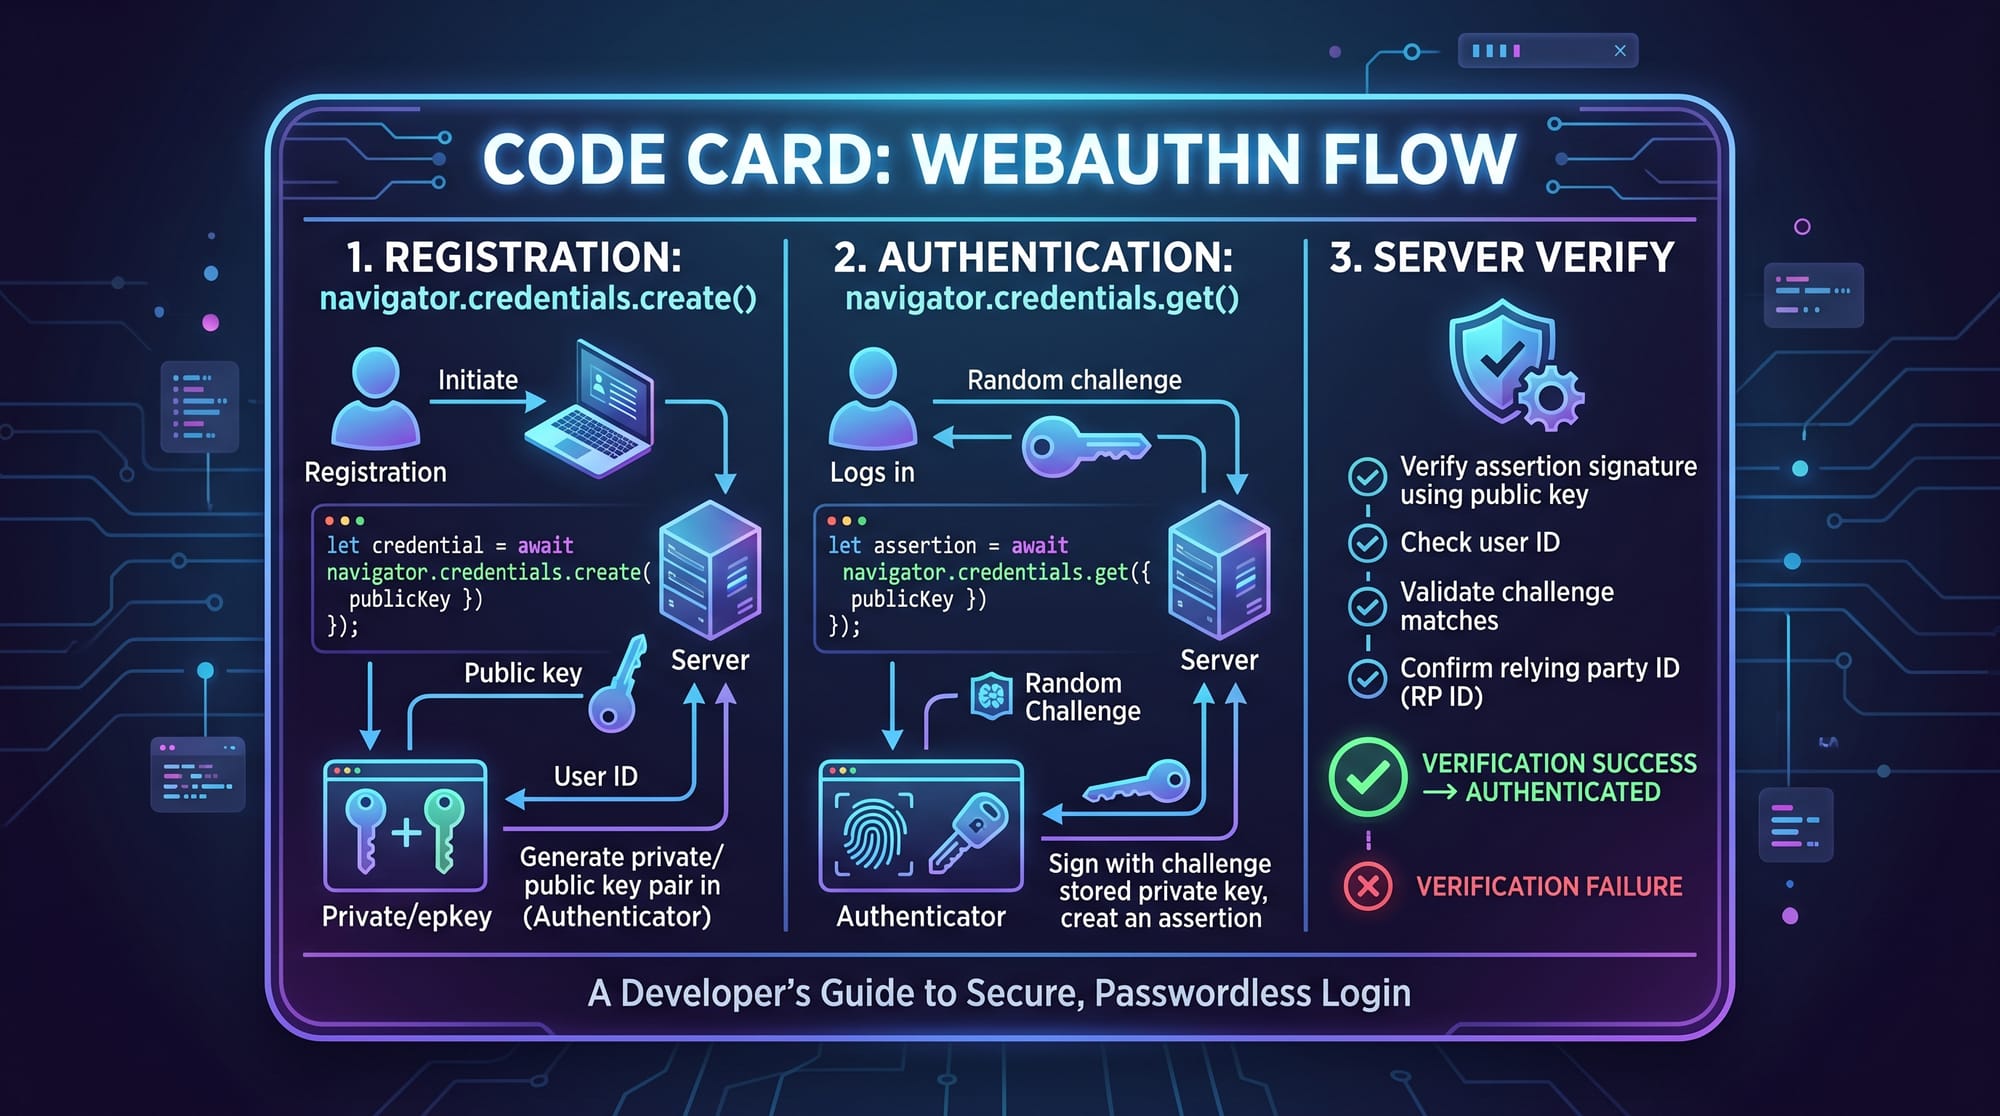
Flow:
- Registration →
navigator.credentials.create() - Login →
navigator.credentials.get() - Server verifies signature
Why it matters for Pakistani developers:
- Banks in Pakistan are moving toward passwordless security
- Freelancers building SaaS apps need secure auth
- Startups benefit from reduced fraud and support costs
Practical Code Examples
Example 1: Registering a Passkey (Frontend)
// Step 1: Request registration options from server
const optionsResponse = await fetch('/register-options');
const options = await optionsResponse.json();

// Step 2: Create credential using WebAuthn
const credential = await navigator.credentials.create({
  publicKey: options
});

// Step 3: Send credential to server
await fetch('/register', {
  method: 'POST',
  body: JSON.stringify(credential),
  headers: {
    'Content-Type': 'application/json'
  }
});
Line-by-line explanation:
fetch('/register-options')
→ Requests challenge and configuration from backendawait optionsResponse.json()
→ Converts response into usable objectnavigator.credentials.create()
→ Triggers browser passkey creationpublicKey: options
→ Contains challenge, RP info, user infofetch('/register', {...})
→ Sends credential to server for storage
Example 2: Login with Passkey (Real-World Application)
// Step 1: Get login challenge from server
const optionsResponse = await fetch('/login-options');
const options = await optionsResponse.json();

// Step 2: Request credential
const assertion = await navigator.credentials.get({
  publicKey: options
});

// Step 3: Send assertion to server
await fetch('/login', {
  method: 'POST',
  body: JSON.stringify(assertion),
  headers: {
    'Content-Type': 'application/json'
  }
});
Line-by-line explanation:
fetch('/login-options')
→ Server sends challenge for authenticationnavigator.credentials.get()
→ Prompts user biometric (fingerprint/face)publicKey: options
→ Contains challenge and allowed credentialsassertion
→ Signed response from devicefetch('/login')
→ Sends proof to server for verification
Backend Example (Node.js Verification)
import express from 'express';

const app = express();
app.use(express.json());

app.post('/login', (req, res) => {
  const assertion = req.body;

  // Step 1: Retrieve user public key from DB
  const publicKey = getUserPublicKey(assertion.id);

  // Step 2: Verify signature
  const isValid = verifySignature(assertion, publicKey);

  // Step 3: Respond
  if (isValid) {
    res.send({ success: true });
  } else {
    res.status(401).send({ error: 'Authentication failed' });
  }
});
Line-by-line explanation:
express.json()
→ Parses incoming JSONreq.body
→ Contains client assertiongetUserPublicKey()
→ Fetch stored public keyverifySignature()
→ Validates cryptographic proofres.send()
→ Returns success response
Common Mistakes & How to Avoid Them
Mistake 1: Not Using HTTPS
WebAuthn requires HTTPS.
❌ Wrong:
http://example.com
✅ Correct:
https://example.com
Fix:
- Use HTTPS locally via
localhost - Use SSL certificates in production
Mistake 2: Improper Challenge Handling
Challenge must be:
- Random
- Unique per request
- Verified on server
❌ Wrong:
const challenge = "12345";
✅ Correct:
const challenge = crypto.randomBytes(32);
Fix explanation:
- Prevent replay attacks
- Always validate challenge on server
Practice Exercises
Exercise 1: Build Registration Endpoint
Problem:
Create a backend endpoint that generates a WebAuthn registration challenge.
Solution:
import crypto from 'crypto';

app.get('/register-options', (req, res) => {
  const challenge = crypto.randomBytes(32);

  res.json({
    challenge: challenge.toString('base64'),
    rp: { name: "Iqra Demo App" },
    user: {
      id: "123",
      name: "[email protected]",
      displayName: "Ahmad"
    },
    pubKeyCredParams: [{ alg: -7, type: "public-key" }]
  });
});
Explanation:
crypto.randomBytes(32)→ secure challengerp→ relying party (your app)user→ identifies userpubKeyCredParams→ defines algorithm
Exercise 2: Implement Login Verification
Problem:
Verify a passkey login request.
Solution:
function verifySignature(assertion, publicKey) {
  // Simplified example
  return true; // Replace with real crypto verification
}
Explanation:
- This is placeholder logic
- Real implementation uses libraries like:
@simplewebauthn/server
Frequently Asked Questions
What is a passkey?
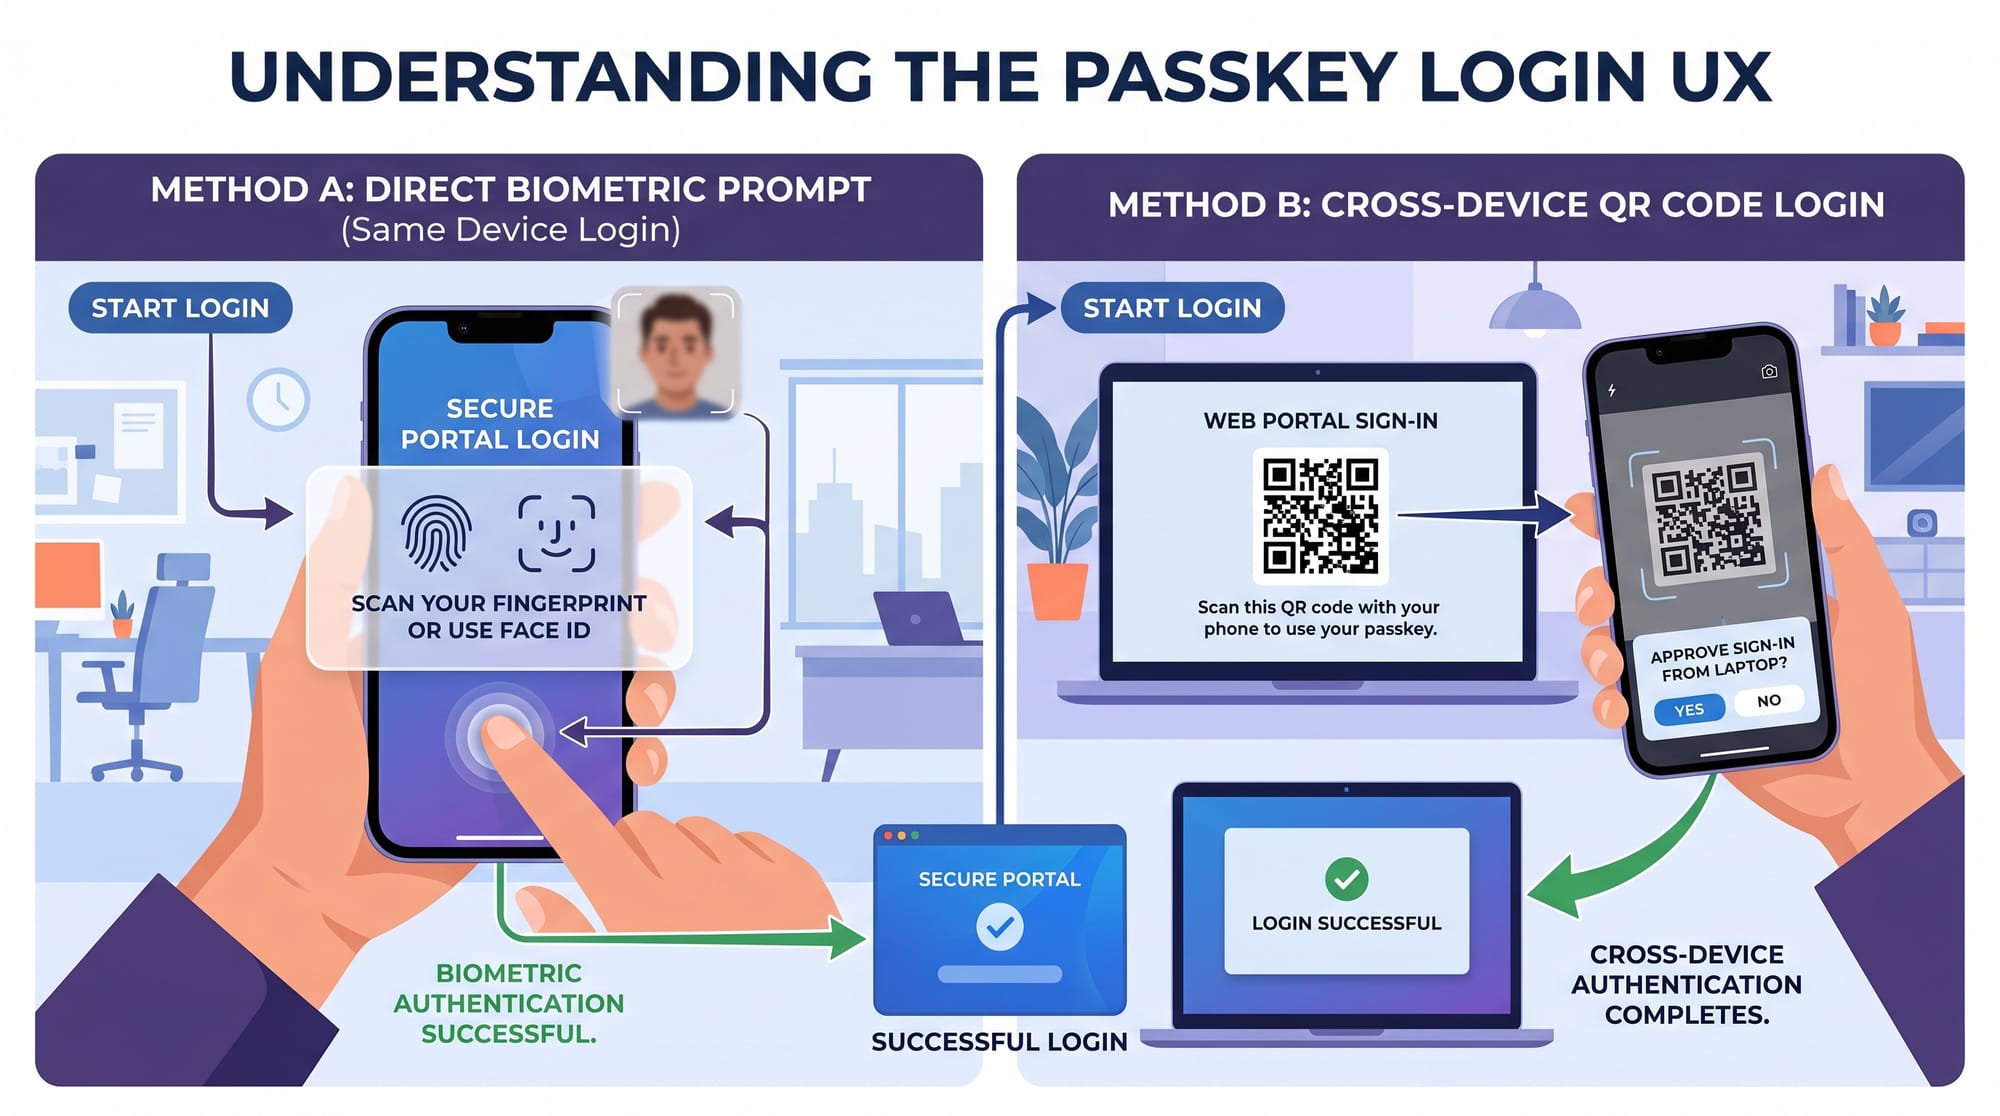
A passkey is a passwordless authentication method using public-private key cryptography. It allows users to log in using biometrics or device PIN instead of typing passwords.
How do I implement WebAuthn in my app?
You use the browser APIs navigator.credentials.create() for registration and navigator.credentials.get() for login, along with backend verification of cryptographic signatures.
Are passkeys secure for Pakistani apps?
Yes, passkeys are highly secure and protect against phishing, credential theft, and password reuse—making them ideal for fintech, e-commerce, and student portals in Pakistan.
Can passkeys work on mobile devices?
Yes, passkeys are designed for mobile-first environments. Users can authenticate using fingerprint or face unlock on Android and iOS devices.
Do passkeys replace passwords completely?
In most cases, yes. However, some systems still use fallback methods (like email OTP) for account recovery.
Summary & Key Takeaways
- Passkeys eliminate passwords using public-key cryptography
- WebAuthn enables passwordless authentication in browsers
- Private keys never leave the user’s device
- Passkeys are phishing-resistant and highly secure
- HTTPS and proper challenge handling are essential
- Pakistani developers can build safer apps using this approach
Next Steps & Related Tutorials
To deepen your understanding, explore these related tutorials on theiqra.edu.pk:
- Learn how to secure APIs in our guide on API Authentication fundamentals
- Strengthen your apps with our Web Security best practices tutorial
- Build secure login systems with our JWT Authentication in Node.js guide
- Understand OAuth flows in our OAuth 2.0 tutorial for beginners
By combining passkeys with modern security practices, you’ll be ready to build production-grade applications for clients in Lahore, Karachi, Islamabad, and beyond.
Test Your Python Knowledge!
Finished reading? Take a quick quiz to see how much you've learned from this tutorial.