Webhooks Tutorial Design Secure & Implement Webhooks
Introduction
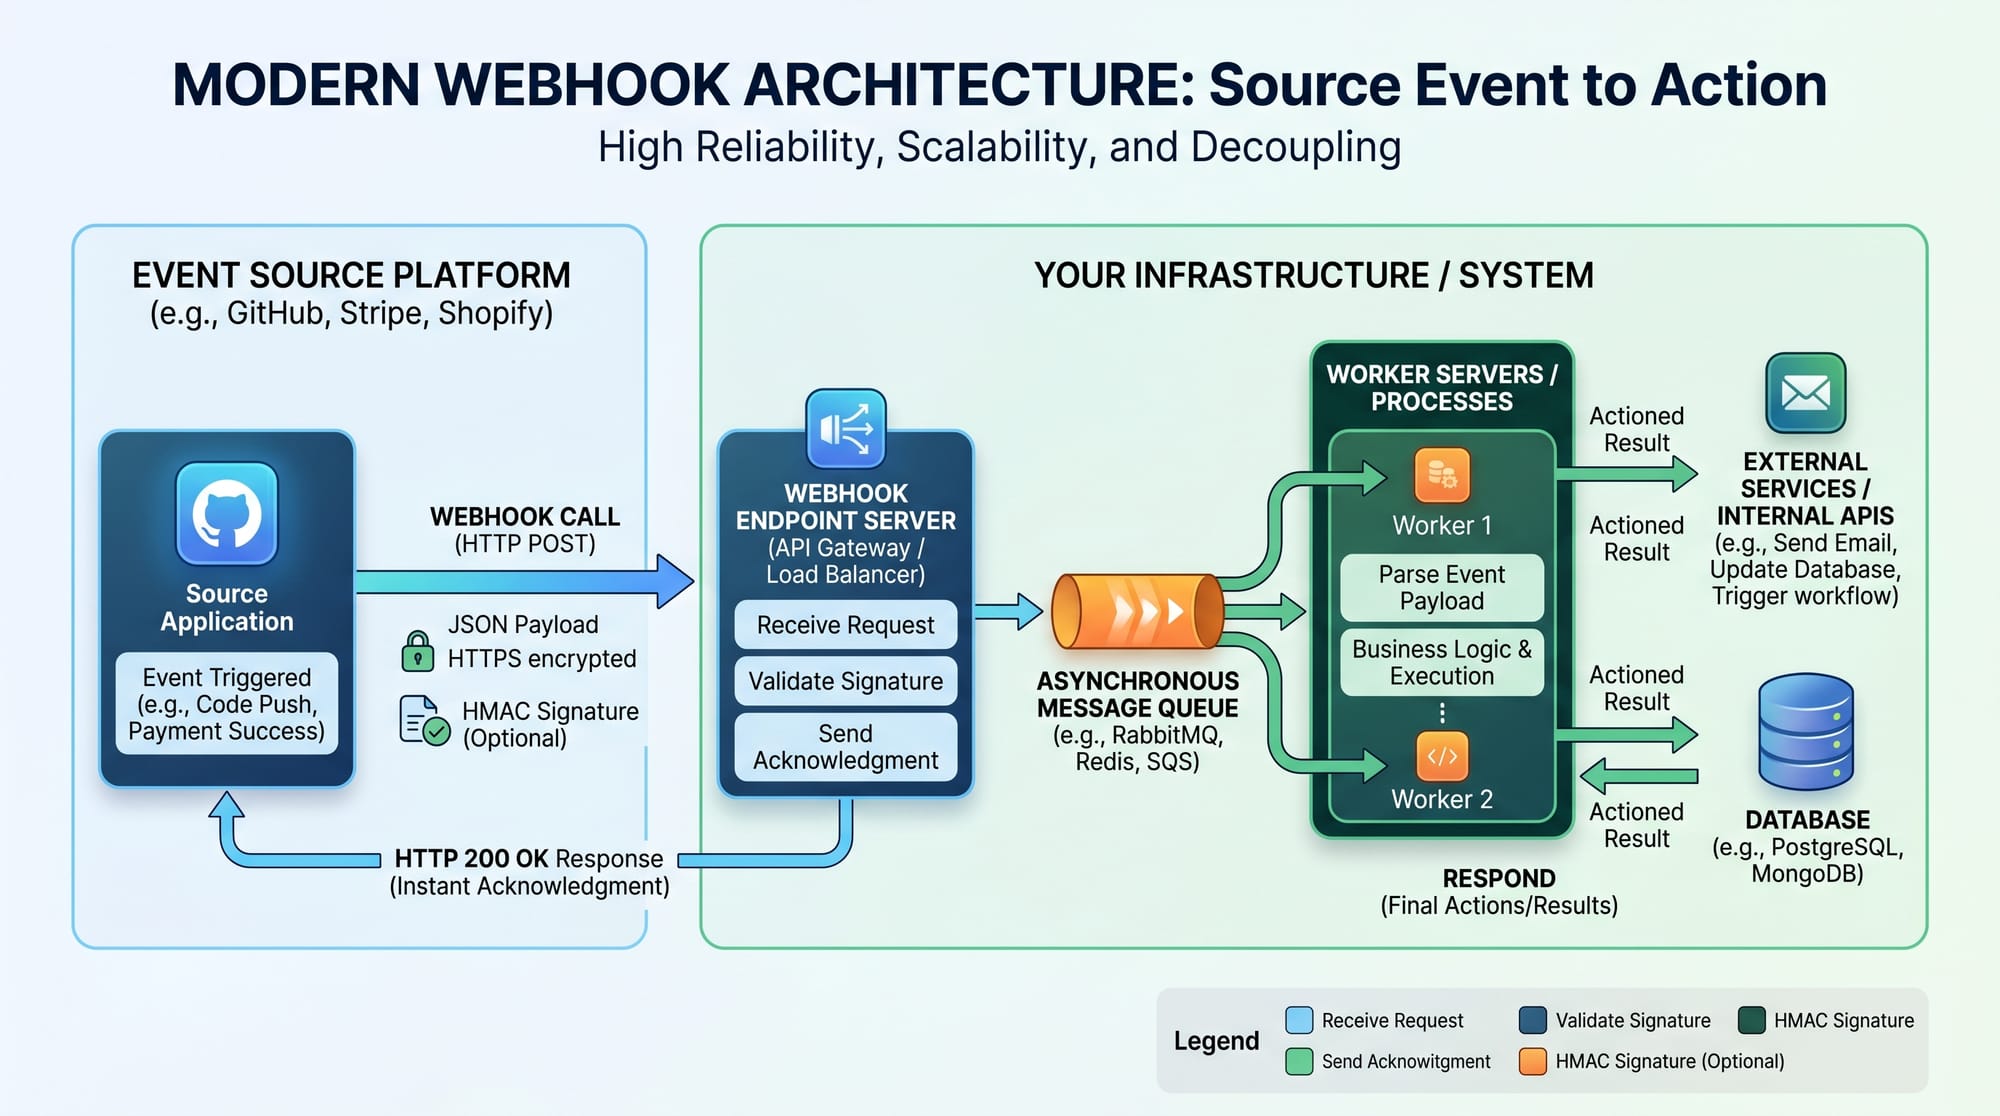
A webhooks tutorial: design, secure & implement webhooks is a practical guide to understanding how modern web applications communicate in real time using event-driven HTTP requests. Instead of constantly asking a server, “Is there new data?”, webhooks allow systems to automatically send updates when something happens.
For example, when Ahmad from Lahore makes an online payment using a Pakistani fintech app, the payment gateway can instantly notify the merchant’s website via a webhook. Similarly, Fatima in Karachi might receive instant order updates from an e-commerce store without refreshing the page.
Webhooks are widely used in modern web development for services like payment gateways (e.g., Stripe alternatives), GitHub integrations, and SaaS tools. For Pakistani students learning web development, mastering webhook implementation is essential because it builds strong foundations in APIs, backend development, and real-time systems.
In this tutorial, you will learn:
- What webhooks are and how they work
- How to design secure webhook systems
- How to implement webhooks in Node.js
- How to protect against common security risks
Prerequisites
Before learning webhooks, you should have a basic understanding of:
- HTML, CSS, and JavaScript fundamentals
- Basic knowledge of Node.js and Express.js
- Understanding of REST APIs (GET, POST requests)
- JSON data format
- Basic knowledge of HTTP status codes (200, 400, 500)
If you are not comfortable with APIs yet, it is recommended to first read theiqra.edu.pk tutorial on REST APIs before continuing.
Core Concepts & Explanation
Webhooks vs Polling Mechanism
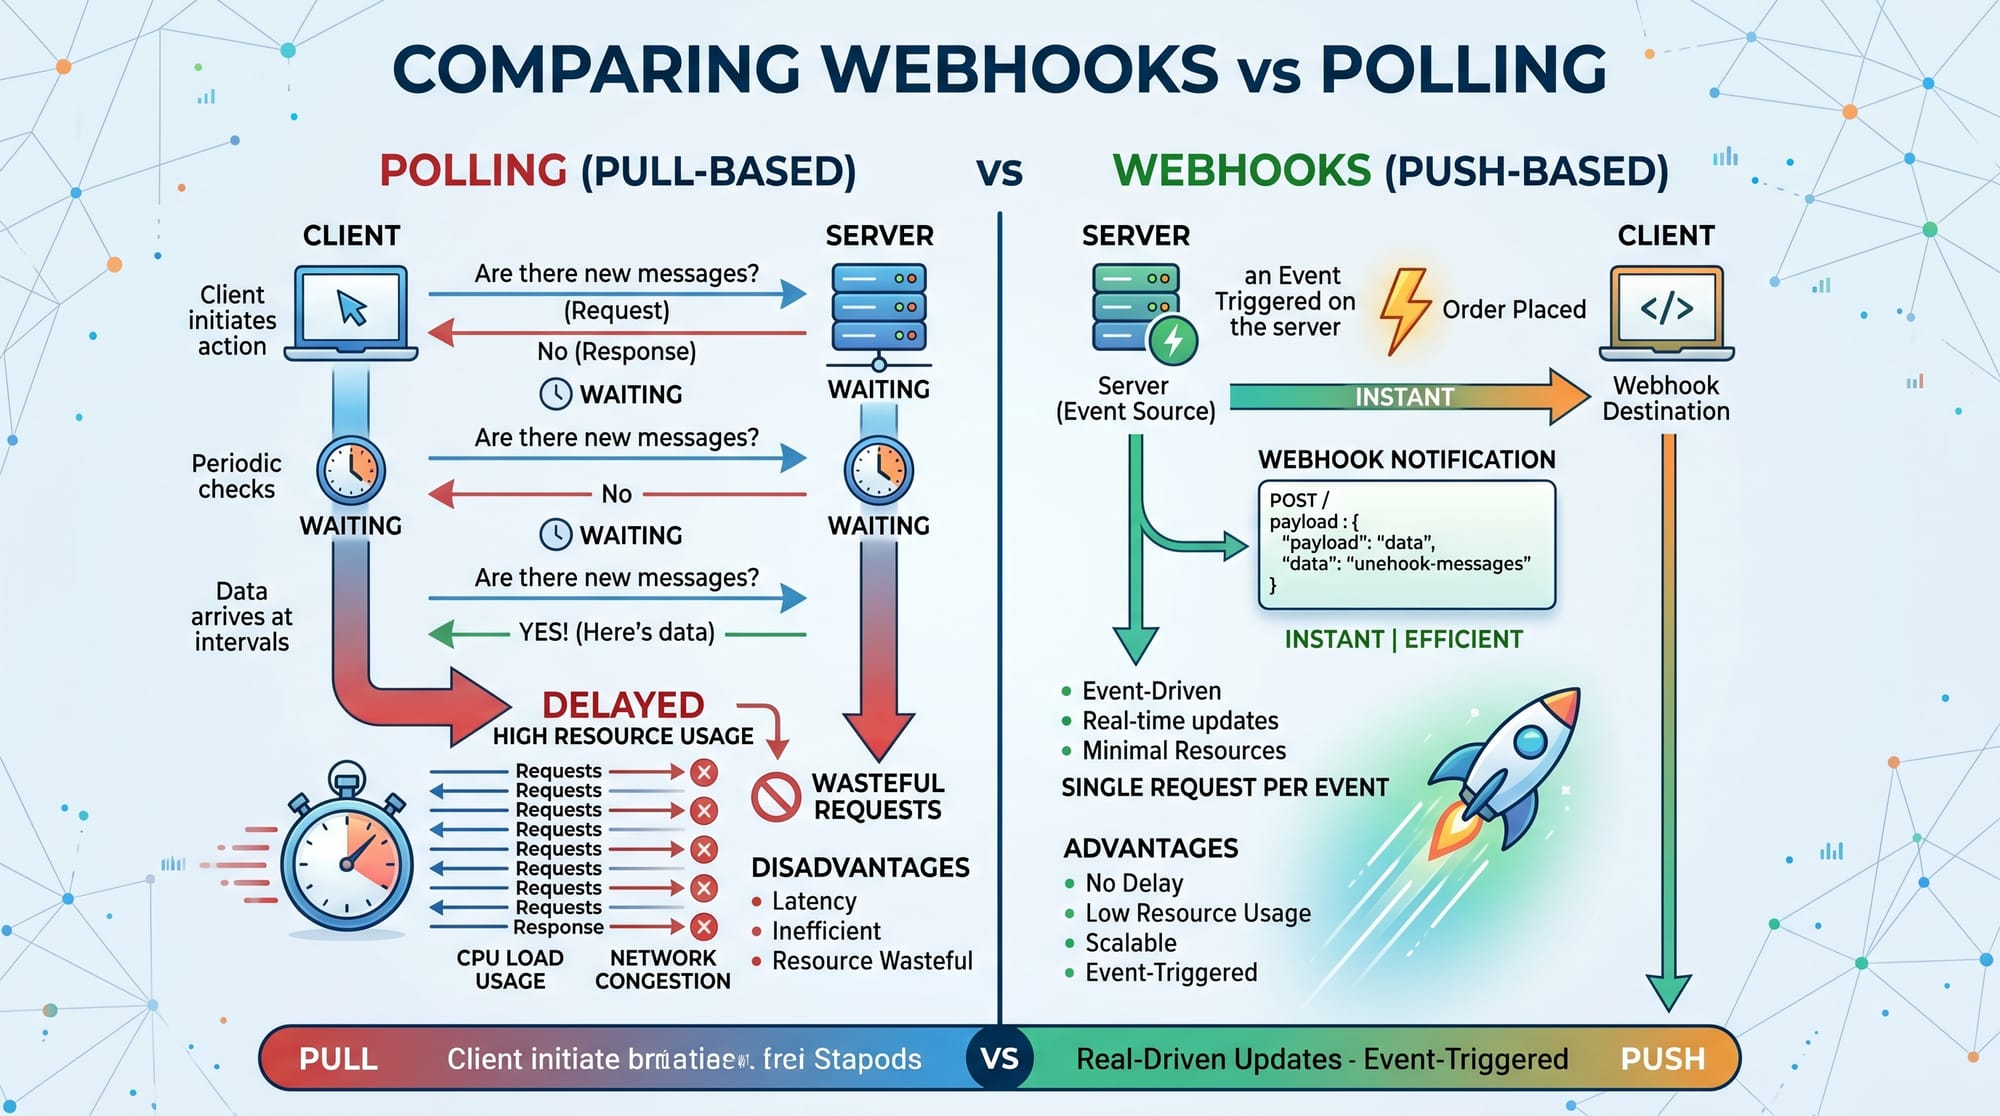
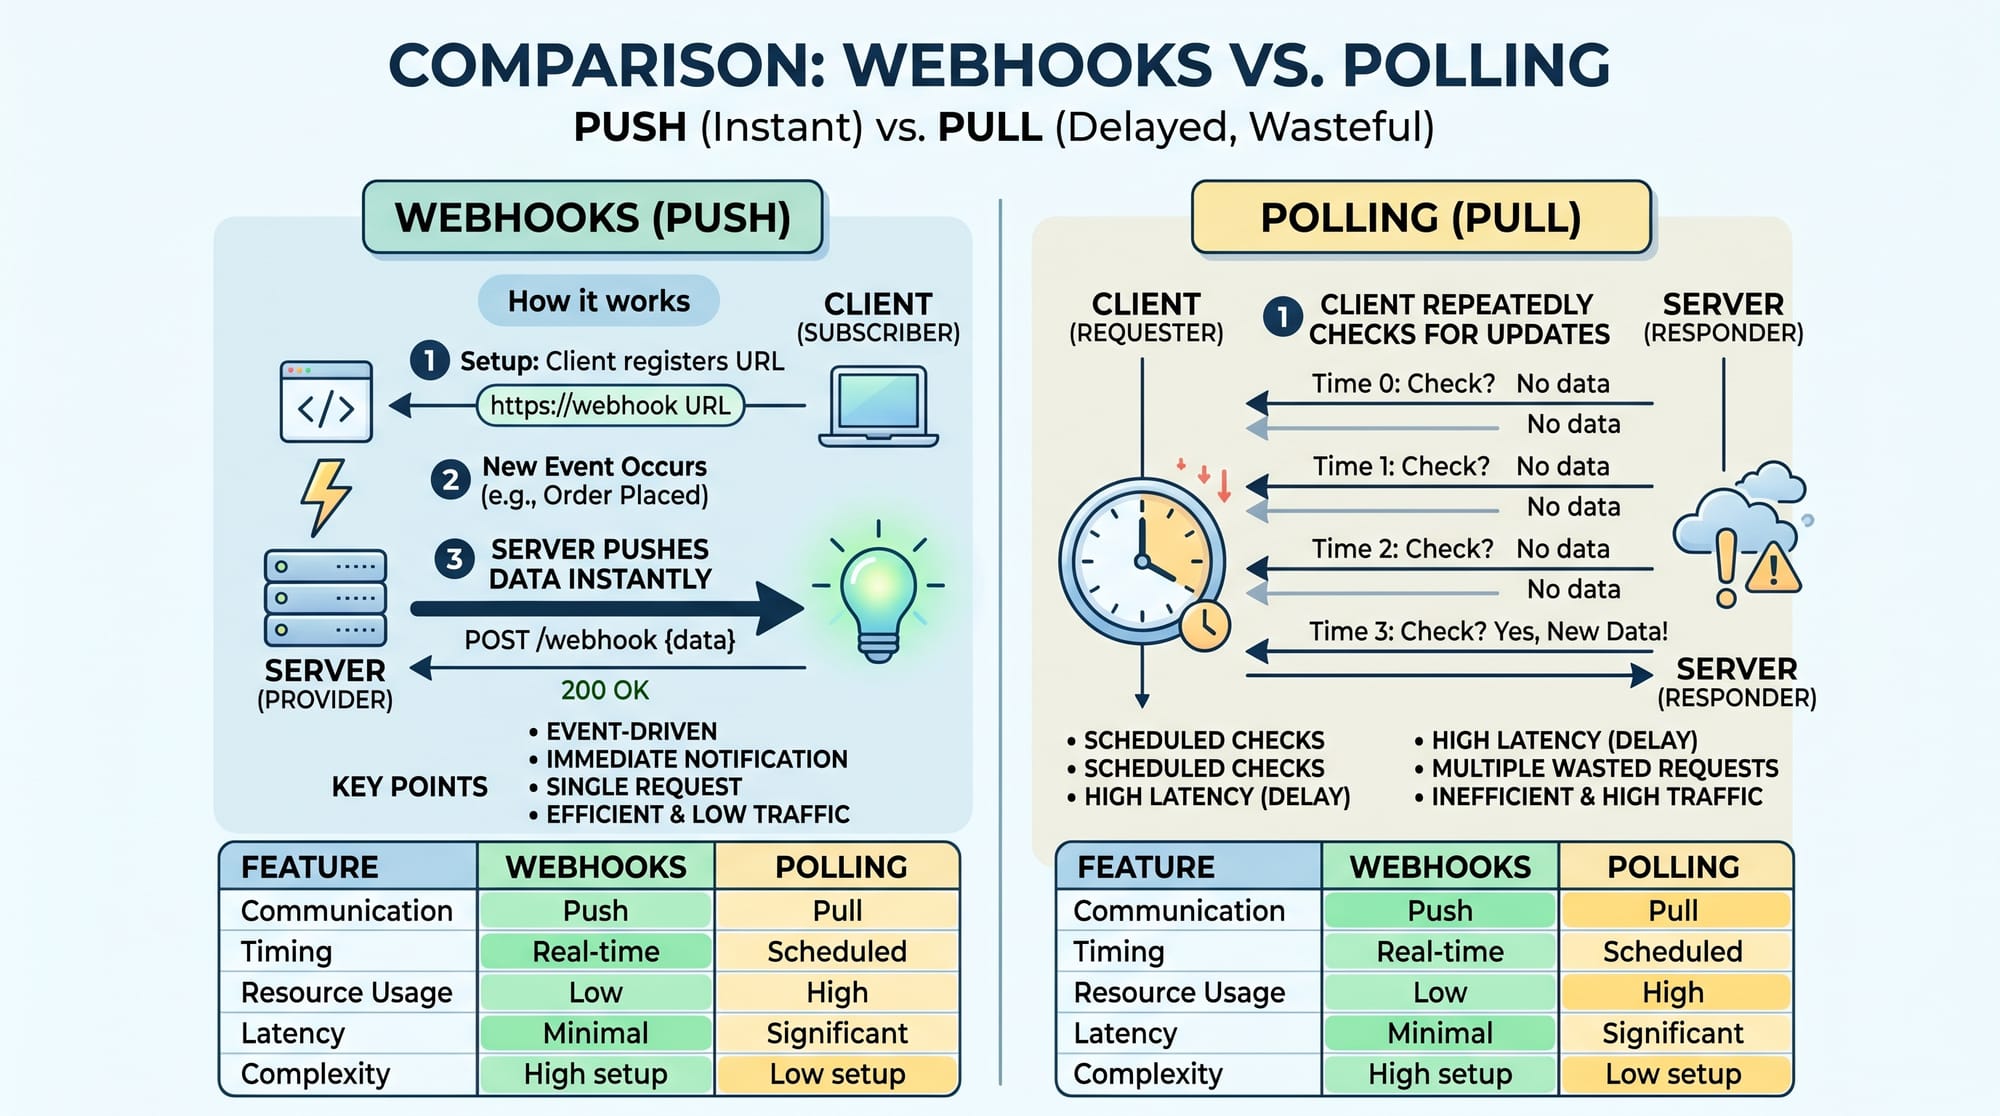
A webhook is a push-based communication system, while polling is a pull-based system.
In polling:
- Your server repeatedly asks another server: “Any updates?”
- This wastes bandwidth and increases delay
In webhooks:
- The external system sends data automatically when an event occurs
- This is faster and more efficient
Example:
- Polling: Ali checks his bank app every 10 seconds for transaction updates
- Webhook: Bank instantly notifies Ali’s app when money is received
Webhook Payloads, Events & Signatures
A webhook typically consists of three important parts:
1. Event
An event is something that triggers the webhook.
Example:
- payment_success
- order_created
- user_registered
2. Payload
Payload is the actual data sent to your server in JSON format.
Example:
{
  "event": "payment_success",
  "amount": 5000,
  "currency": "PKR",
  "user": "Ahmad"
}
3. Signature (Security Feature)
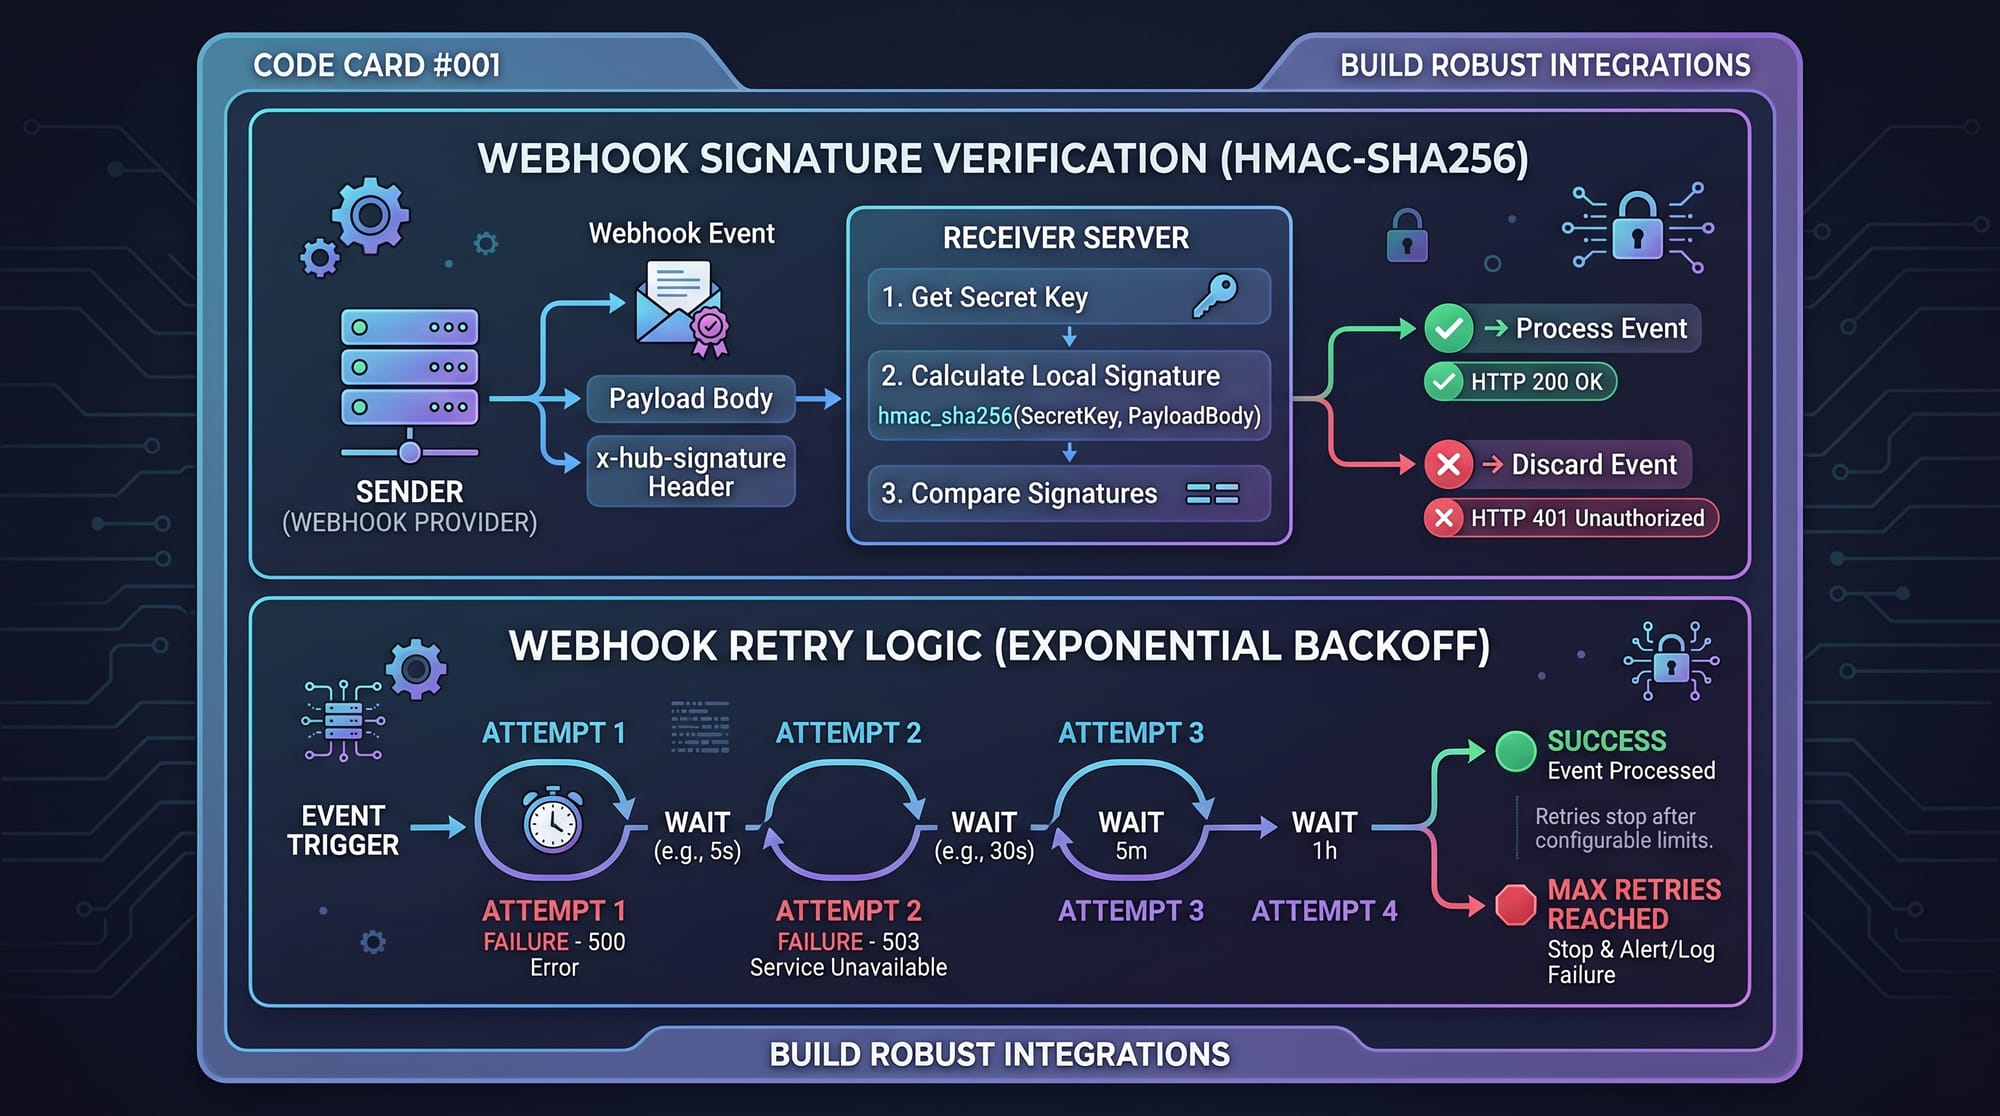
To ensure security, most webhook providers send a signature using HMAC-SHA256. This allows your server to verify that the request is genuine and not fake.
Practical Code Examples
Example 1: Basic Webhook Receiver in Node.js
Let’s build a simple webhook endpoint using Express.js.
const express = require('express');
const app = express();

app.use(express.json());

// Webhook endpoint
app.post('/webhook', (req, res) => {
    console.log("Webhook received:", req.body);

    res.status(200).send("Webhook received successfully");
});

app.listen(3000, () => {
    console.log("Server running on port 3000");
});
Line-by-Line Explanation
const express = require('express');
Imports the Express framework.const app = express();
Creates an Express application instance.app.use(express.json());
Enables JSON parsing for incoming webhook data.app.post('/webhook', (req, res) => {
Creates a POST endpoint that listens for webhook requests.console.log(req.body);
Prints webhook data to console for debugging.res.status(200).send(...)
Sends a success response back to the sender.app.listen(3000, ...)
Starts the server on port 3000.
Example 2: Real-World Payment Webhook (Secure Version)
Now let’s simulate a payment gateway webhook with signature verification.
const express = require('express');
const crypto = require('crypto');
const app = express();

app.use(express.json());

const SECRET = "my_secret_key";

// Webhook endpoint
app.post('/payment-webhook', (req, res) => {
    const signature = req.headers['x-signature'];

    const payload = JSON.stringify(req.body);

    const hash = crypto
        .createHmac('sha256', SECRET)
        .update(payload)
        .digest('hex');

    if (hash !== signature) {
        return res.status(401).send("Invalid signature");
    }

    console.log("Payment verified:", req.body);

    res.status(200).send("Payment processed");
});

app.listen(3000);
Line-by-Line Explanation
crypto = require('crypto');
Imports Node.js crypto module for hashing.SECRET = "my_secret_key";
Shared secret between server and webhook provider.req.headers['x-signature']
Reads signature sent by external system.createHmac('sha256', SECRET)
Creates a secure hash using HMAC-SHA256..update(payload)
Adds request data to hash calculation..digest('hex')
Converts hash into readable format.if (hash !== signature)
Validates webhook authenticity.
Common Mistakes & How to Avoid Them
Mistake 1: Not Verifying Webhook Security
Many beginners in Pakistan skip signature verification, making their system vulnerable.
Problem:
Attackers can send fake payment or event data.
Fix:
Always verify webhook signatures using HMAC or provider tokens.
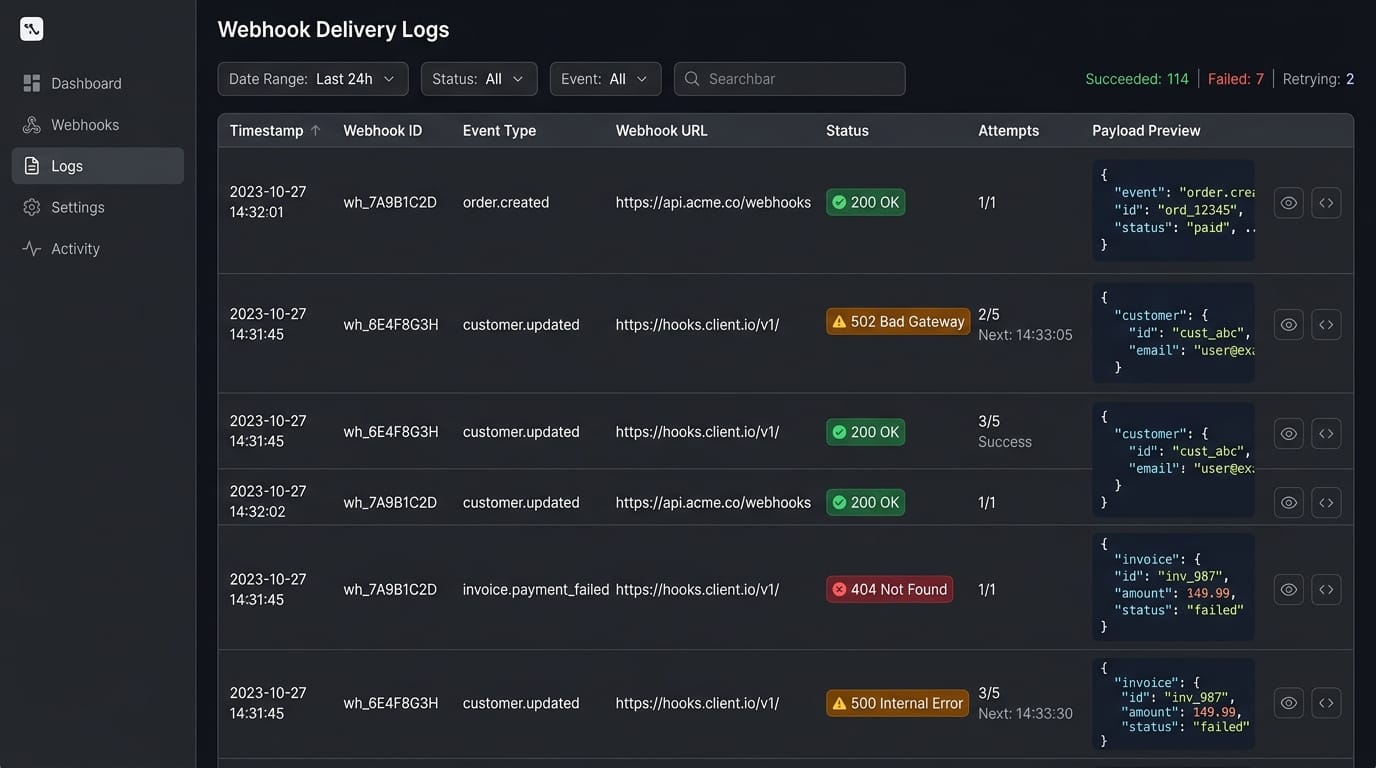
Mistake 2: Taking Too Long to Respond
Webhook providers expect a fast response (usually within 2–5 seconds).
Problem:
Slow processing may cause retries or duplicate events.
Fix:
- Immediately return
200 OK - Process heavy tasks asynchronously (queues like Bull or RabbitMQ)
Practice Exercises
Exercise 1: Create a Simple Webhook Listener
Problem:
Build a webhook endpoint that logs student enrollment data like name and course.
Solution:
app.post('/enroll-webhook', (req, res) => {
    console.log("Student enrolled:", req.body);
    res.status(200).send("OK");
});
Explanation:
- Receives enrollment data
- Logs it to console
- Sends confirmation response
Exercise 2: Validate Order Webhook
Problem:
Create a webhook that receives order data and checks if amount is greater than 1000 PKR.
Solution:
app.post('/order-webhook', (req, res) => {
    const order = req.body;

    if (order.amount > 1000) {
        console.log("High value order:", order);
    }

    res.status(200).send("Processed");
});
Explanation:
- Reads order data
- Applies conditional logic
- Logs high-value orders
Frequently Asked Questions
What is a webhook in simple words?
A webhook is a way for one application to send real-time data to another application when something happens. It removes the need for repeated API requests.
How does webhook implementation work?
Webhook implementation involves creating an endpoint (URL) in your server that listens for HTTP POST requests from external services and processes the received data.
Is webhook security important?
Yes, webhook security is critical. Without verification (like HMAC signatures), attackers can send fake data to your system and compromise your application.
What is the difference between API and webhook?
APIs require you to request data manually, while webhooks automatically send data when events occur. Webhooks are event-driven, APIs are request-driven.
Can I use webhooks in Node.js easily?
Yes, Node.js with Express makes webhook implementation very simple. You just need to create a POST route and handle incoming JSON data.
Summary & Key Takeaways
- Webhooks enable real-time communication between applications
- They are more efficient than polling systems
- Webhook security is essential to prevent fake data injection
- HMAC-SHA256 is commonly used for signature verification
- Always respond quickly to avoid retries and duplication
- Node.js and Express make webhook implementation simple
Next Steps & Related Tutorials
Now that you understand webhooks, you should explore deeper backend concepts:
- Learn how APIs work in detail: REST API Tutorial on theiqra.edu.pk
- Understand backend servers: Node.js Basics for Beginners
- Explore authentication systems: JWT Authentication Guide
- Learn database integration: MongoDB with Node.js Tutorial
These topics will help you build complete real-world applications like e-commerce systems and fintech apps used in Pakistan.
Test Your Python Knowledge!
Finished reading? Take a quick quiz to see how much you've learned from this tutorial.