WordPress REST API Headless WordPress with React Next js
Introduction
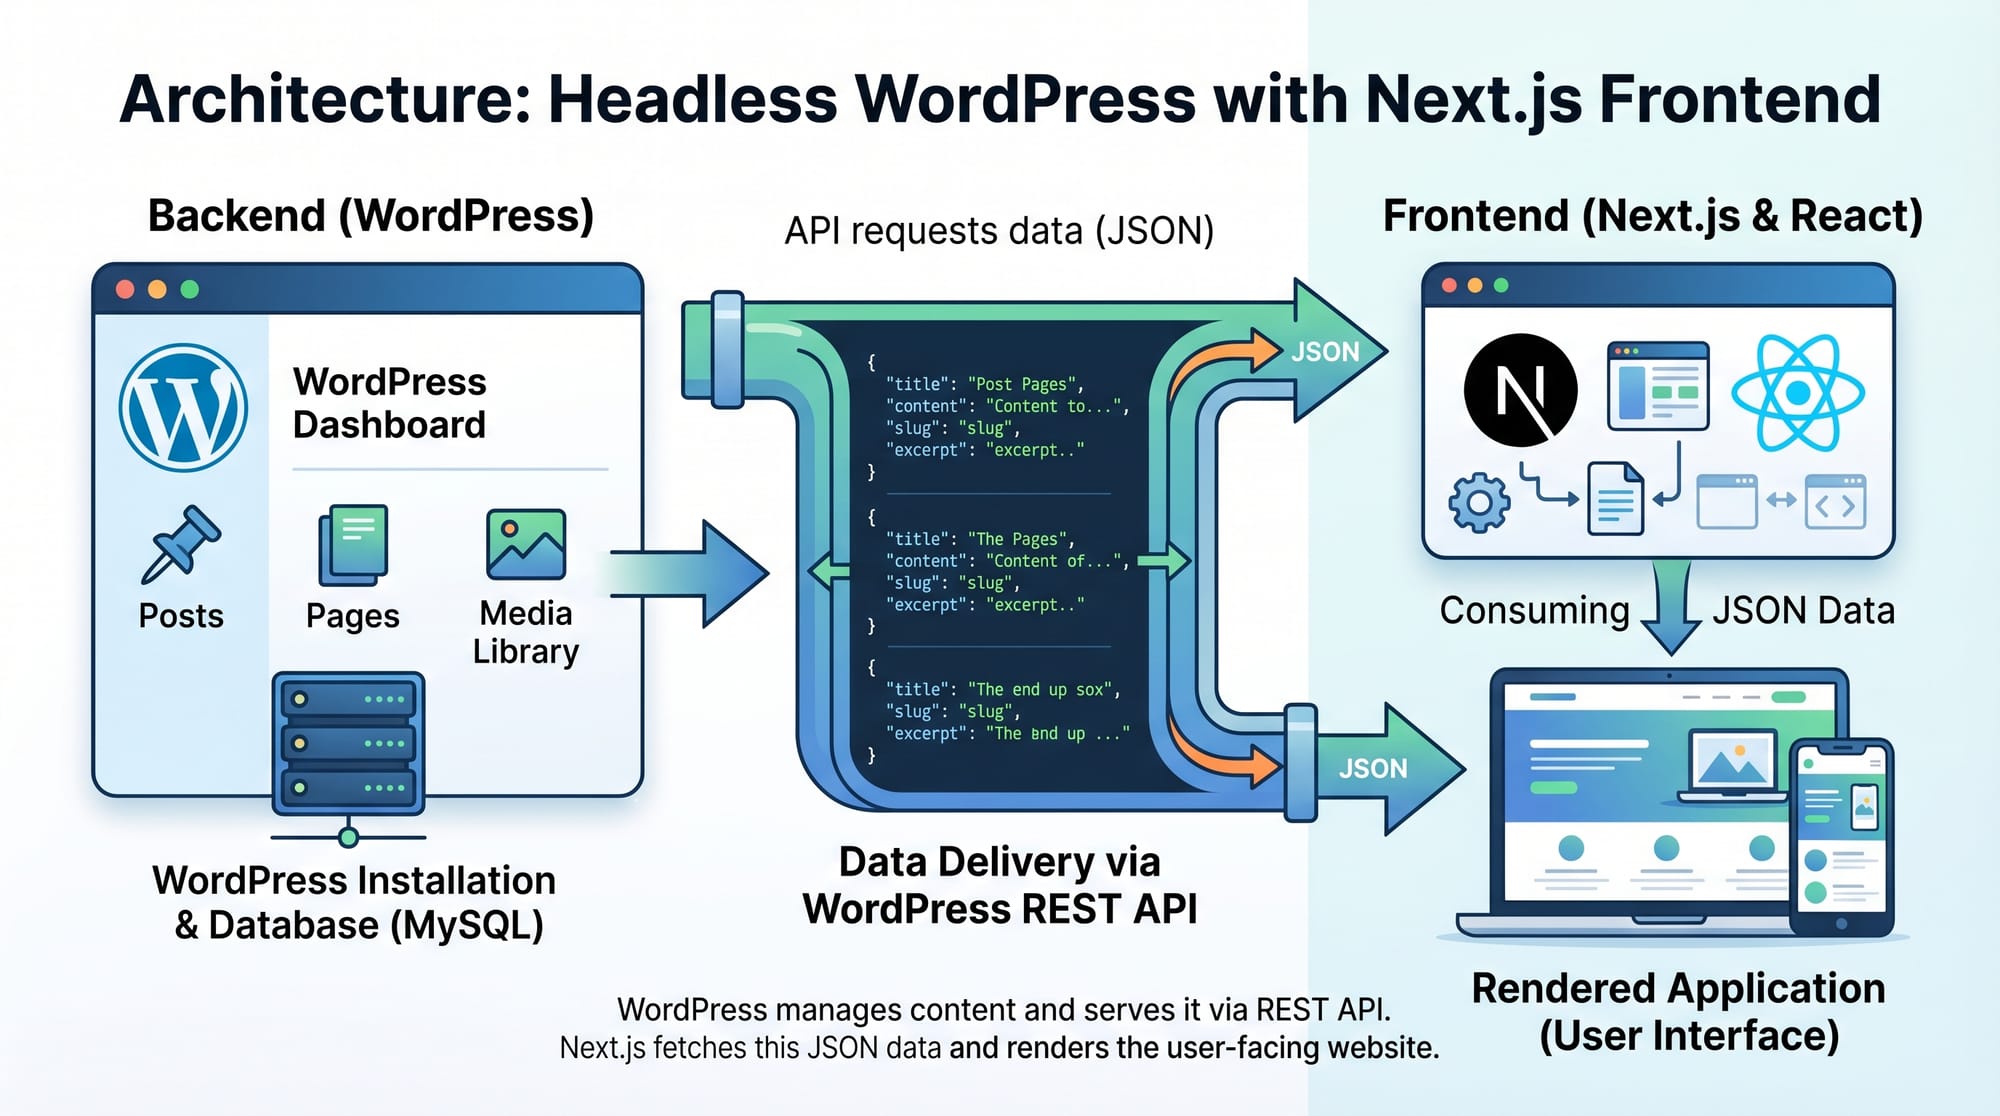
WordPress REST API has transformed WordPress from a traditional CMS into a powerful headless content backend. In a headless setup, WordPress is used only for managing content, while the frontend is built separately using modern JavaScript frameworks like React or Next.js.
In simple terms:
- WordPress = Content management system (backend)
- React/Next.js = Frontend user interface
- REST API = Bridge that connects both
This architecture is widely used by global companies because it improves performance, scalability, and developer flexibility.
For Pakistani students learning modern web development, mastering wordpress rest api: headless wordpress with react/next.js is extremely valuable. Many freelancing clients from platforms like Upwork and Fiverr are now requesting headless WordPress websites for faster and more dynamic user experiences.
For example:
- Ahmad from Lahore builds a blog using WordPress but renders it in Next.js for speed
- Fatima from Karachi creates a news portal with headless WordPress for better SEO
- Ali from Islamabad builds an eCommerce frontend using React while WordPress handles products
Prerequisites
Before starting this tutorial, you should have:
- Basic knowledge of HTML, CSS, and JavaScript
- Understanding of React.js fundamentals (components, props, state)
- Basic knowledge of WordPress dashboard
- Node.js installed on your system
- Familiarity with API concepts (GET, POST requests)
Optional but helpful:
- Next.js basics (pages, routing, SSR/ISR)
- Basic PHP understanding (for WordPress customization)
Core Concepts & Explanation
WordPress REST API Basics
The WordPress REST API allows you to access WordPress data in JSON format using URLs like:
https://yourwebsite.com/wp-json/wp/v2/posts
This endpoint returns posts in structured JSON format that React or Next.js can easily consume.
Example response:
[
  {
    "id": 1,
    "title": { "rendered": "Hello World" },
    "content": { "rendered": "<p>This is a post</p>" }
  }
]
This means WordPress is no longer limited to themes—it becomes a backend data provider.
Headless WordPress Architecture
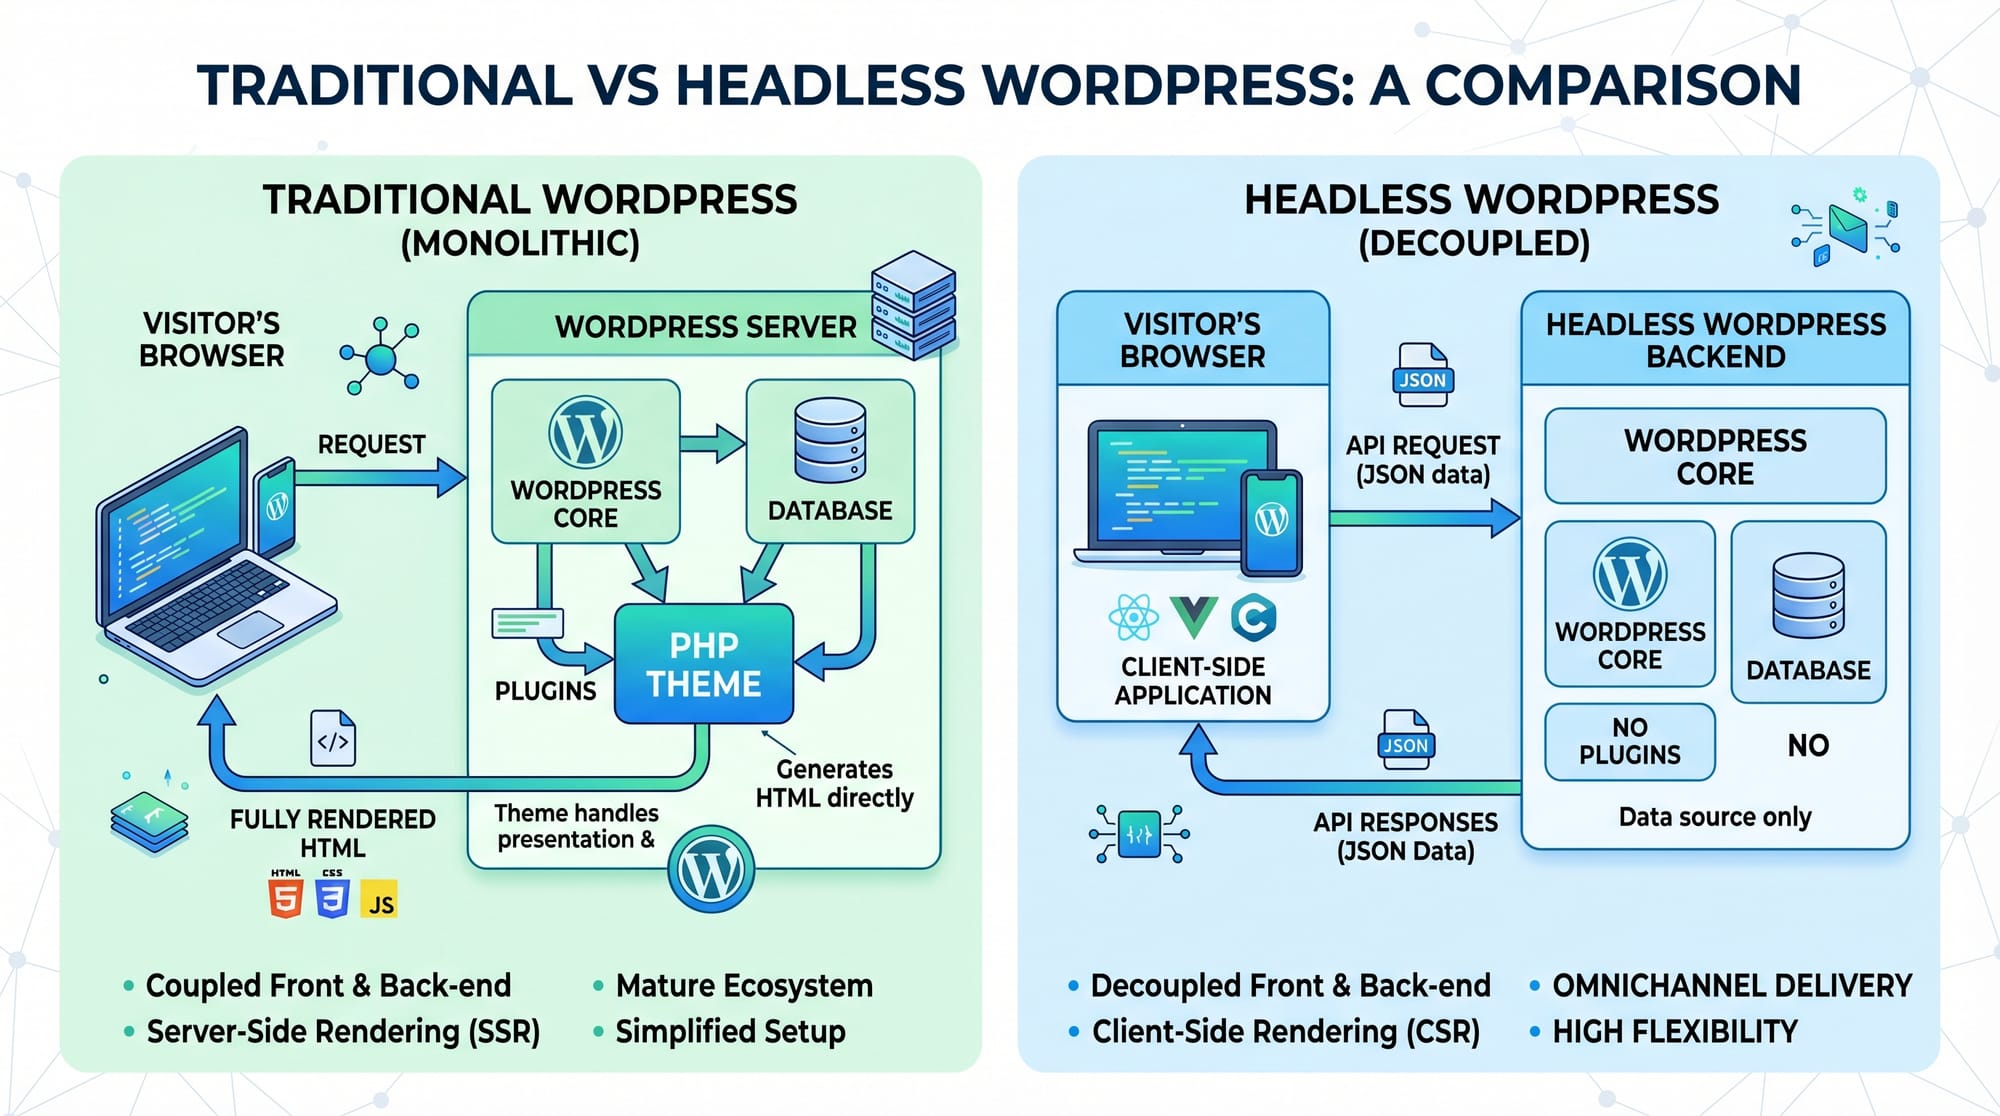
In traditional WordPress:
- WordPress handles both backend and frontend
- Themes control UI rendering
- PHP generates HTML pages
In headless WordPress:
- WordPress only manages content
- React/Next.js handles UI rendering
- REST API or GraphQL provides data
Key benefits:
- Faster performance
- Better security
- Flexible frontend design
- Mobile app compatibility
Practical Code Examples
Example 1: Fetching Posts from WordPress in React
This example shows how to fetch WordPress posts using React.
import React, { useEffect, useState } from "react";

function Posts() {
  const [posts, setPosts] = useState([]);

  useEffect(() => {
    fetch("https://yourwebsite.com/wp-json/wp/v2/posts")
      .then((response) => response.json())
      .then((data) => setPosts(data));
  }, []);

  return (
    <div>
      <h1>Latest Posts</h1>
      {posts.map((post) => (
        <div key={post.id}>
          <h2>{post.title.rendered}</h2>
          <div dangerouslySetInnerHTML={{ __html: post.content.rendered }} />
        </div>
      ))}
    </div>
  );
}

export default Posts;
Line-by-line explanation:
import React...→ Imports React and hooksuseState([])→ Stores posts in stateuseEffect()→ Runs API call when component loadsfetch()→ Calls WordPress REST APIresponse.json()→ Converts response into JSONsetPosts(data)→ Saves data into stateposts.map()→ Loops through postsdangerouslySetInnerHTML→ Renders WordPress HTML content
Example 2: Next.js Real-World Blog Page
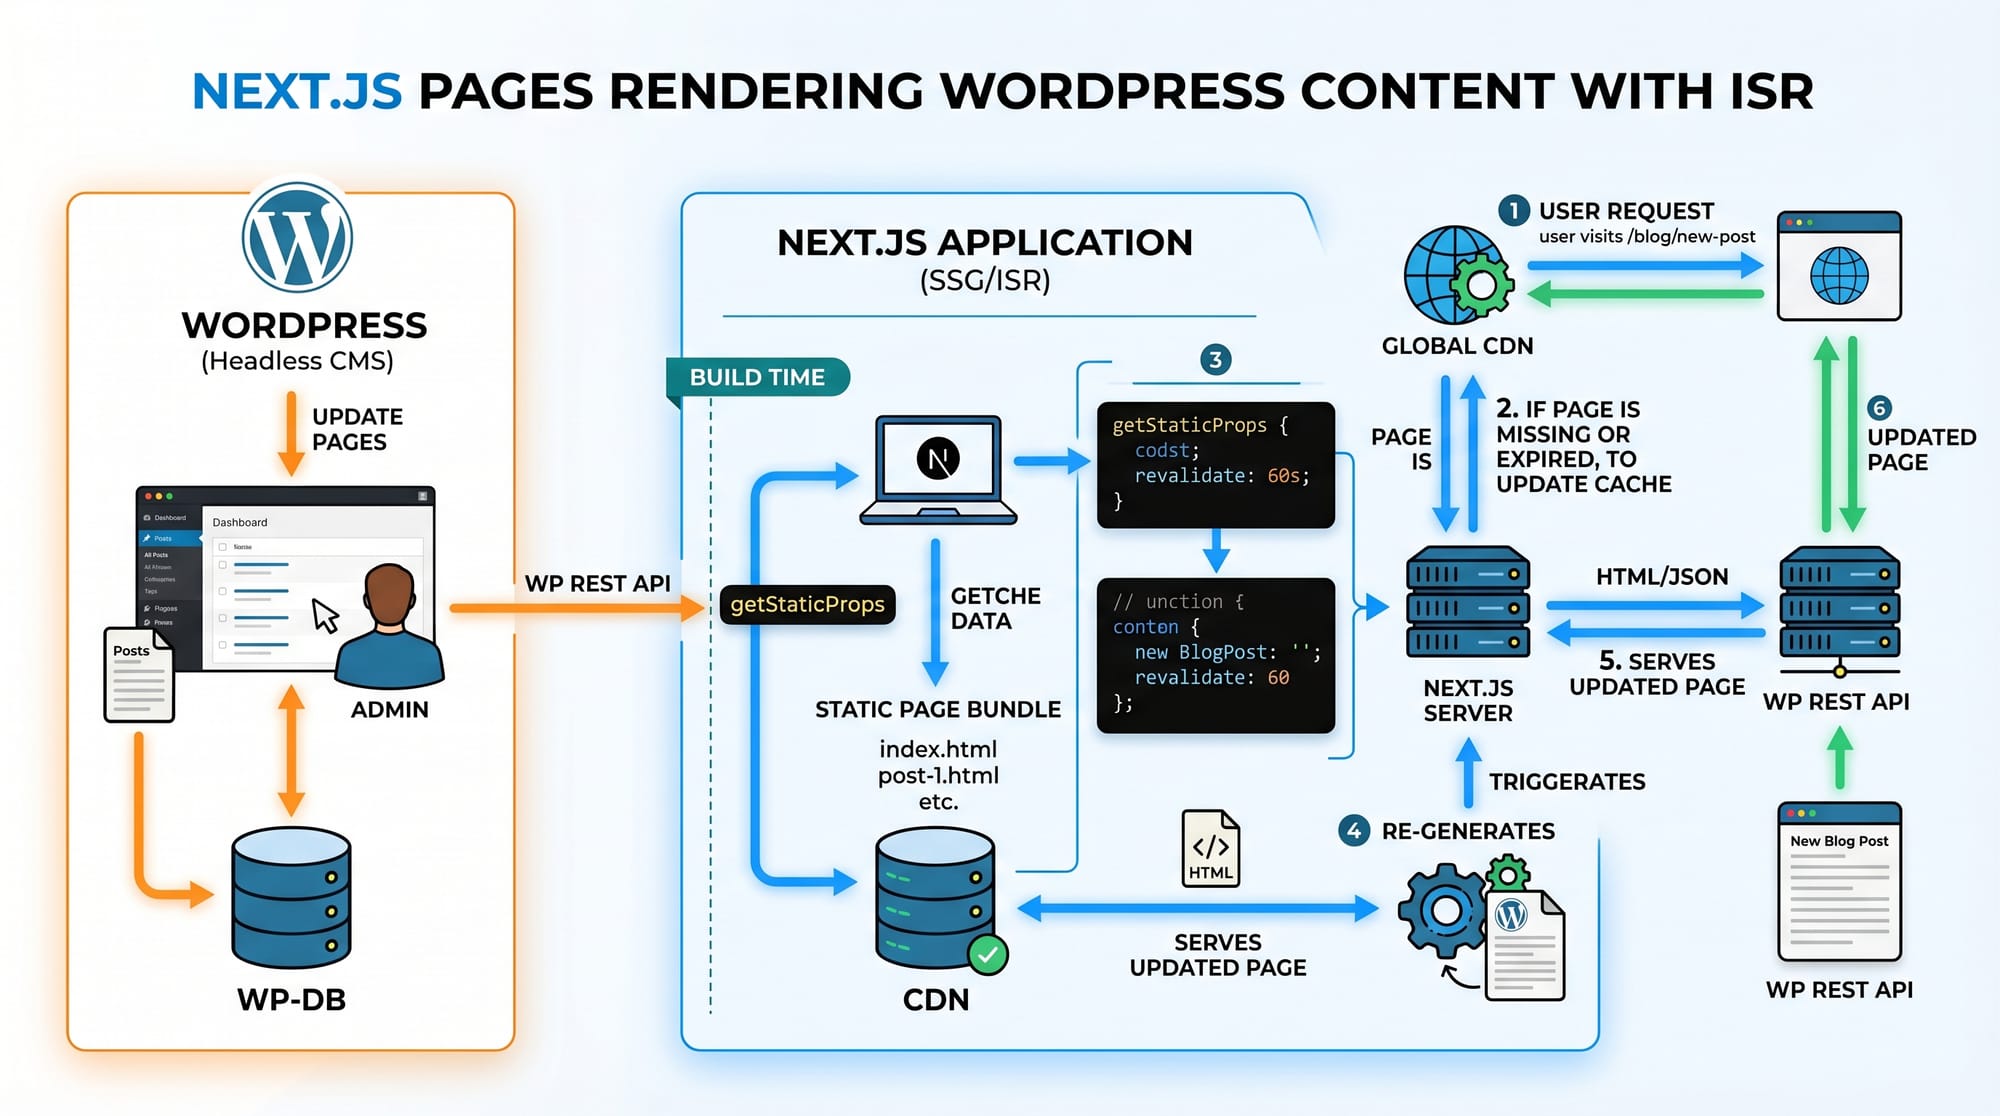
This example uses Next.js for server-side rendering (SSR).
export async function getStaticProps() {
  const res = await fetch("https://yourwebsite.com/wp-json/wp/v2/posts");
  const posts = await res.json();

  return {
    props: {
      posts,
    },
    revalidate: 10,
  };
}

export default function Blog({ posts }) {
  return (
    <div>
      <h1>Pakistan Tech Blog</h1>
      {posts.map((post) => (
        <article key={post.id}>
          <h2>{post.title.rendered}</h2>
          <div dangerouslySetInnerHTML={{ __html: post.content.rendered }} />
        </article>
      ))}
    </div>
  );
}
Line-by-line explanation:
getStaticProps()→ Fetches data at build timefetch()→ Calls WordPress APIrevalidate: 10→ Enables ISR (updates content every 10 seconds)posts→ Passed as props to componentBlog({ posts })→ Receives data from Next.js.map()→ Renders each blog post
Common Mistakes & How to Avoid Them
Mistake 1: Not Handling CORS Errors
When fetching from WordPress, beginners often face CORS issues.
❌ Problem:
Frontend cannot access WordPress API
✔ Solution:
Add this in WordPress functions.php:
add_action('init', function() {
  header("Access-Control-Allow-Origin: *");
});
Explanation:
header()→ Allows cross-origin requests*→ Allows all domains (use carefully in production)
Mistake 2: Directly Rendering Unsafe HTML
Many students directly render WordPress HTML without sanitization.
❌ Problem:
Security risks (XSS attacks)
✔ Solution:
Use sanitization or safe rendering:
<div dangerouslySetInnerHTML={{ __html: post.content.rendered }} />
Better approach:
- Use DOMPurify library
- Sanitize HTML before rendering
Practice Exercises
Exercise 1: Display WordPress Posts in React
Task: Create a React app that fetches and displays WordPress posts.
Solution:
- Use
fetch()to call/wp-json/wp/v2/posts - Store data using
useState - Render using
.map()
Expected output:
A simple blog listing page showing titles and content.
Exercise 2: Create a Dynamic Blog Page in Next.js
Task: Build a Next.js page that updates every 30 seconds using ISR.
Solution:
- Use
getStaticProps - Set
revalidate: 30 - Fetch WordPress API
- Render posts dynamically
This helps build:
- News websites
- Blogs
- Educational portals
Frequently Asked Questions
What is WordPress REST API?
WordPress REST API is a built-in feature that allows developers to access WordPress content in JSON format. It enables integration with modern frameworks like React and Next.js.
What is headless WordPress?
Headless WordPress means using WordPress only as a backend content management system while the frontend is built using technologies like React or Next.js.
Why use React with WordPress?
React provides a fast and interactive user interface, while WordPress handles content management. Together, they create powerful modern web applications.
Is headless WordPress good for SEO?
Yes, especially when using Next.js. Server-side rendering (SSR) and static generation improve SEO performance significantly compared to traditional WordPress themes.
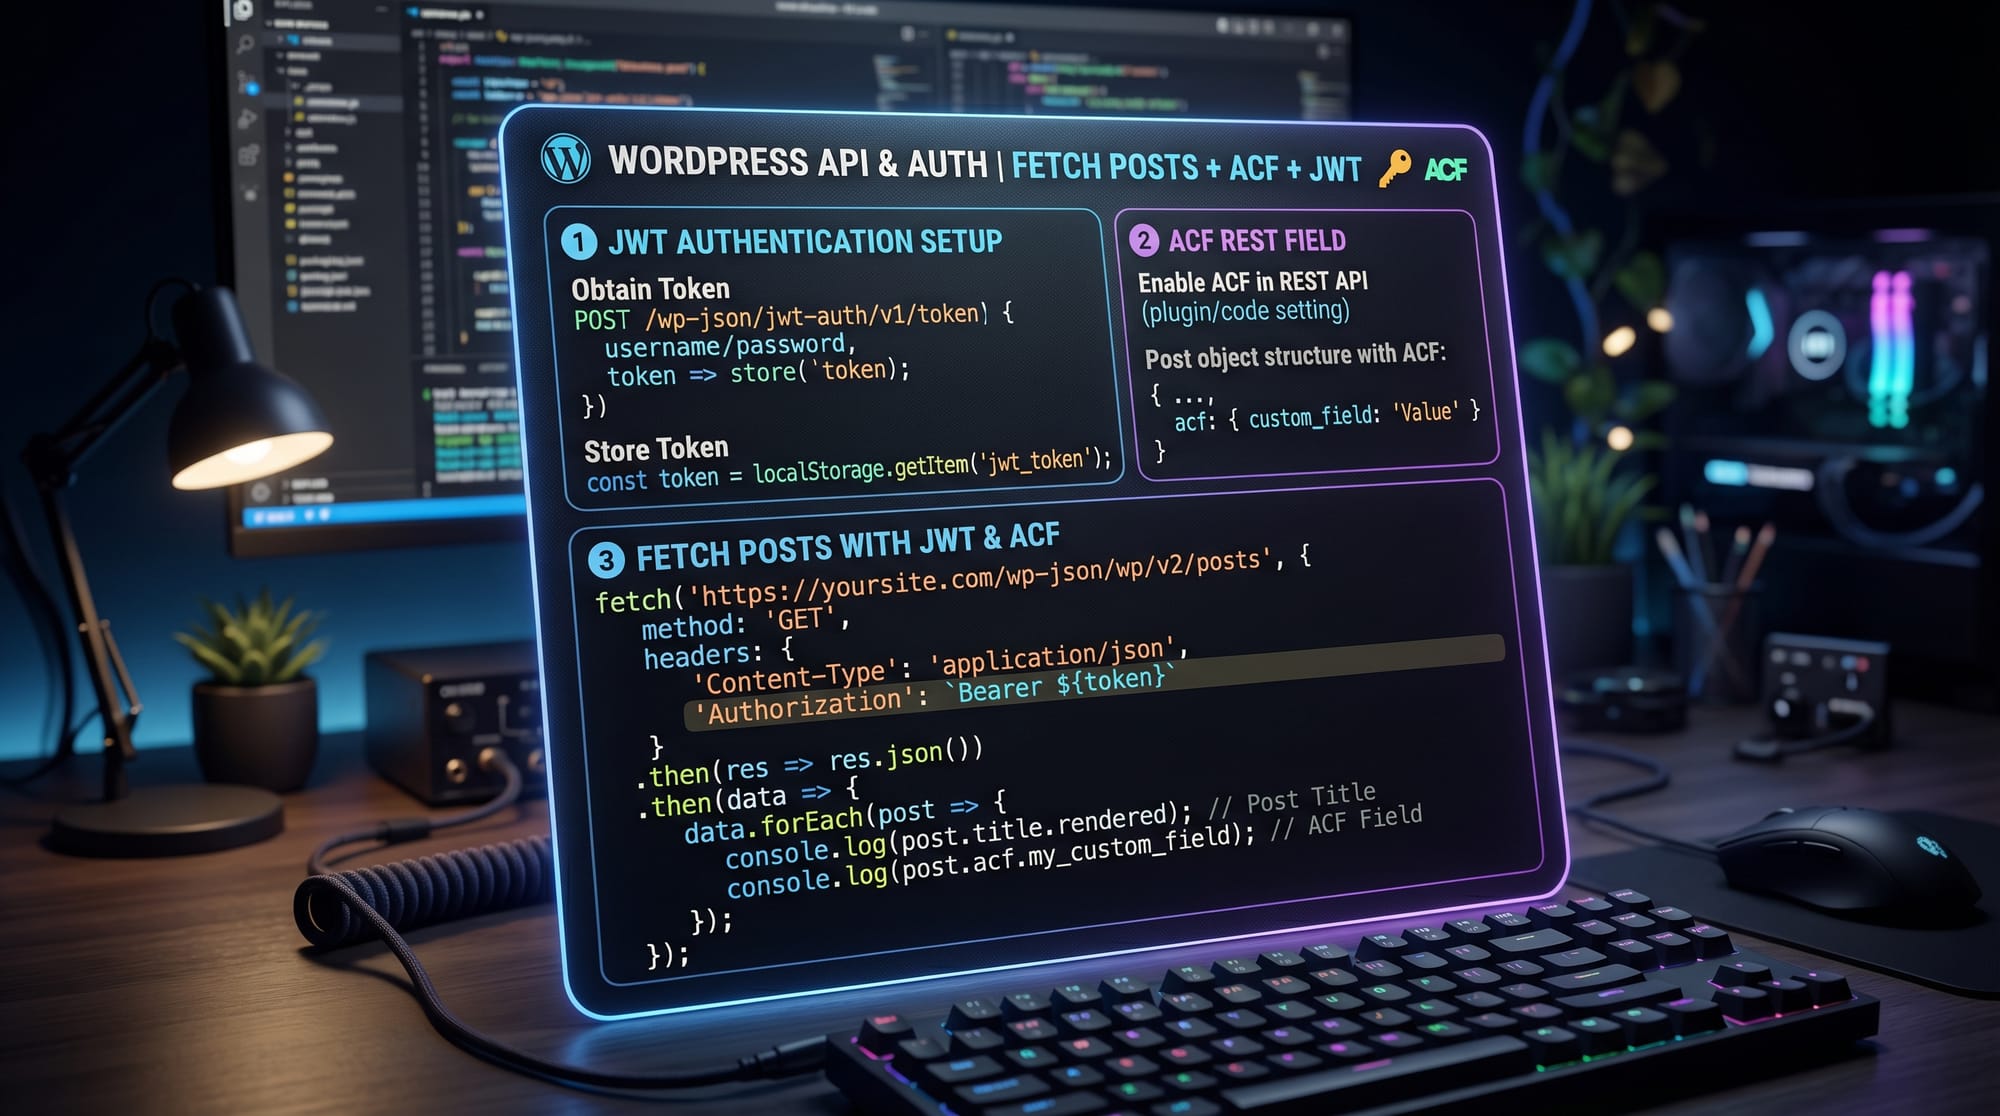
How do I secure WordPress REST API?
You can secure it using:
- Authentication (JWT)
- Role-based access control
- Limiting endpoints
- Using HTTPS
Summary & Key Takeaways
- WordPress REST API allows WordPress to act as a backend only
- Headless WordPress improves speed and scalability
- React/Next.js handles frontend rendering
- REST API returns JSON data consumable by JavaScript
- Next.js supports SSR and ISR for SEO optimization
- Pakistani students can use this skill for freelancing opportunities
Next Steps & Related Tutorials
Now that you understand wordpress rest api: headless wordpress with react/next.js, you can move forward with advanced topics:
- Learn more in our tutorial on WordPress Development Basics
- Explore React.js Introduction for Beginners
- Master Next.js Full Stack Development Guide
- Understand API Integration in Modern Web Apps
These skills are highly in demand in Pakistan’s freelance and remote job market, especially for developers working with clients from the USA, UK, and Middle East.
Test Your Python Knowledge!
Finished reading? Take a quick quiz to see how much you've learned from this tutorial.